Configuring a Scenario
Table of Contents
Scenario Designer
Comindware Business Application Platform provides an easy-to-use visual scenario designer.
There are two ways to open the scenario designer:
- Double-click the scenario row in the scenario list (see Scenario Definition and List).
- Click Entry scenario or Exit scenario in the business process diagram element menu (see Creating a Scenario for a Business Process Diagram Element).
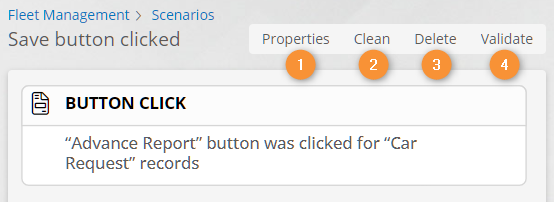
Scenario designer
Scenario Configuration Buttons
The scenario designer provides the following buttons to configure the scenario.
- Properties — configure the scenario properties. See Scenario Properties.
- Clean — permanently delete all scenario elements. When you click this button, an empty Button click start event is placed in the scenario, as if the scenario was re-created.
- Delete — permanently delete the scenario.
- Validate — check the scenario's integrity and functioning. Click this button to see the Validation result panel with a list of scenario errors.
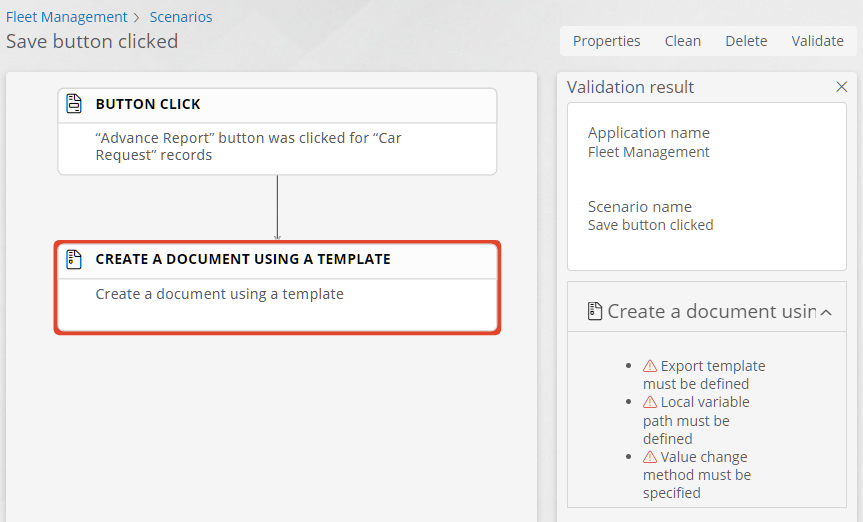
Scenario validation result
Scenario Element Configuration Buttons
Hover the mouse pointer over a scenario element to display the element configuration buttons.
- Edit — configure the scenario element properties. See Configuring the Scenario Elements.
- Go to context template — view the context template for scenario element execution.
- Delete — permanently delete the scenario element.
- Add action — create an action nested in or after the current scenario element.

Scenario element configuration buttons
Configuring the Scenario Elements
Configuring the Start Event
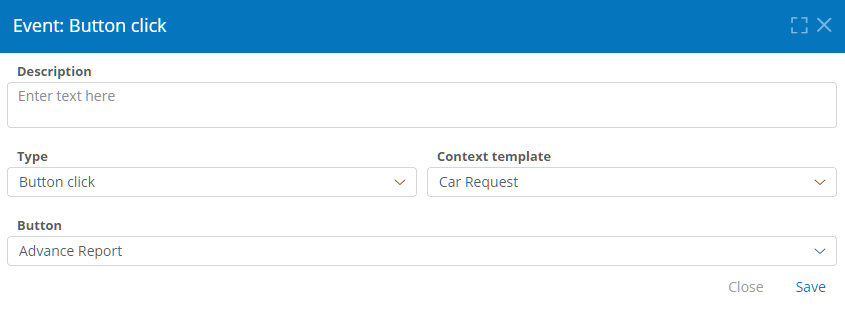
Scenario start event properties window
- Hover the mouse pointer over the scenario start event and click Edit.
- The start event properties window appears with the following properties.
- Description — a brief start event's purpose description.
- Type — a type of event that triggers the scenario. See the Scenario Start Event Types and Properties.
- Context template — the scenario will run in this record or process template when the specified event triggers.
Scenario Start Event Types and Properties
The start event types available in scenarios are listed below.
Some event types have additional properties to configure.
- Button click — the scenario will run when the specified button in the context template is clicked.
- Button — the button clicked to run the scenario.
- Record creation — the scenario will run when a record is created in the context template.
- Record change — the scenario will run when the specified record attribute values in the context template change. If the attributes are not specified, the scenario will run when any attribute value in the context template is changed.
- Attributes — a list of context template attributes. Changes to these attribute values will trigger the scenario.
- Process start — the scenario will run when the context template process instance is started.
- Message receipt — the scenario will run when a message is received through the specified connection and communication route.
- Connection — the scenario will run when a message is received through this connection.
- Communication route — a communication route to parse the message.
- Variable name — a variable to store the message content parsed by the communication route.
- Token entry — the scenario will run when a token enters the selected element of the context process template diagram.
- Diagram element — a token entering this process diagram element will trigger the scenario.
- Token exit — the scenario will run when a token exits the selected element of the context process template diagram.
- Diagram element — a token exiting this process diagram element will trigger the scenario.
Configuring the Actions
Creating an Action
- Hover the mouse pointer over the scenario element to add an action after or inside it.
- Click Add action.
- An of available actions will appear.
- Select the desired action.
- A new action will appear in the scenario designer.
- Configure the action. See Setting Up Action Properties.
For detailed information about action properties, see Scenario ActionsScenario Actions
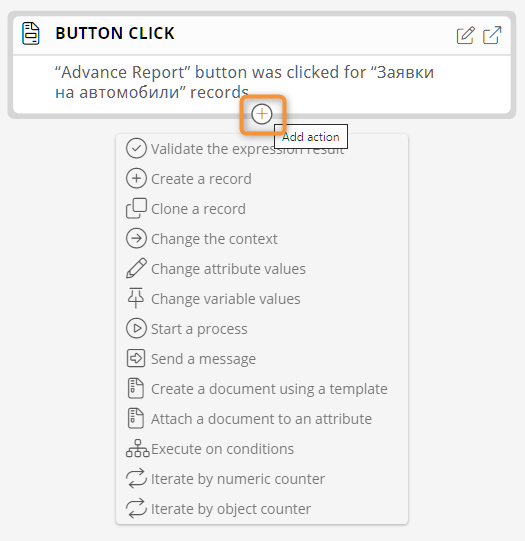
Creating an action in a scenario
Creating Nested Actions
Other actions can be nested inside the Change the context, Execute on conditions, Counter loop, and Object loop actions.
To create a nested action, click the Add action button inside an action.
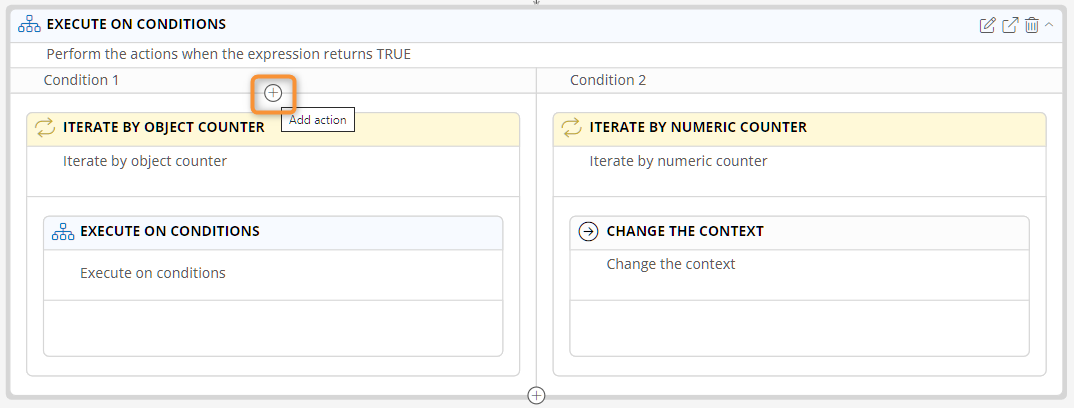
Creating a nested action in a scenario
Setting Up Action Properties
- Hover the mouse pointer over an action.
- Click Edit.
- The action properties window appears.
- Configure the action properties.
- Click Save.

Opening action properties in a scenario
For detailed information about action properties, see Scenario ActionsScenario Actions
Deleting an Action
- Hover the mouse pointer over the action to be deleted.
- Click Delete.
- A delete confirmation window will appear.
- Confirm the action deletion.

Deleting a scenario action
