Lesson 7 — Automatic Calculations
Table of Contents
- Introduction
- Automatic Attribute Value Calculation
- Display the Request Initiator's Full Name and Submission Date
- Calculate Total Costs
- Generate Request Number
- Track Vehicle Request Status
- Customize Task Titles
- Results
Introduction
In this lesson, you will learn how to show the initiator name and request date and implement automatic calculations: total costs, request number, request status, and task title.
Estimated time to complete: 20 min
Prerequisite: complete Lesson 6 — Advanced Process
Note: This lesson is for the CMW Platform version 4.2.571.0. In other versions, the page and menu appearance may differ from the screenshots.
Automatic Attribute Value Calculation
Business Requirement
We need to identify the requests by the request number and submission date. Also, we want the Secretary to know the request Initiator during the request approval. And we need to calculate the Total costs.
- The request Initiator is its creator, and the submission date is the request creation date. The Creator and Creation date system attributes are automatically set for each record. So, we will simply place these attributes on the request form.
- To calculate the request number and total cost amount, we will define the formulas.
Display the Request Initiator's Full Name and Submission Date
Let's add the request creator and submission date fields to the vehicle request form.
1. Open the Forms tab of the Vehicle requests record template.
2. Open the Vehicle requests - Main Form form.
3. Expand the Creator attribute in the element pane and drag the Full name attribute to the form layout.
4. Then drag the Creation date attribute to the form layout.
5. Click Save.
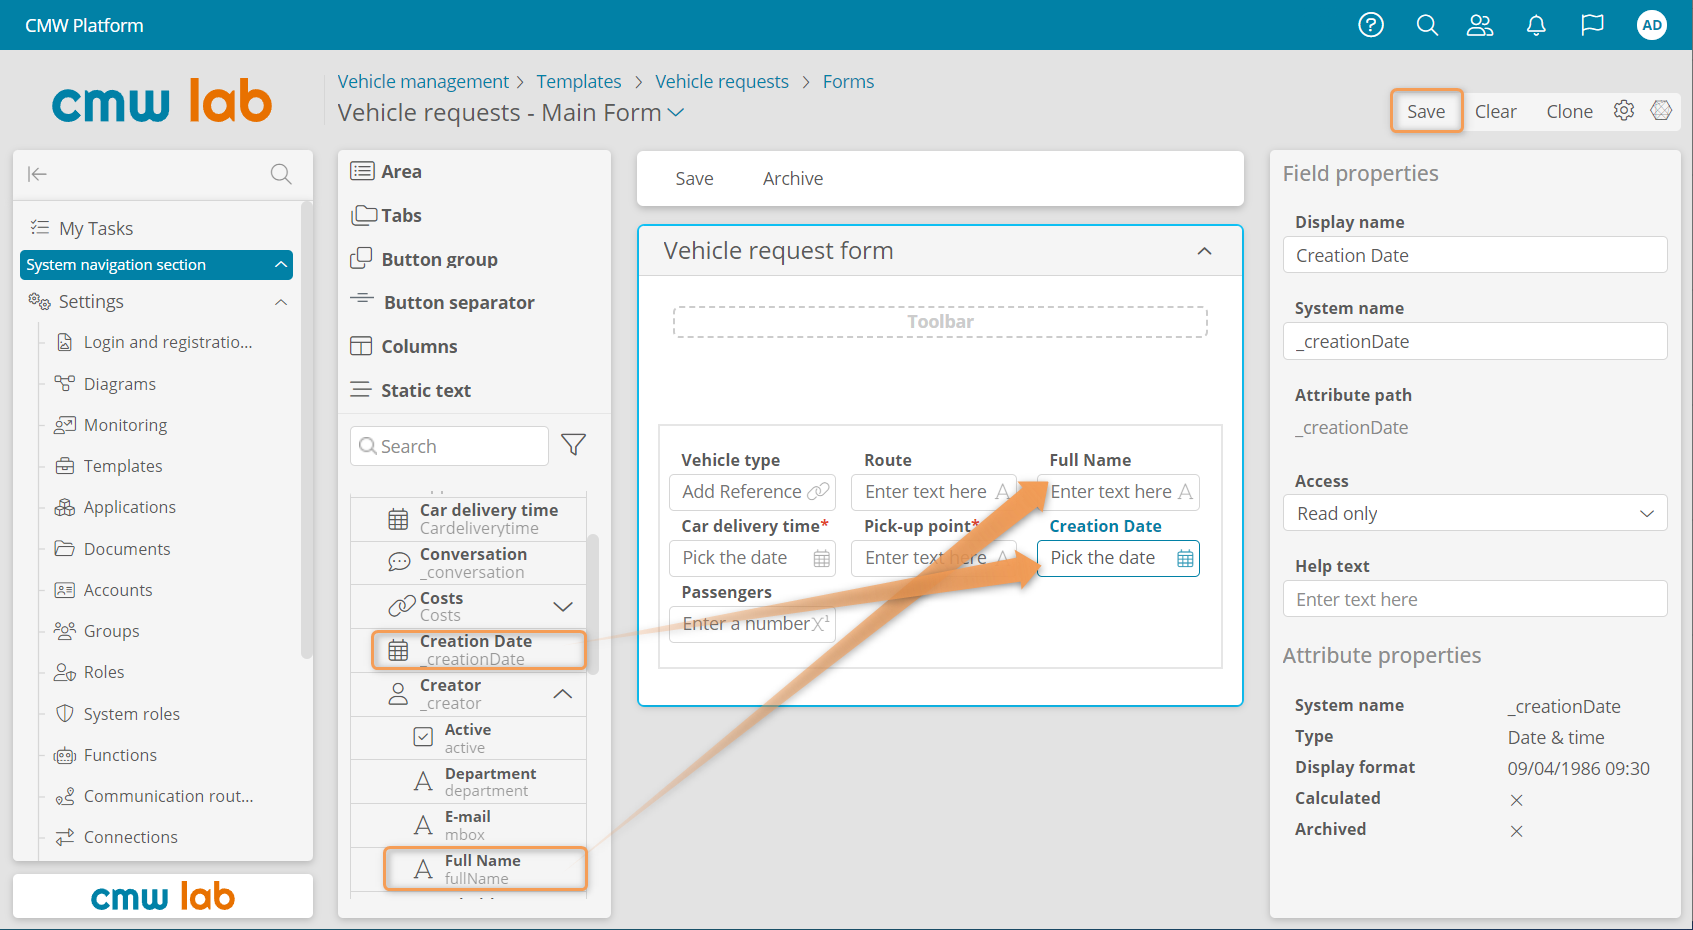
Adding system fields onto the request form
Calculate Total Costs
Let's configure the automatic Total costs calculation.
To do this, we will select the Calculate using an expression checkbox in the Total costs attribute properties. Then, we will enter a formula to calculate the attribute value. We will compose the formula using the expression editor and predictive input.
1. Go to the Ordering a corporate vehicle process template, open the process diagram, and click Edit.
2. Select the Complete the trip task.
3. In the element menu, click Form.
4. In the form designer, expand the Vehicle requests attribute in the element pane.
5. Click Edit next to the Total costs attribute.
6. In the attribute properties window, select the Calculate using an expression checkbox.
7. In the Calculated value field, click Open in editor.
8. In the expression editor that appears, enter the following function: SUM().
9. Place the cursor inside the brackets and press Ctrl+Space.
10. In the dropdown that appears, double-click the Costs attribute.
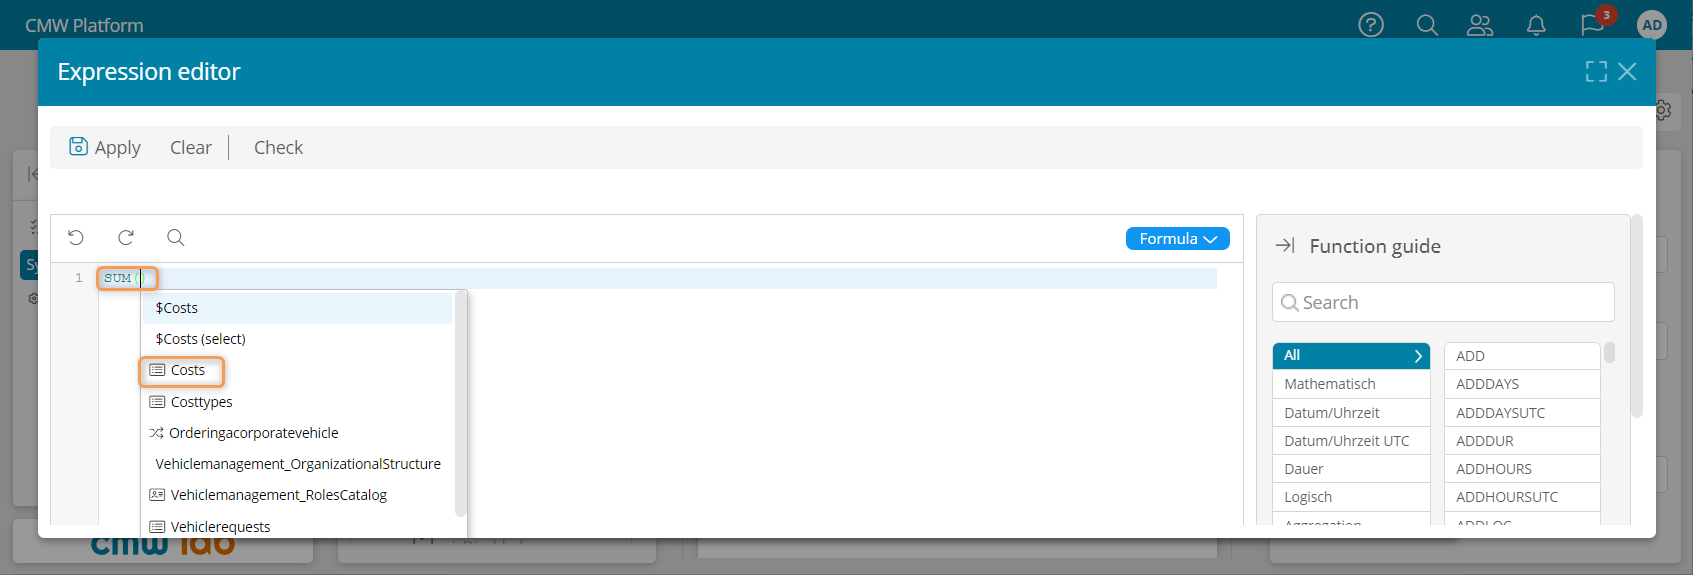
Configuring an expression in the expression editor
11. The following expression should be inserted into the SUM function: from a in db->Costs where Your condition select a->id

Request query statement for a record template
12. Replace the Your condition text with a-> and press Ctrl+Space.
13. In the dropdown that appears, double-click Vehiclerequest (system name of the Vehicle request attribute in the Costs record template).
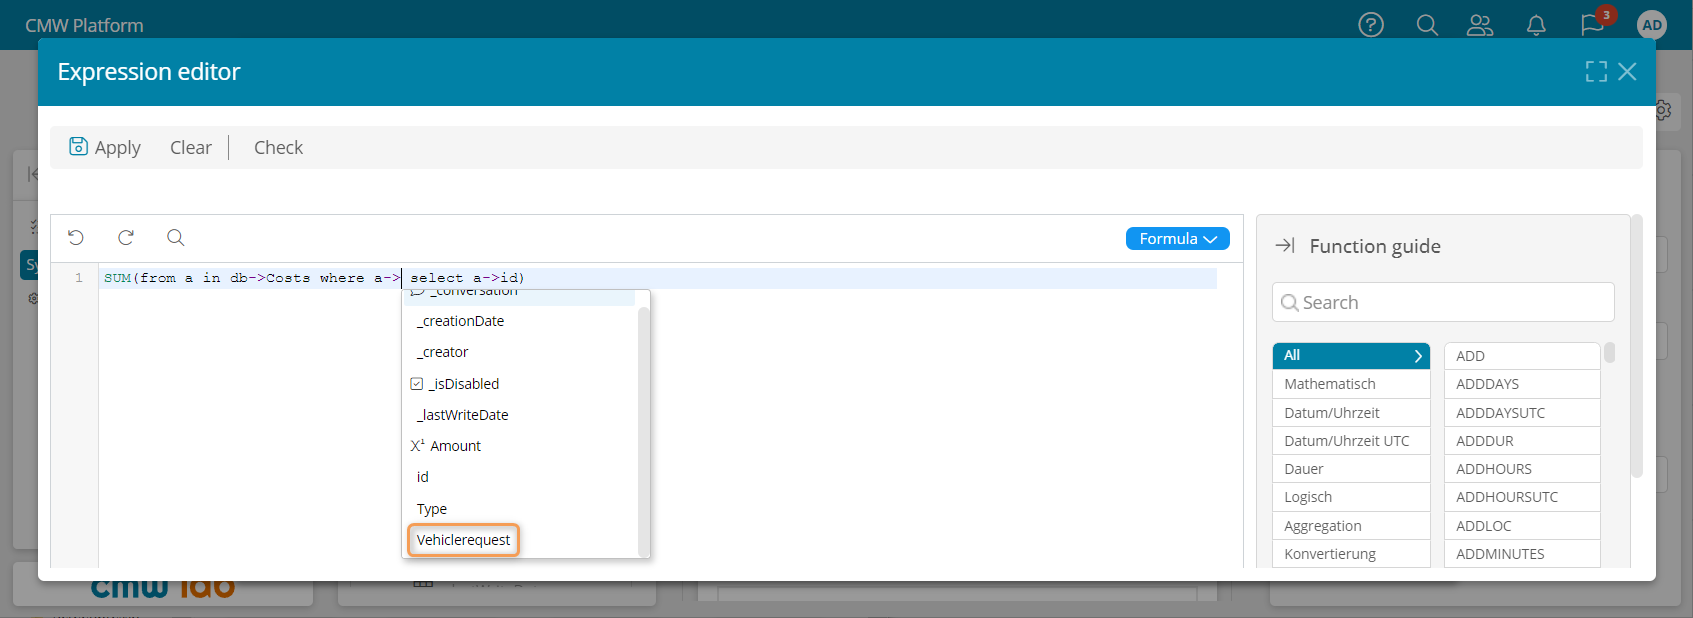
Entering the Vehicle request attribute's system name in the formula
14. Enter == $ after Vehiclerequest.
15. In the dropdown that appears, double-click the id (system name of the ID attribute in the Vehicle requests record template).
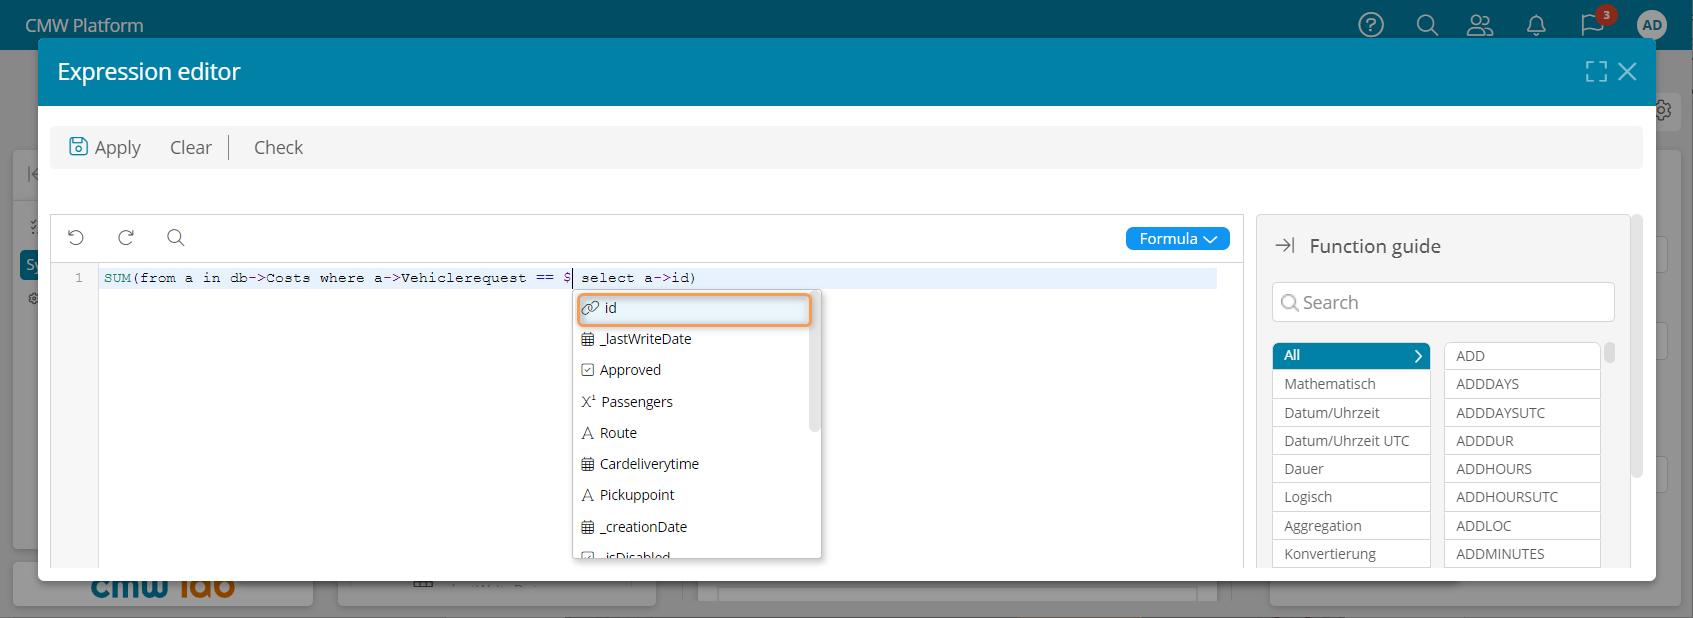
Entering the ID attribute's system name in the formula
16. Delete the id text after select a-> and press Ctrl+Space.
17. In the dropdown that appears, double-click the Amount (the system name of the Amount attribute in the Costs record template).
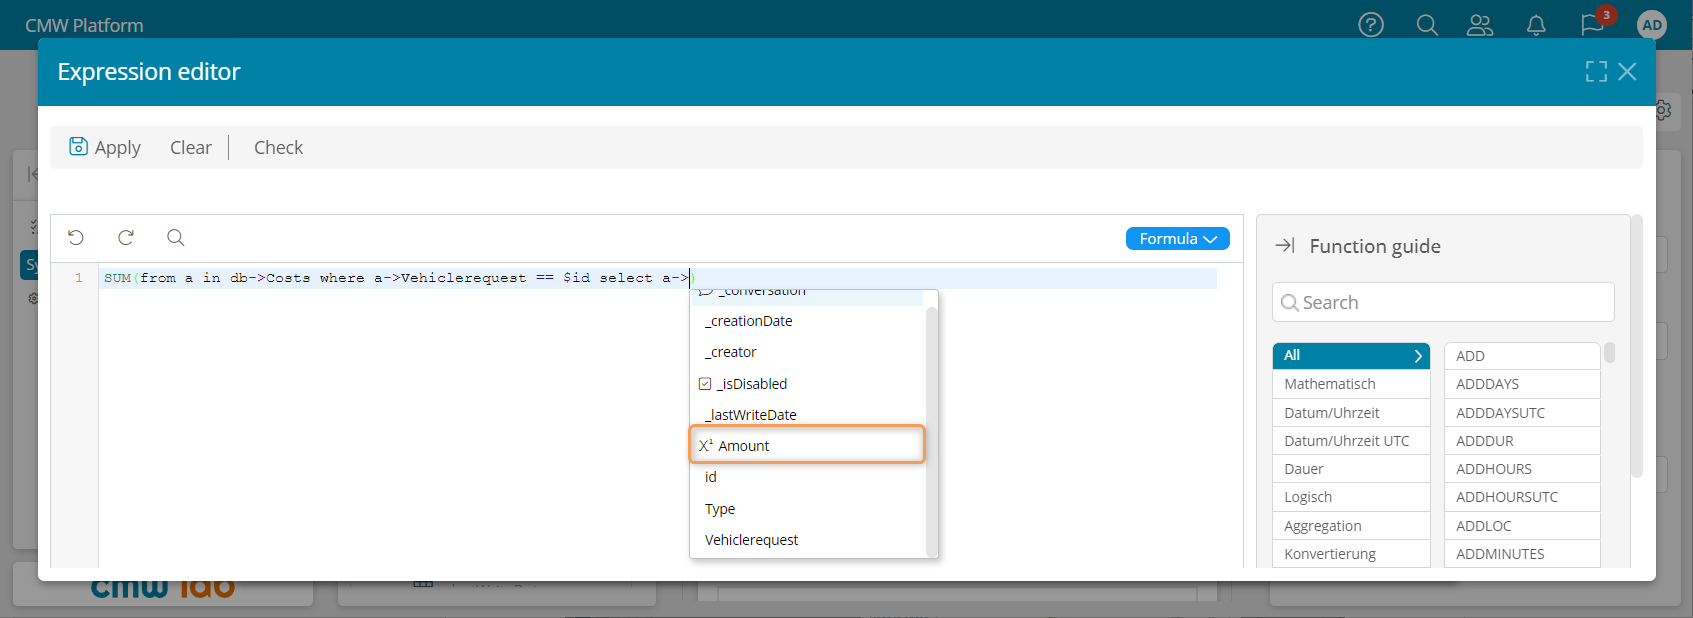
Entering the Amount attribute's system name in the formula
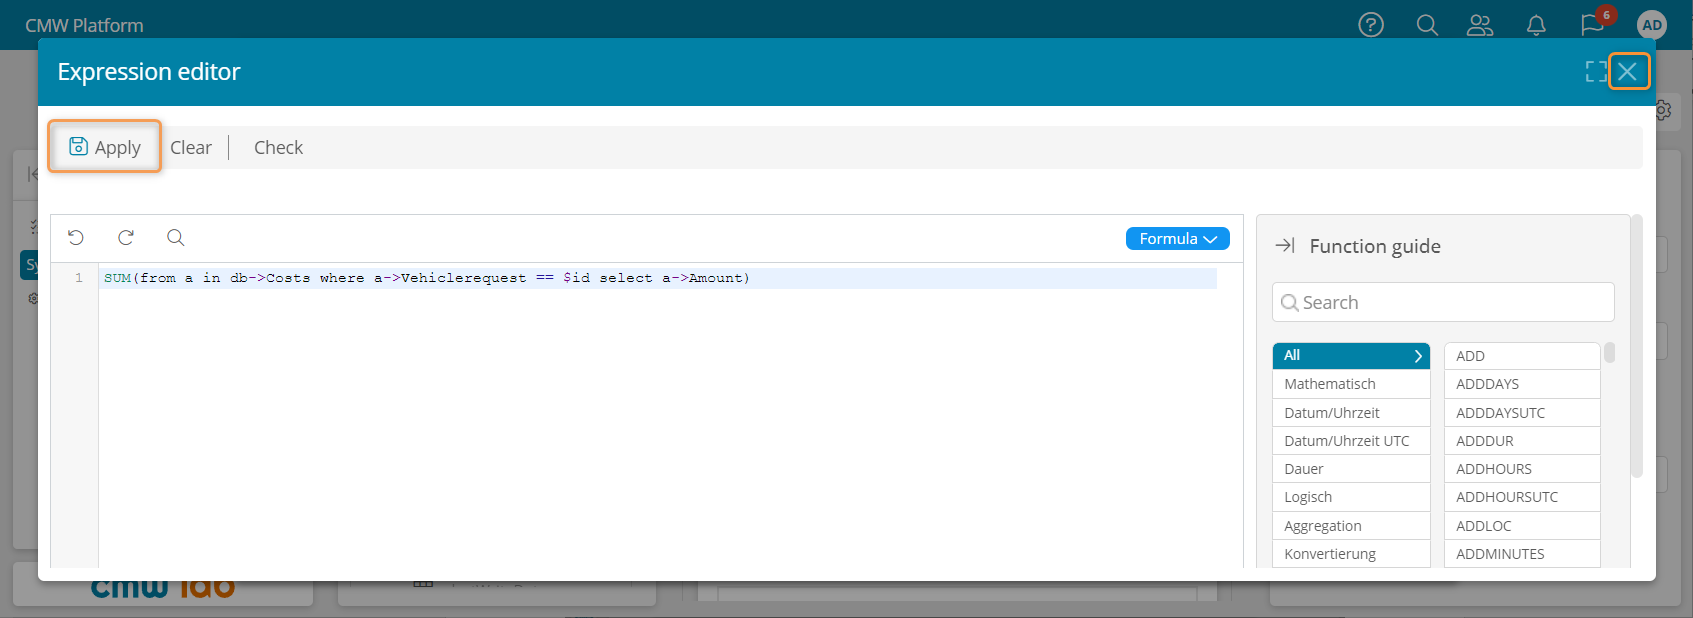
18. The resulting formula should look as follows:
SUM(from a in db->Costs where a->Vehiclerequest == $id select a->Amount)
Total Costs Formula and Database Query Syntax
SUM()— this function takes a value list and returns the sum of values.
As an argument to the SUM() function, we pass the list (array) of Amount values from the Costs template. To get these values, we use a database query:
from a— local variableadeclaration.in db->Costs— data source declaration: Costs record template.where a->Vehiclerequest == $id— condition to sample the records from the Costs template, where the Vehicle request attribute value equals the ID attribute value of the current vehicle request.select a->Amount— query clause to get the Amount attribute values from the Costs template.Costs— the system name of the Costs record template.Vehiclerequest— system name of the Vehicle request attribute in the Costs template.$id— system name of the ID attribute in the Vehicle requests record template.Amount— system name of the Amount attribute in the Costs record template.
19. Click Apply, close the expression editor, and click Save.
The total costs formula
20. Go to the business process diagram and click Publish.
Test the Total Costs Calculation
1. Go to the instance list of the Ordering a corporate vehicle process template and click Create.
2. Go through the process up to the Complete the trip task.
3. Go to My tasks and open the Ordering a corporate vehicle - Complete the trip task.
4. Fill in the Costs table. The Total costs field should update automatically.
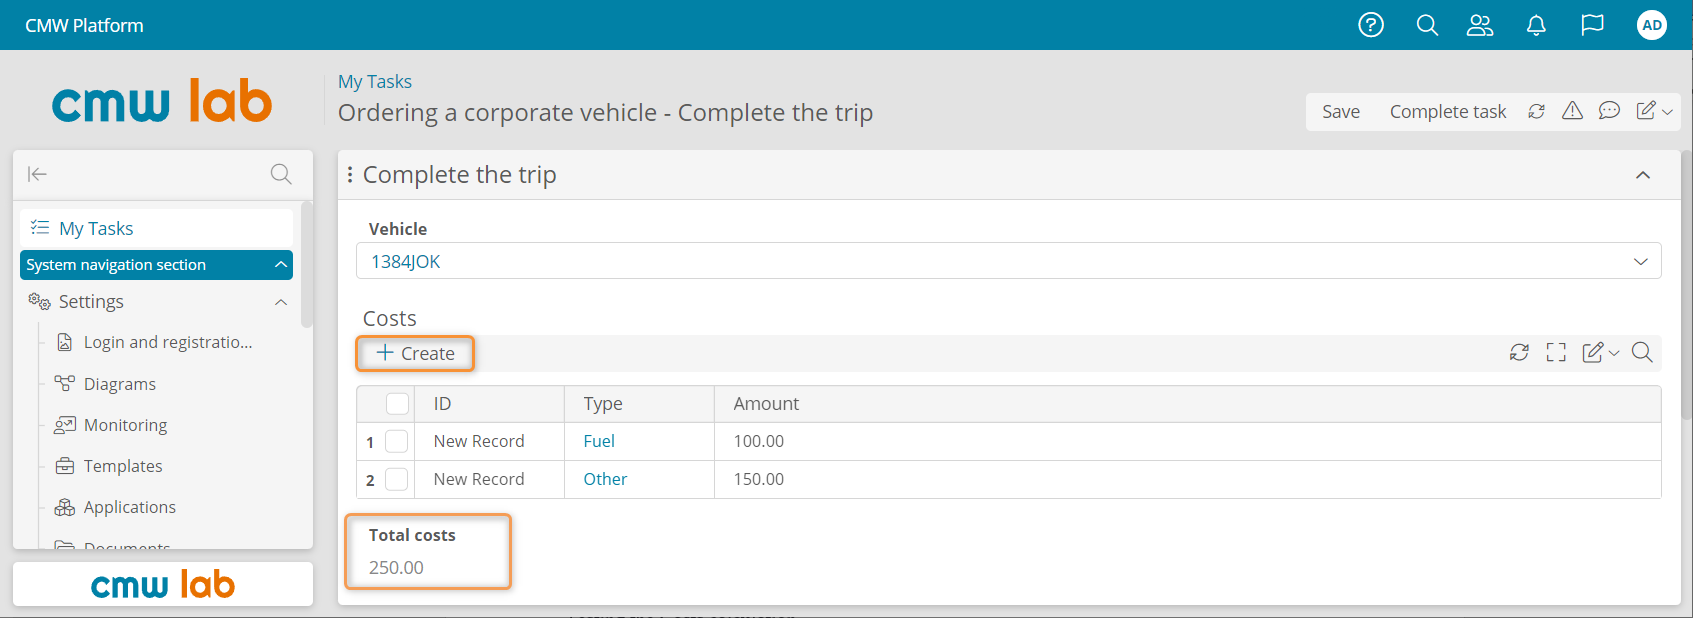
Total costs automatic calculation
Generate Request Number
Let’s set up automatic request numbering.
1. Go to the Attributes tab of the Vehicle requests record template.
2. Create a new attribute:
- Name: Number
- Data type: Text
- Use as a record title: selected.
3. Go to the Ordering a corporate vehicle process diagram and click Edit.
4. Select the start event and click Exit scenario in the element menu.
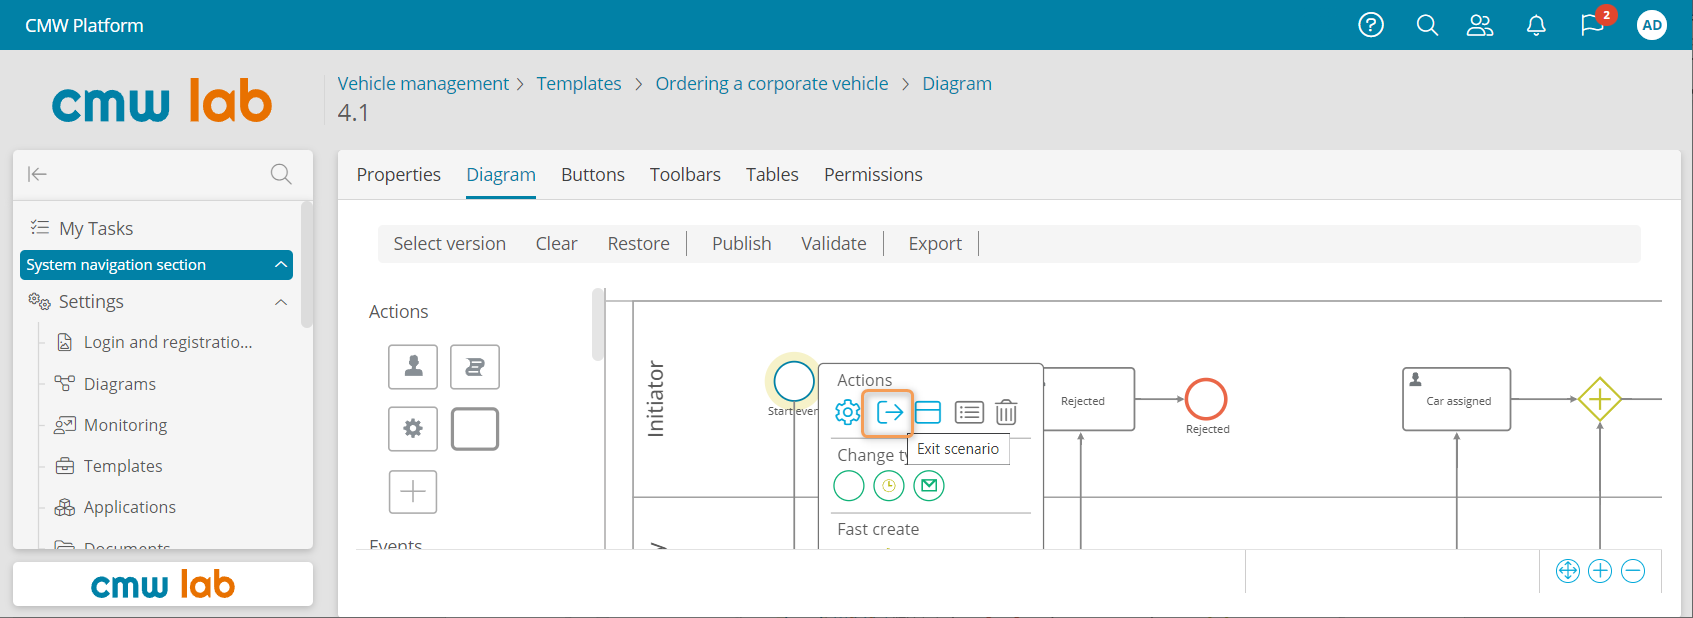
Navigating to the start event exit scenario
5. The scenario designer appears.
6. Inside the Change the context action, click Add action and select Change attribute values from the dropdown.
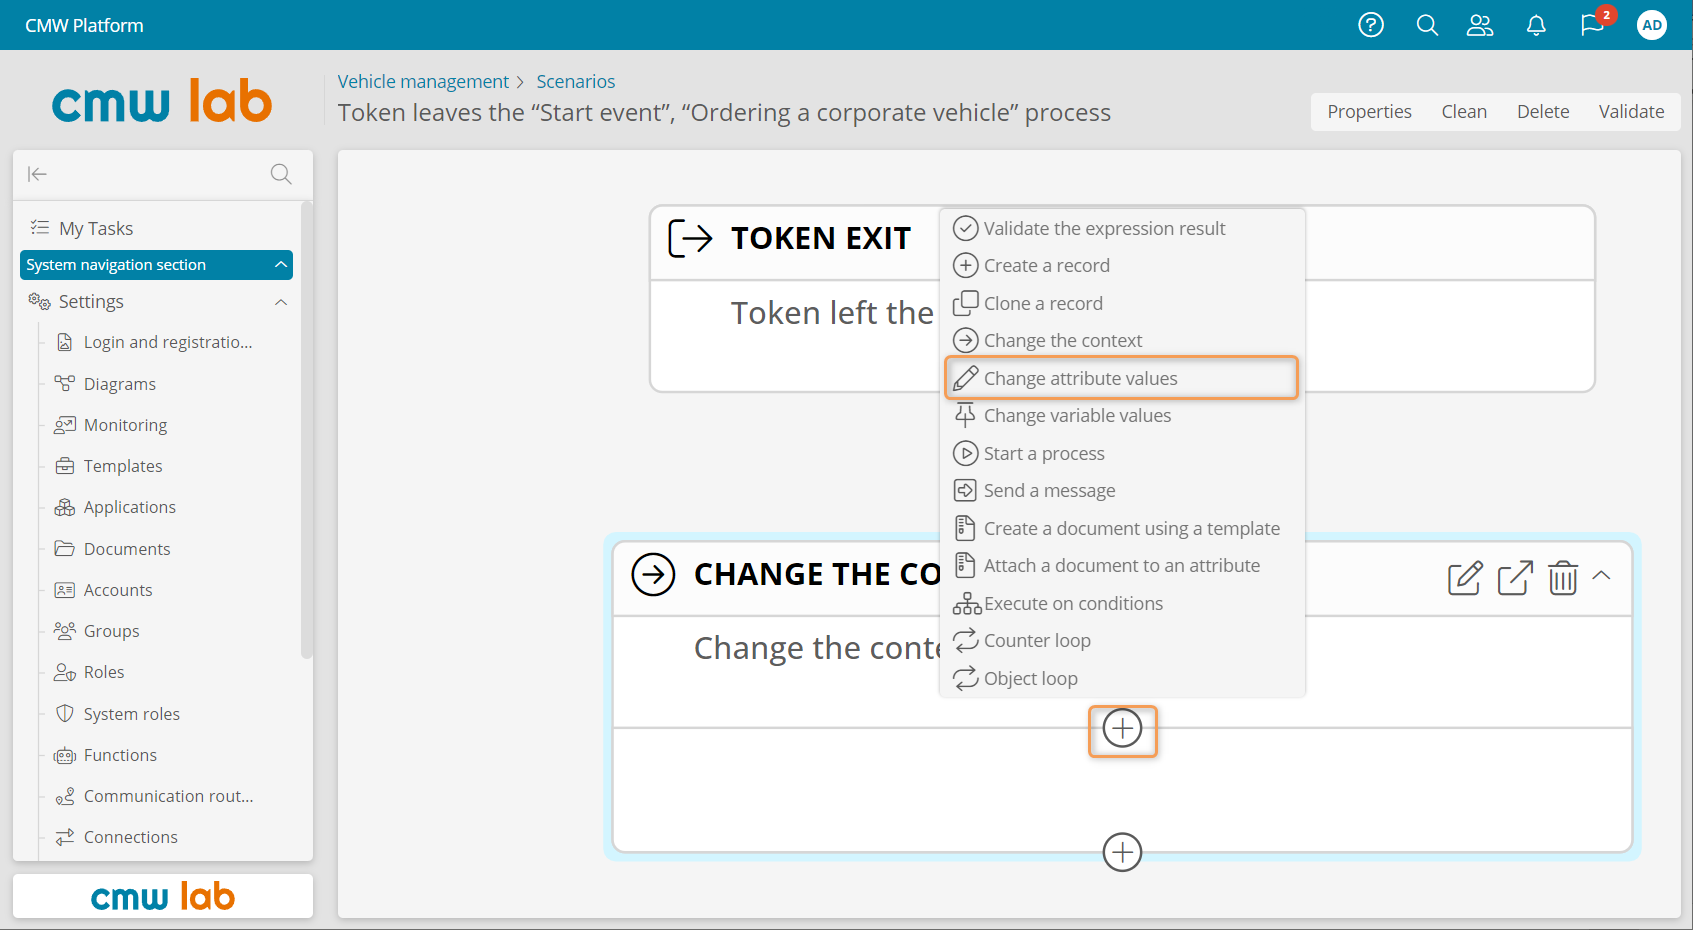
Adding the Change attribute values action to the scenario
7. The new Change attribute values action appears inside the Change the context action.
8. Click Change in the Change attribute values header.
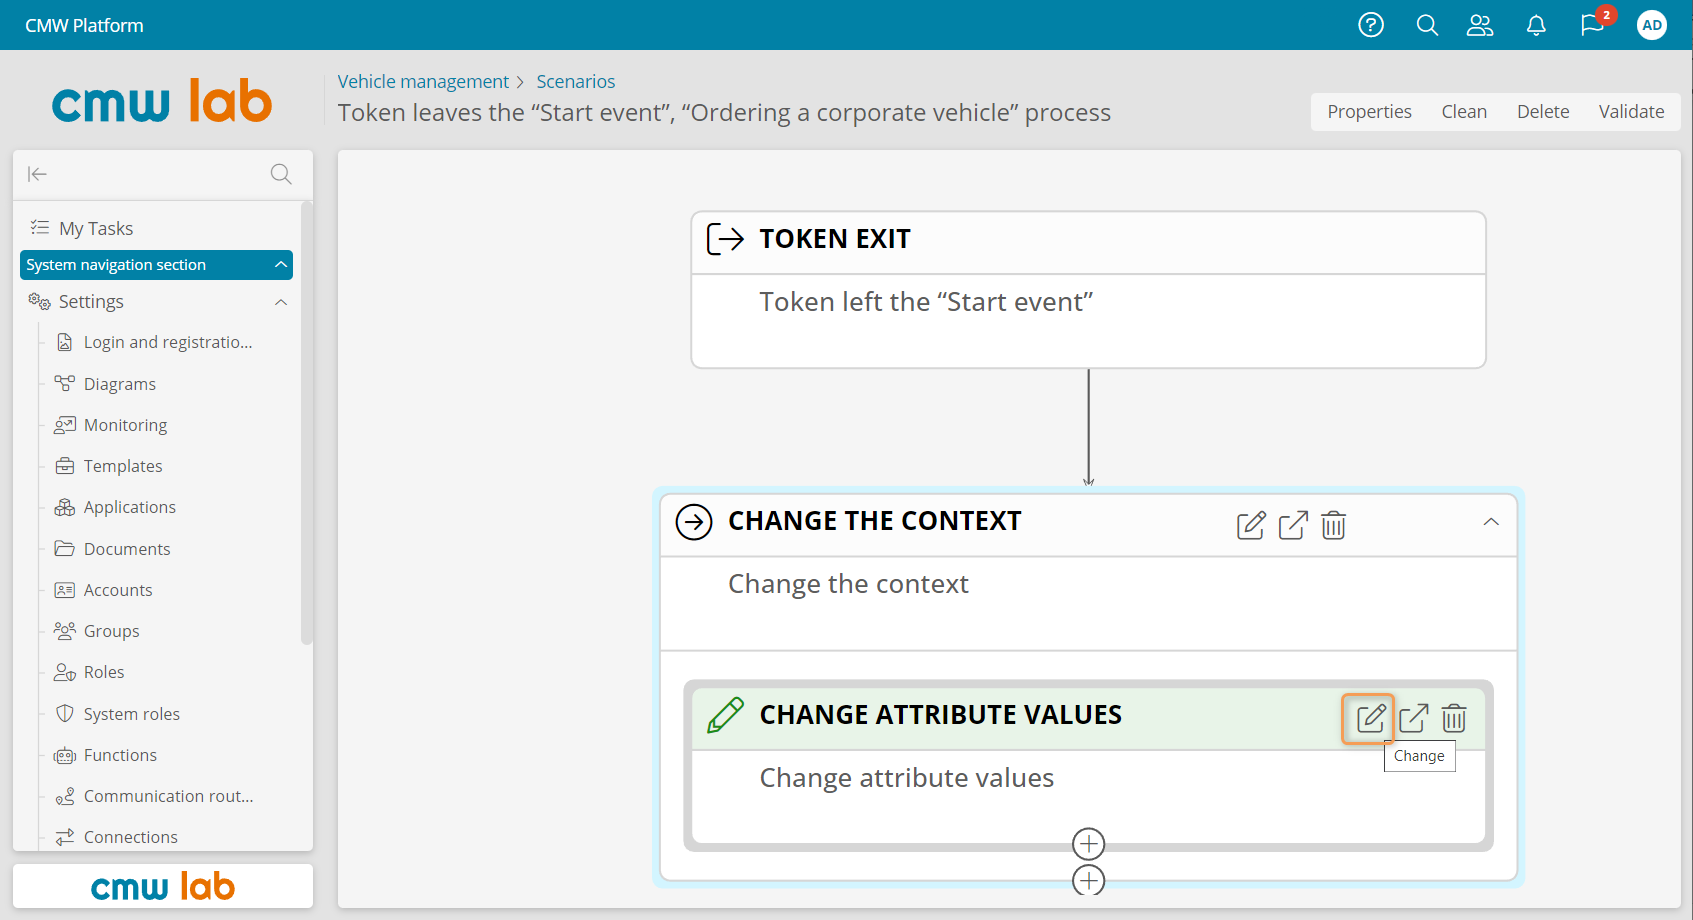
Going to the scenario action properties
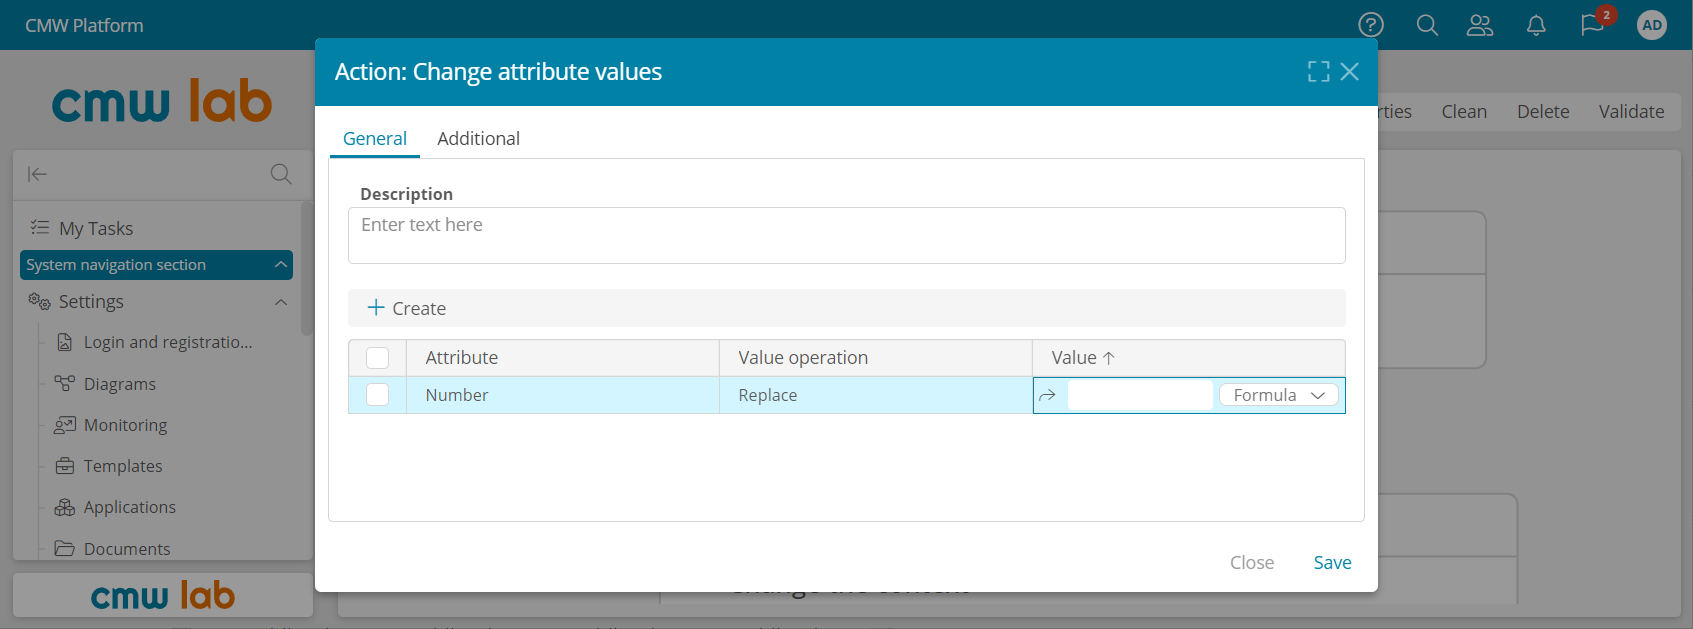
9. The Action: Change attribute values window appears.
10. Click Create above the attribute table.
11. In the Attribute column, select the Number attribute.
12. In the Value operation column, select Replace.
13. In the Value column, select Formula.
Configuring the Change attribute values action
14. In the Value field, click Open in editor.
15. Enter the following formula:
FORMAT("RE-{0}",LIST(COUNT(from a in db->Vehiclerequests select a->id)))Request Number Formula Syntax
FORMAT()— this function takes a string and a value list, replaces the{0}–{n}placeholders with the list values, and returns the resulting string.LIST()— this function combines its arguments into a list.COUNT()— this function takes a value list and returns the number of list items.Vehichlerequests— the system name of the Vehicle requests record template.
16. Click Apply, close the expression editor, and click Save.

Expression for the request's number calculation
17. Go to the process diagram and click Publish.
Display the Request Number on the Form
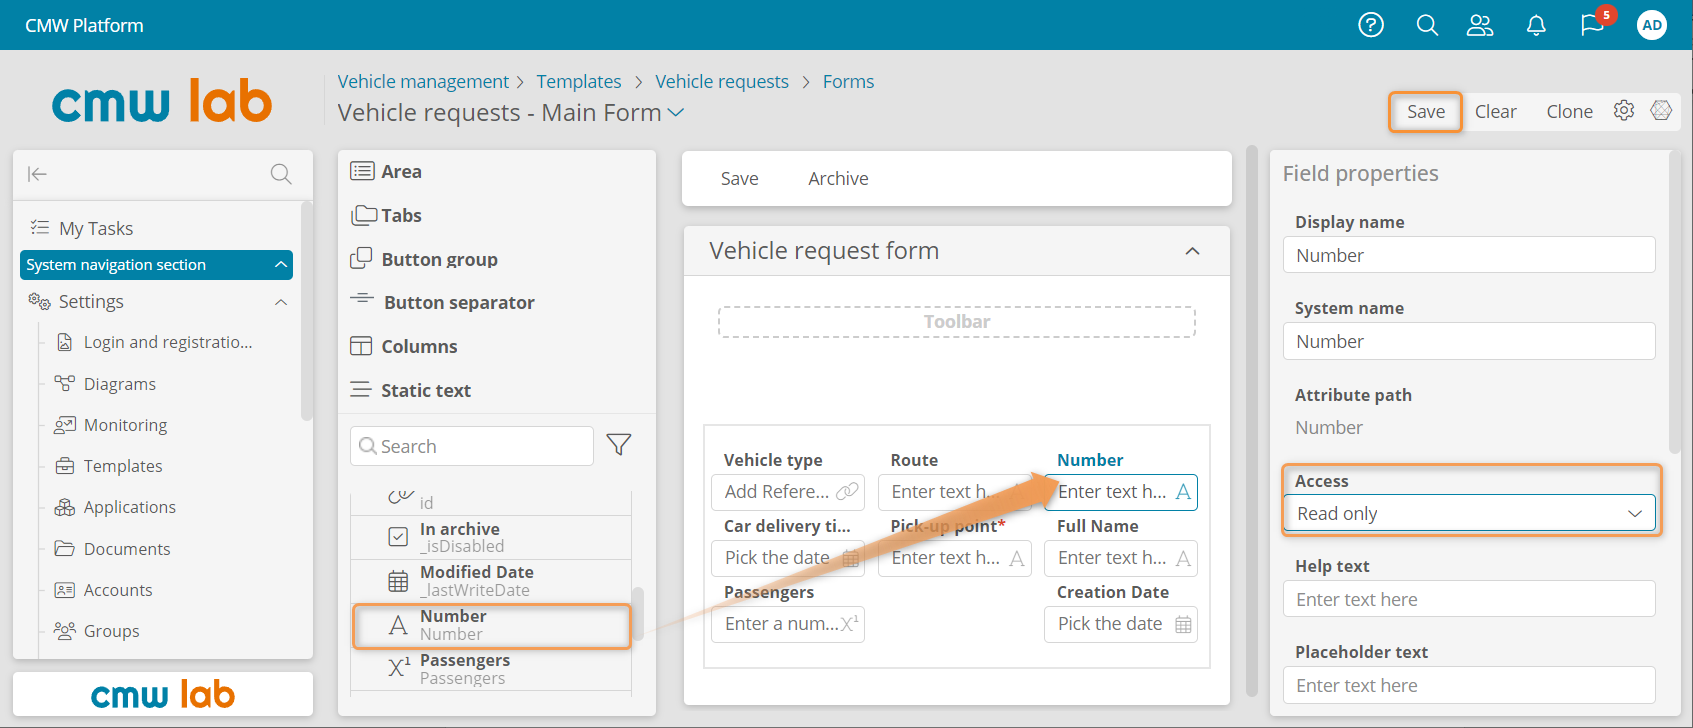
Let's add the request number field on the form.
1. Open the Forms tab of the Vehicle requests record template.
2. Open the Vehicle requests - Main Form.
3. Add the Number attribute to the form layout.
4. For the Number field, set Access to Read only.
5. Save the form.
Adding the request number to the vehicle request form
Test the Request Number Generation
1. Go to the instance list of the Ordering a corporate vehicle process template.
2. Click Create to initiate a new vehicle request.
3. In My tasks, open the Ordering a corporate vehicle - Approve request task.
4. The Number field should display the auto-generated request number.
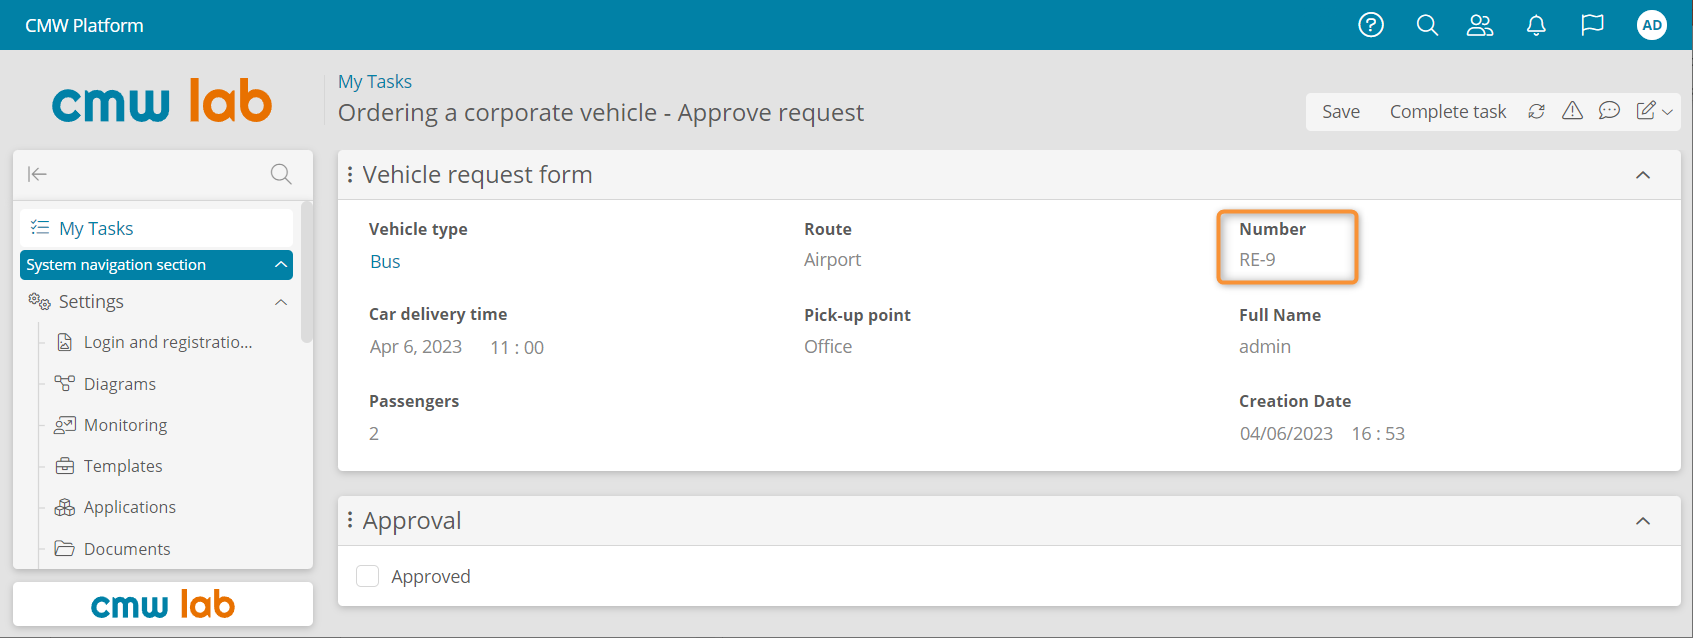
The automatically generated request number
Track Vehicle Request Status
Let's configure the application to automatically change the vehicle request status depending on the process stage.
Configure the Statuses Registry
We'll store the statuses in a new record template.
1. In the navigation pane on the left, select Diagrams.
2. Open the Data model - Vehicle management diagram.
3. Drag the New record type element to the diagram and create a new record template — Statuses.
4. Select the Statuses record template and add a new attribute:
- Name: Title
- Data type: Text
- Use as a record title: selected
5. Select the Statuses template and click Tables in the element menu.
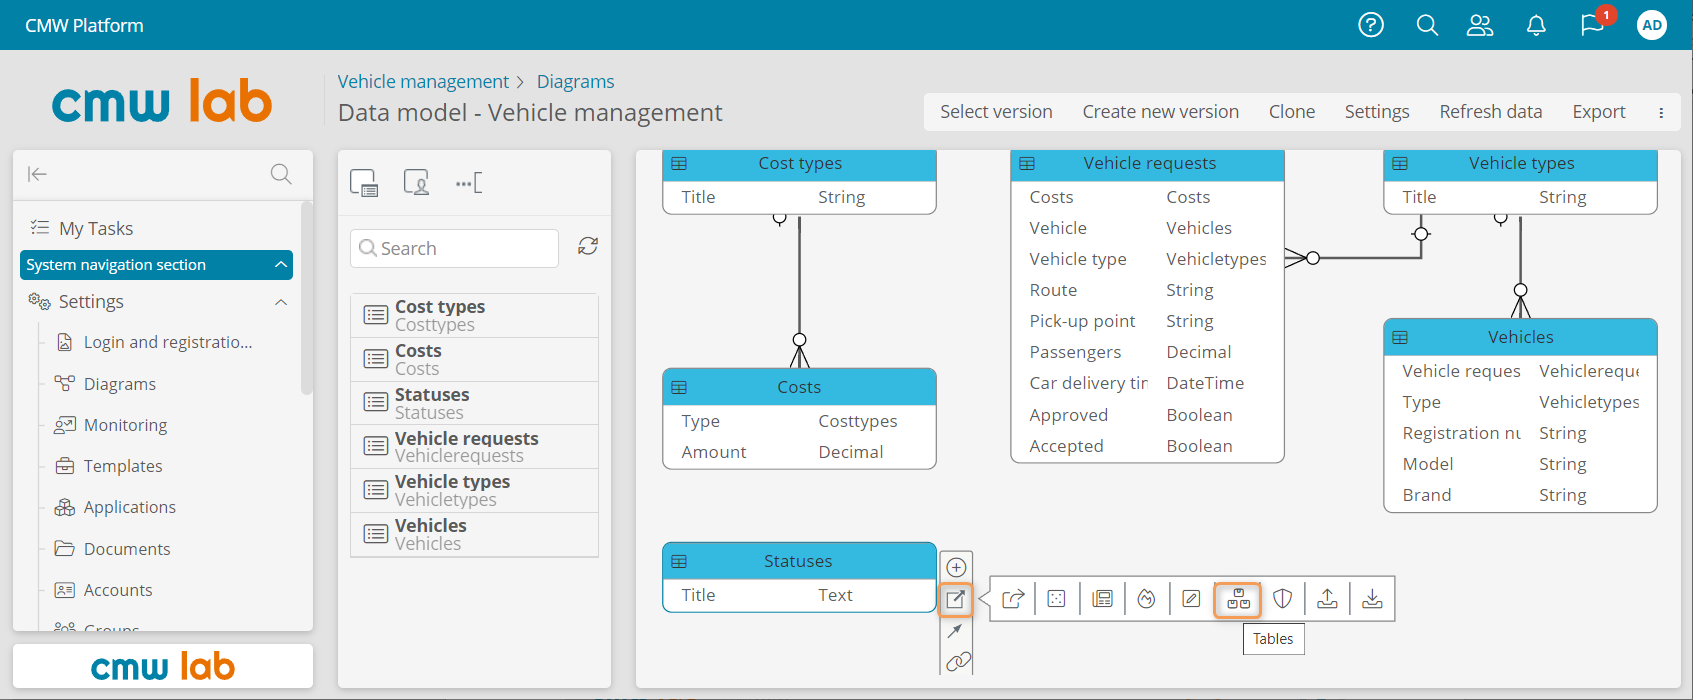
Navigating to the template table list from the data model diagram
6. In the table list, open the All records table by double-clicking it.
7. Configure the table to display only the Title column.
9. Click Save.
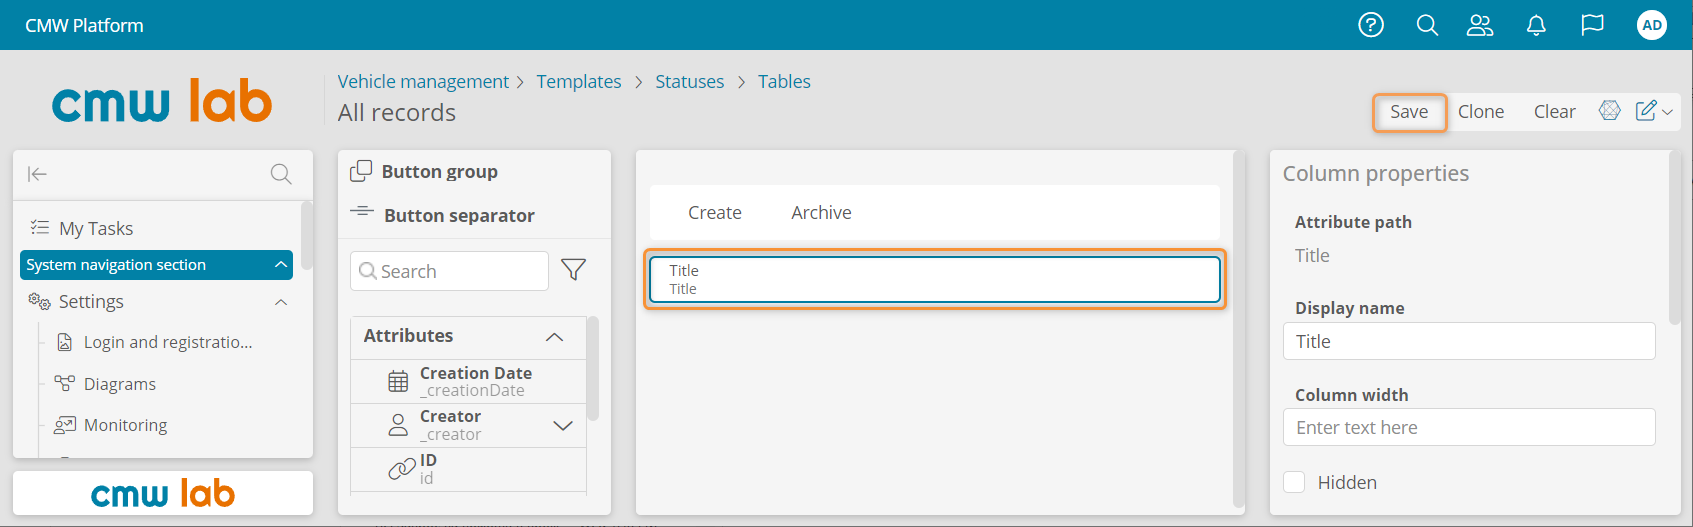
Configuring the Statuses table
9. Go to the Forms tab and open the Statuses - Main Form.
10. Add the Title attribute to the form.
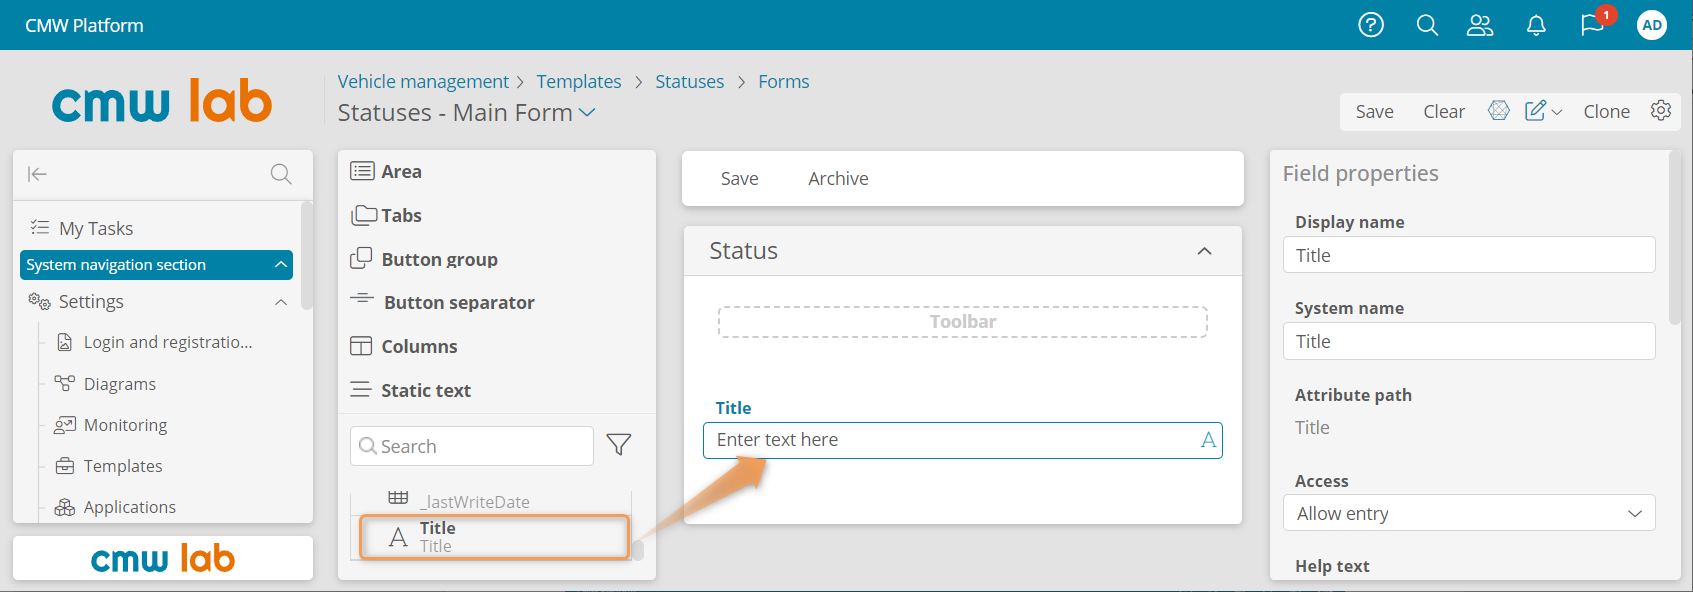
Configuring the Statuses main screen form
11. Go to the record list and create the following status records: Created, In Approval, Completed, Rejected, and Trip in Progress.
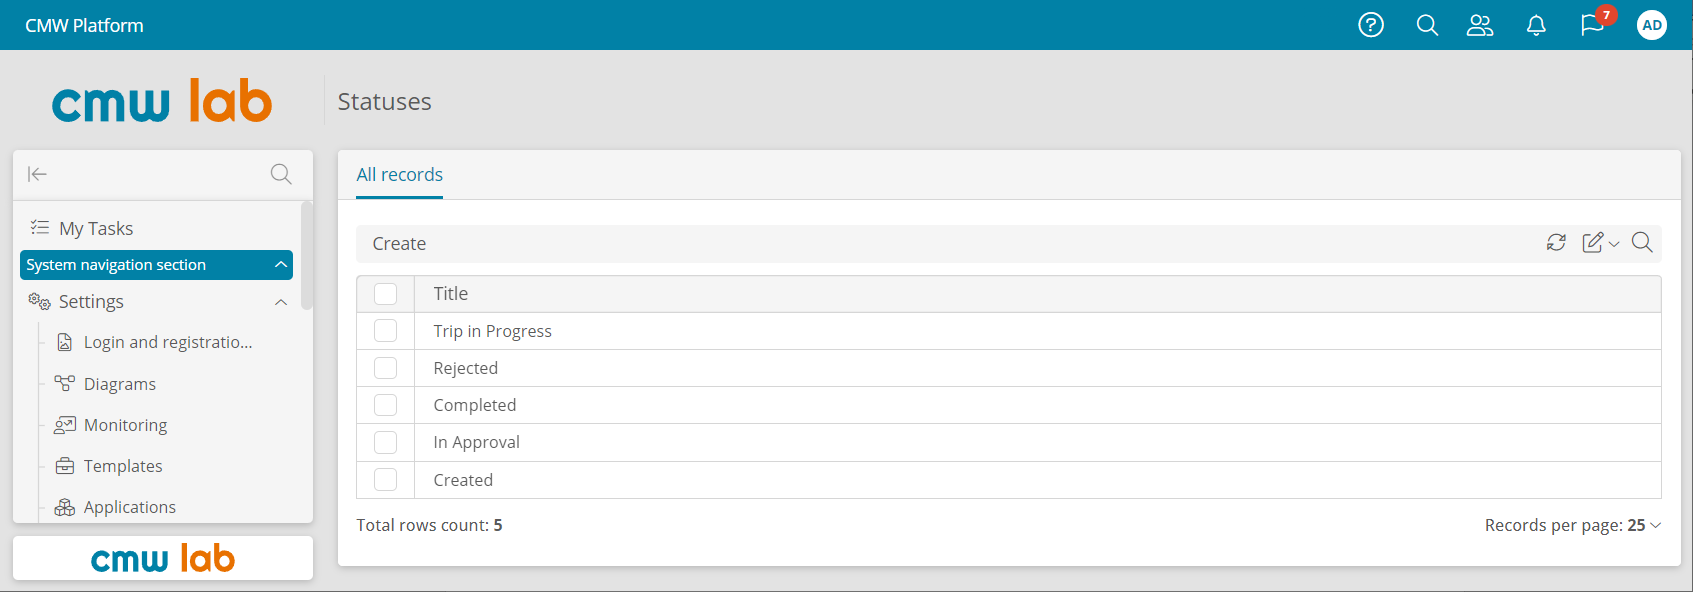
Vehicle status records
12. Return to the data model diagram and select the Vehicle requests record template.
13. Using the element menu, create a new attribute:
- Name: Status
- Data type: Record
- Linked template: Statuses

Selected template relationships on the data model diagram are highlighted in blue
Configure the Status Calculation
Let's configure the vehicle request status calculation depending on the process stage:
- Created
- In Approval
- Rejected
- Trip in Progress
- Completed
Set Status to Created
1. Go to the Ordering a corporate vehicle process diagram and click Edit.
2. Select the start event and click Exit scenario in the element menu.
3. Double-click the title of the Change attribute values action to configure its properties.
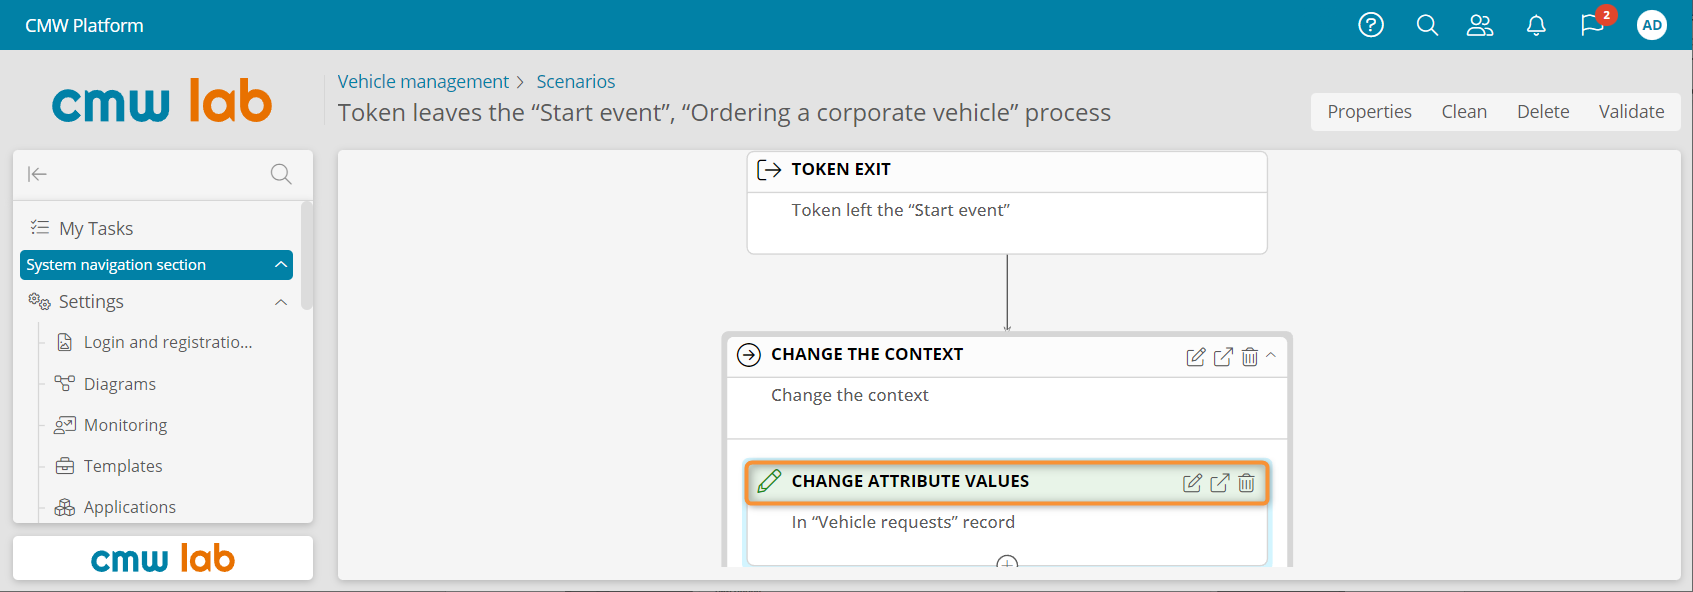
Editing the start event exit scenario
4. Click Create above the attribute table.
6. In the Attribute column, select the Status attribute.
7. In the Value operation column, select Replace.
8. In the Value column, select Formula.
9. In the Value field, click Open in editor.
10. Enter the following formula:
OBJECT("Vehiclemanagement","Statuses","Title","Created")Request Status Formula Syntax
OBJECT()— this function takes the application system name, template system name, attribute system name, and attribute value. It returns the ID of the record where the attribute has the specified value.Vehiclemanagement— the system name of the Vehicle management application.Statuses— the system name of the Statuses record template.Title— the system name of the Title attribute in the Statuses record template.Created— the Title attribute value to search.
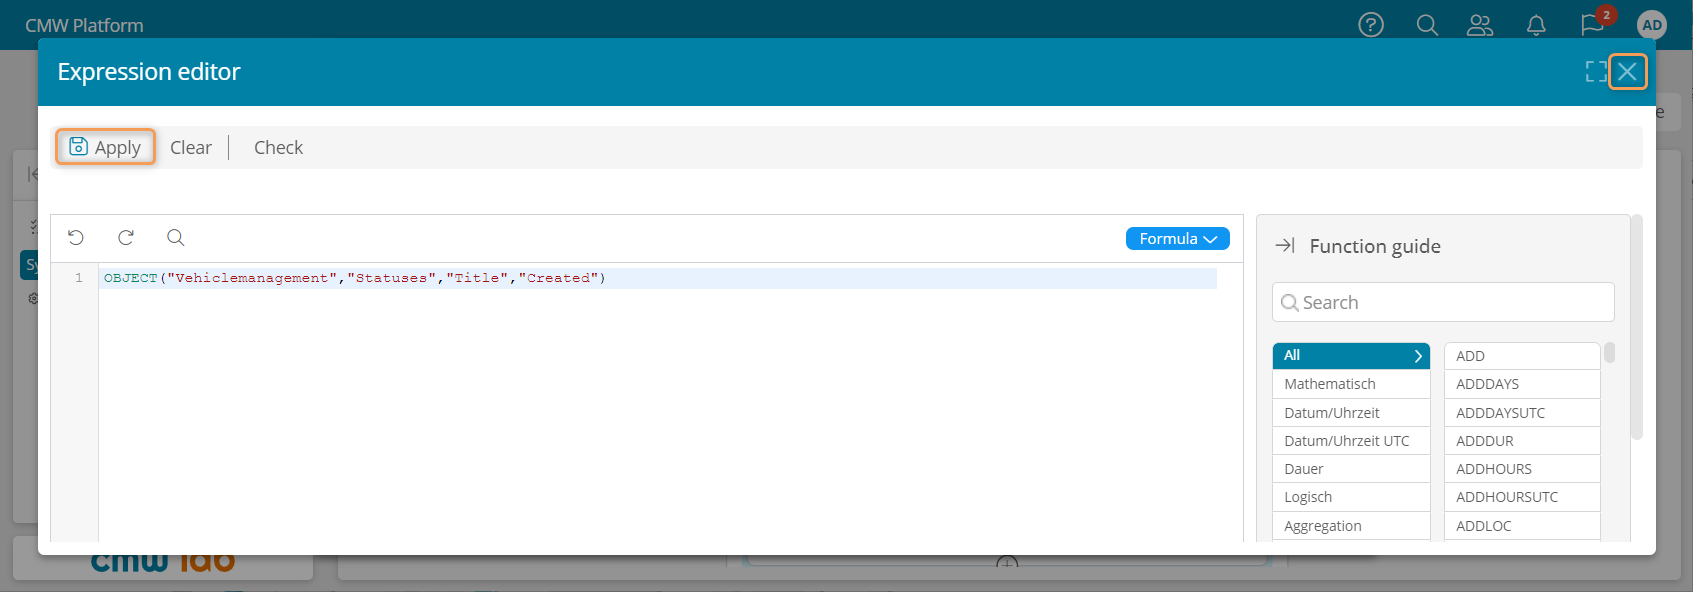
A formula to change the vehicle request status to Created
11. Click Apply, close the expression editor, and click Save.
Set Status to In Approval
1. Return to the process diagram, but do not publish it yet.
2. If the business process diagram is not in the editing mode, click Edit.
3. Select the Approve request user task and click Entry scenario in the element menu.
4. Add the Change attribute values action inside the default Change the context action.
5. In the Change attribute values action, add the Status attribute with the Replace value operation and the following Value formula:
OBJECT("Vehiclemanagement","Statuses","Title","In Approval")Set the Status to Rejected
1. Select the Rejected user task and use the element menu to open the Entry scenario.
2. Add the Change attribute values action inside the default Change the context action.
3. In the Change attribute values action, add the Status attribute with the Replace value operation and the following Value formula:
OBJECT("Vehiclemanagement","Statuses","Title","Rejected")Set Status to Trip in Progress
1. Select a parallel gateway before the Car assigned and Complete the trip user tasks.
2. Similarly to the above, configure the Exit scenario to change the request Status to Trip in Progress:
OBJECT("Vehiclemanagement","Statuses","Title","Trip in Progress")Set Status to Completed
1. Select the Success end event.
2. Configure the Entry scenario to change the request Status to Completed:
OBJECT("Vehiclemanagement","Statuses","Title","Completed")3. Publish the business process diagram for the changes to take effect.
Display the Request Status on the Form
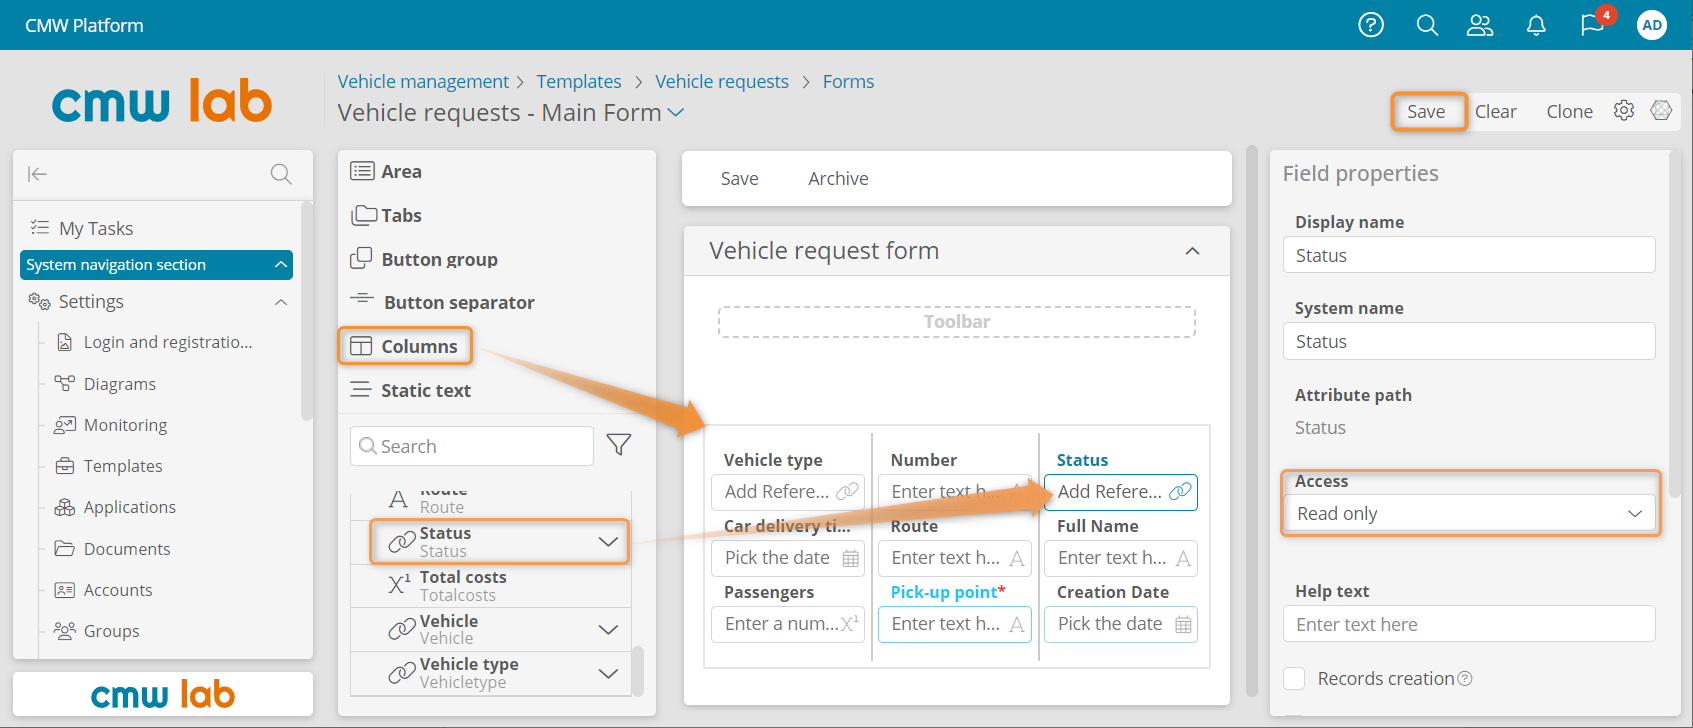
We have configured a new attribute — vehicle request Status. Let's add it to the request form.
1. Open the Forms tab of the Vehicle requests record template.
2. Open the Vehicle requests - Main Form.
3. Arrange the form fields in two or three columns.
4. Drag the Status attribute to the form.
5. Set the Status field Access mode to Read only.
6. Click Save.
Adding the Status attribute to the vehicle request form
Display the Request Status and Number in the Request List
Let's add the vehicle request status and number to the table listing the vehicle requests.
1. Go to the Tables tab of the Vehicle requests record template.
2. Open the All records table designer.
3. Add the Number and Status columns to the table.
4. Click Save.
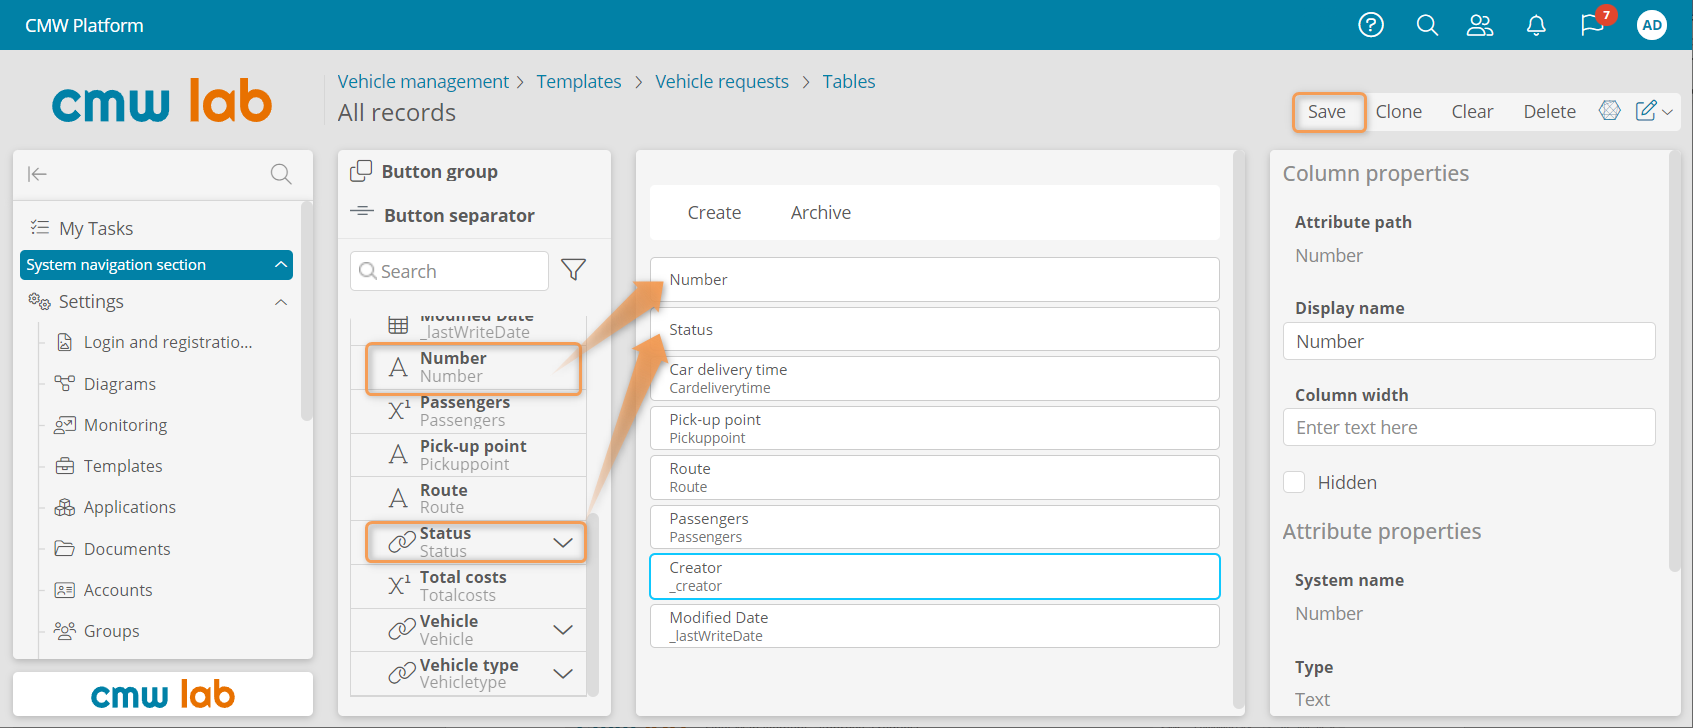
Adding attributes to the Vehicle requests default table
Test the Request Status Change
1. Go to the instance list of the Ordering a corporate vehicle process template and create a new request.
2. In My tasks, open the Ordering a corporate vehicle - Approve request task.
3. The Status should be In Approval.
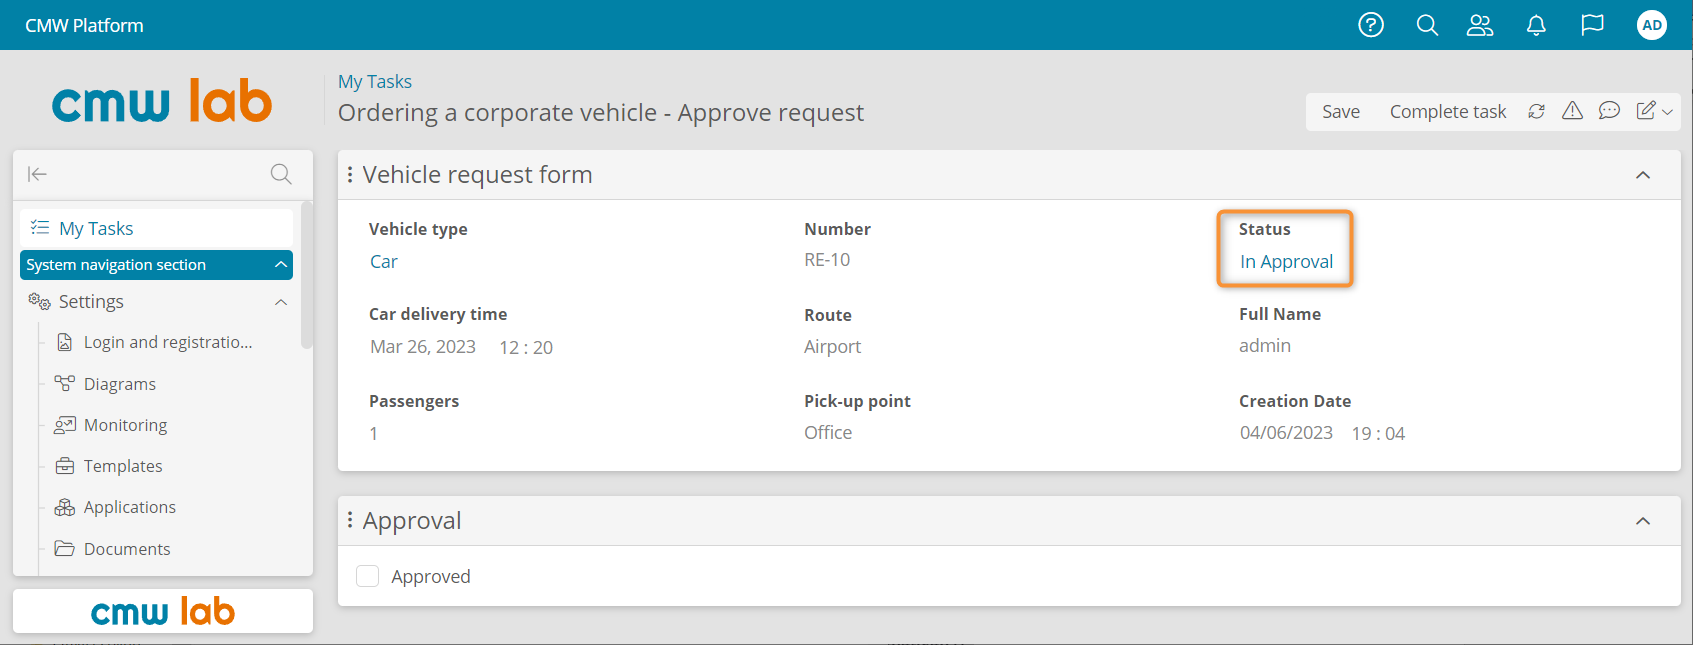
Automatically calculated Status attribute value
Customize Task Titles
Business Requirement
The default task titles are not very informative — they only contain the process and task names.
For user convenience, we can add relevant request details to the task titles, e.g., the route and the Initiator's full name.
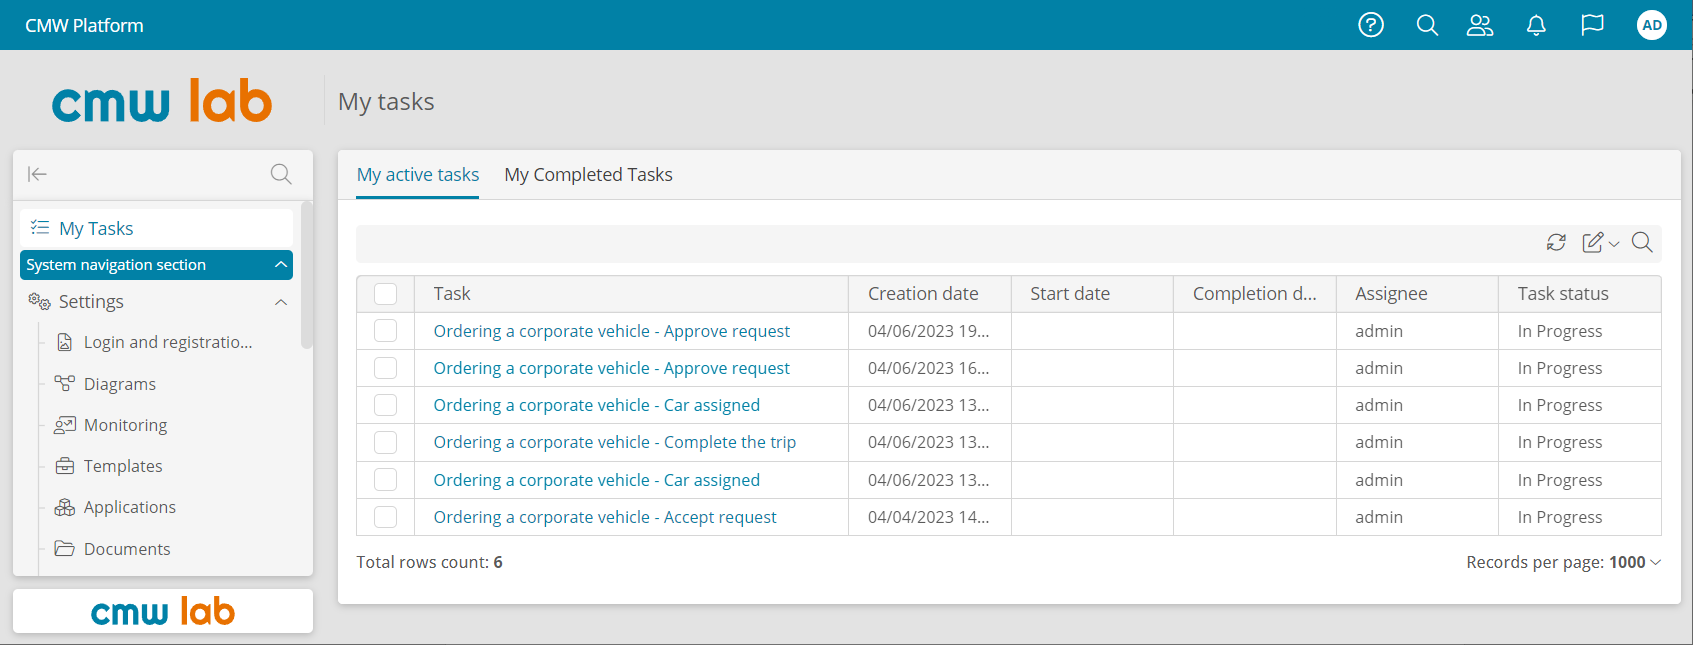
The task list with default titles
1. Go to the Ordering a corporate vehicle business process diagram and click Edit.
2. Select the Approve request user task.
3. Click Properties in the element menu.
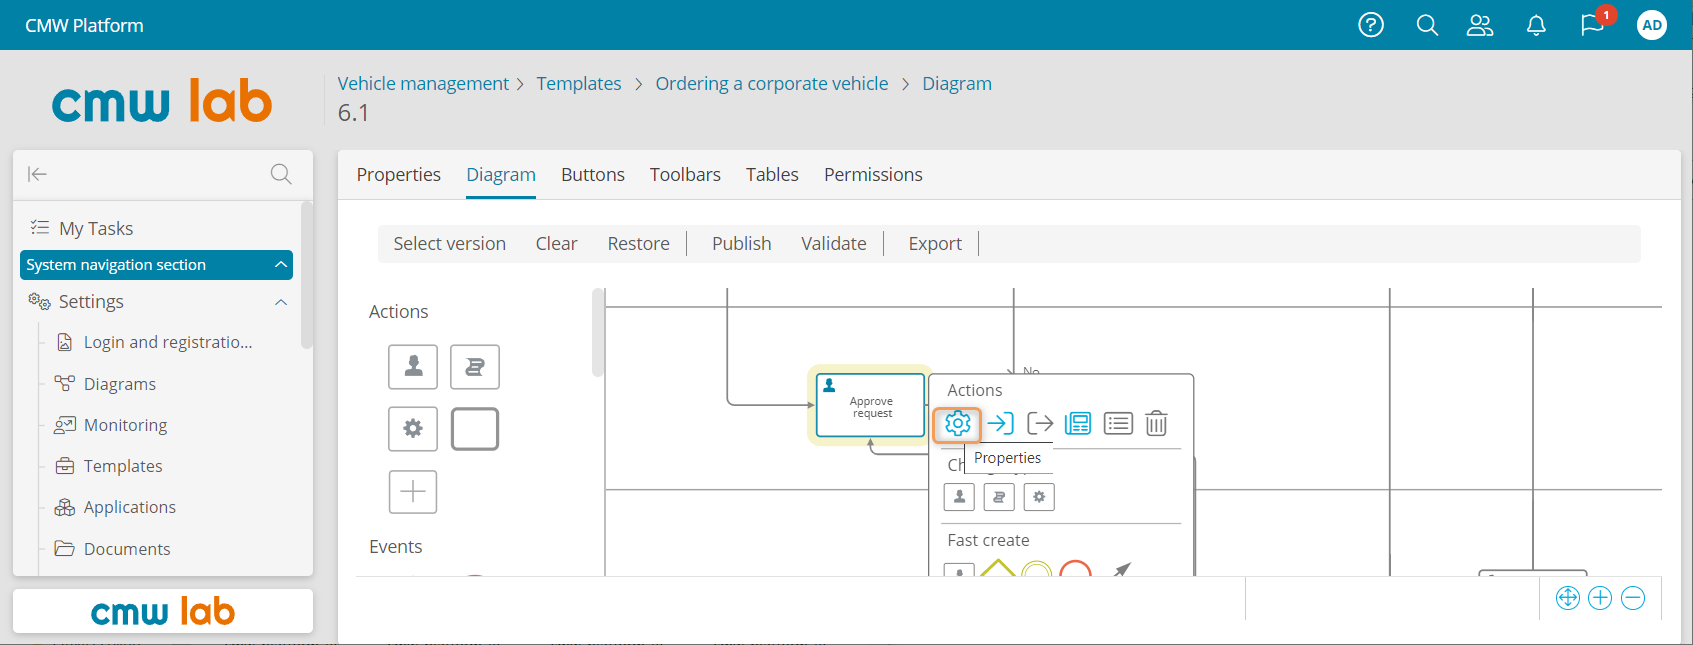
Navigating to the user task properties
4. In the User task properties window, go to the Advanced tab.
5. Select Formula in the Task title field.
6. Enter the following formula:
FORMAT(Approve request ({0} — {1}),LIST($Route,$_creator->fullName))Task Title Formula Syntax
Route— the system name of the Route attribute._creator->fullName— full name of the user who created the request.FORMAT()— this function takes a string and a value list, replaces the{0}–{n}placeholders with the list values, and returns the resulting string.LIST()— this function combines its arguments into a list.
7. Click Save.
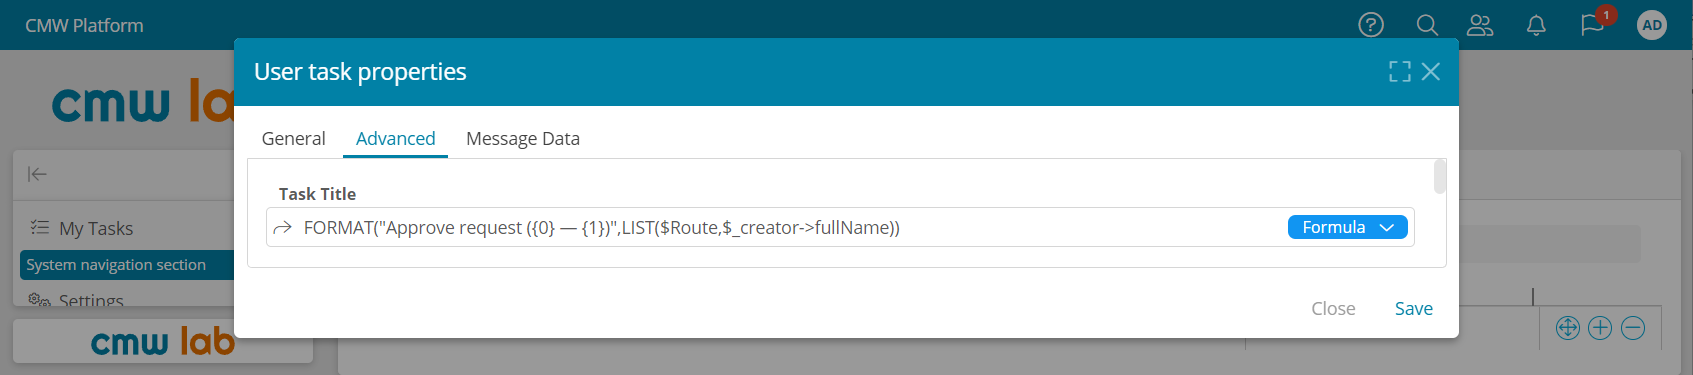
The Approve request task title formula
8. Similarly to the above, enter the Task title formulas for other tasks, specifying the appropriate task names:
FORMAT(Accept request ({0} — {1}),LIST($Route,$_creator->fullName))FORMAT(Rejected ({0} — {1}),LIST($Route,$_creator->fullName))FORMAT(Complete the trip ({0} — {1}),LIST($Route,$_creator->fullName))FORMAT(Car assigned ({0} — {1}),LIST($Route,$_creator->fullName))
9. Publish the business process diagram.
Test the Task Title Display in My Tasks
Let's view the custom task titles in the task list.
1. Go to the instance list of the Ordering a corporate vehicle process template and create a new request.
2. Go to My tasks.
2. The new task title should contain the route and the request creator's full name.
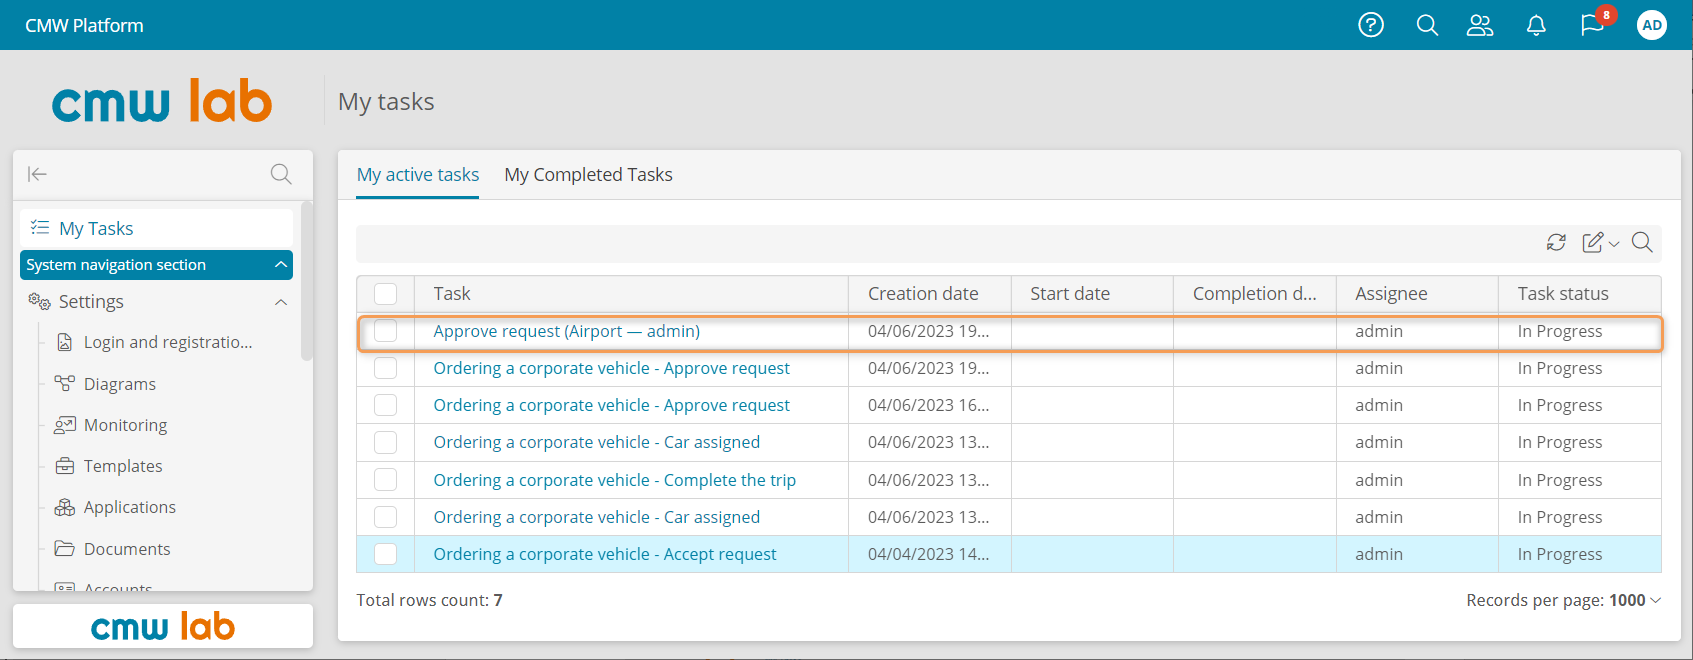
A task with the calculated title including the route and the Initiator's name
Results
Congrats! You have learned how to configure automatic calculations for attribute values and task titles.
Proceed to Lesson 8 — Accounts to configure user accounts, roles, and permissions in your business application.