Lesson 6 — Advanced Process
Table of Contents
Introduction
In this lesson, you will improve the vehicle booking process by using the record templates created in the previous lesson (Vehicle types, Vehicles, Costs, and Cost types). You will configure the app to enable vehicle type selection during request submission, manage the corporate vehicles, and track the costs.
Estimated time to complete: 10 min
Prerequisite: complete Lesson 3 — My First Business Process and Lesson 5 — Data Structures
Note: This lesson is for the CMW Platform version 4.2.571.0. In other versions, the page and menu appearance may differ from the screenshots.
Enable Vehicle Type Selection at the Request Submission
Let's add the option to select the vehicle type when submitting a request. To do this, we will configure the vehicle request form.
1. Go to the Vehicle requests record template. Select the Forms tab.
2. Open the Vehicle requests – Main Form.
3. Drag the Vehicle type attribute to the form layout.
4. Click Save.
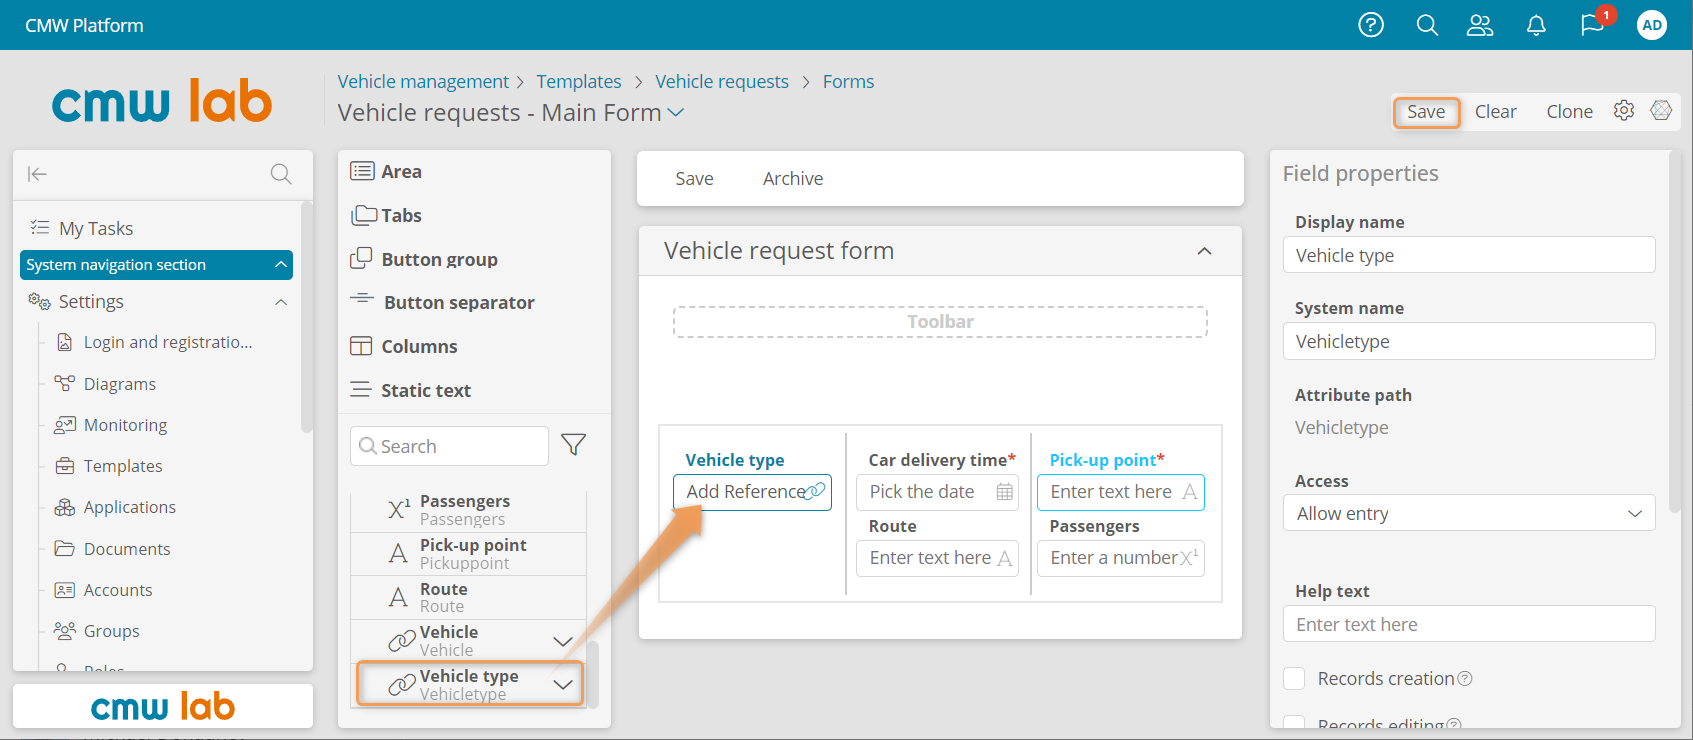
Adding an attribute to the form layout
Enable Vehicle Selection for the Trip
Let's configure the Accept request task form so the Garage manager can select a vehicle for the trip.
1. Go to the Ordering a corporate vehicle business process diagram and click Edit.
2. Select the Accept request task and click Form in the element menu.
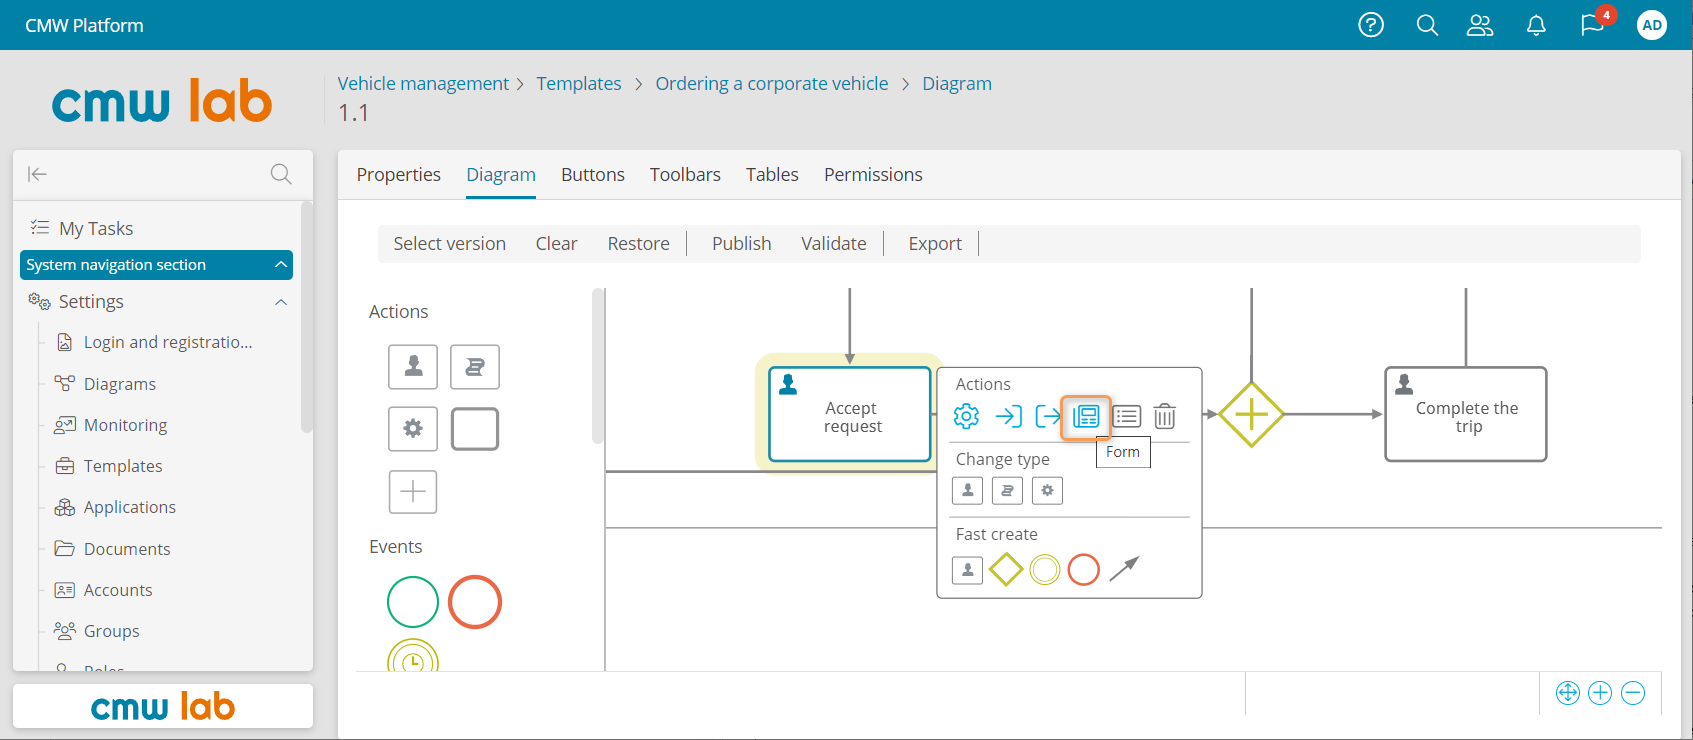
Navigating to the task form designer from the process diagram
3. Expand the Vehicle requests attribute in the element pane and drag the Vehicle attribute to the Acceptance area.
4. Set the Vehicle field Access mode to Require entry and click Save.
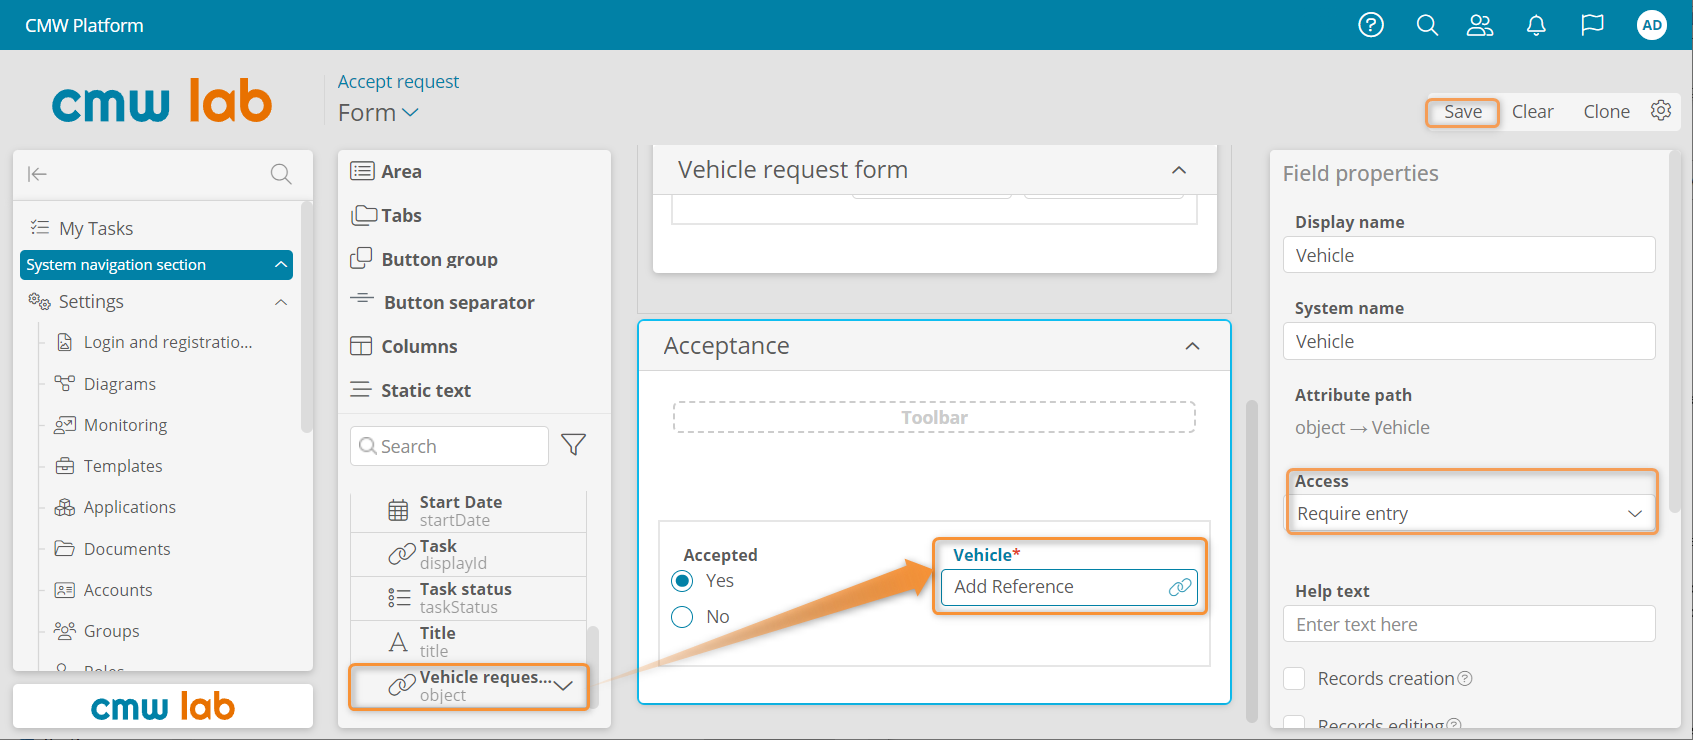
Adding the Vehicle dropdown to the Accept request task form
Enable Trip Expense Accounting and On-The-Fly Vehicle Adding
Business Requirement
When the Driver receives the Complete the trip task, they should see the license plate number of the booked vehicle.
We'll also enable them to add a new vehicle to the list and track the trip expenses.
To achieve this, let's add the Vehicle dropdown and Costs table to the Complete the trip task form.
Configure the Vehicle Field and Costs Table on the Complete the Trip Form
1. In the process diagram, select the Complete the trip task and click Form in the element menu.
2. Expand the Vehicle requests attribute in the element pane and drag the Vehicle attribute to the Complete the trip area.
3. Drag the Costs attribute to the Complete the trip area.
4. In the Costs Field properties panel, set the Appearance to Table.

Configuring and saving the Complete the trip task form
5. Expand the Costs attribute in the element pane and drag the Type and Amount attributes to the Costs table on the form.
6. Select the table toolbar. Drag the following buttons from the element pane to the toolbar: Create, Edit, and Navigate. This allows the end-users to create, edit, and view cost records from the Costs table on the form.
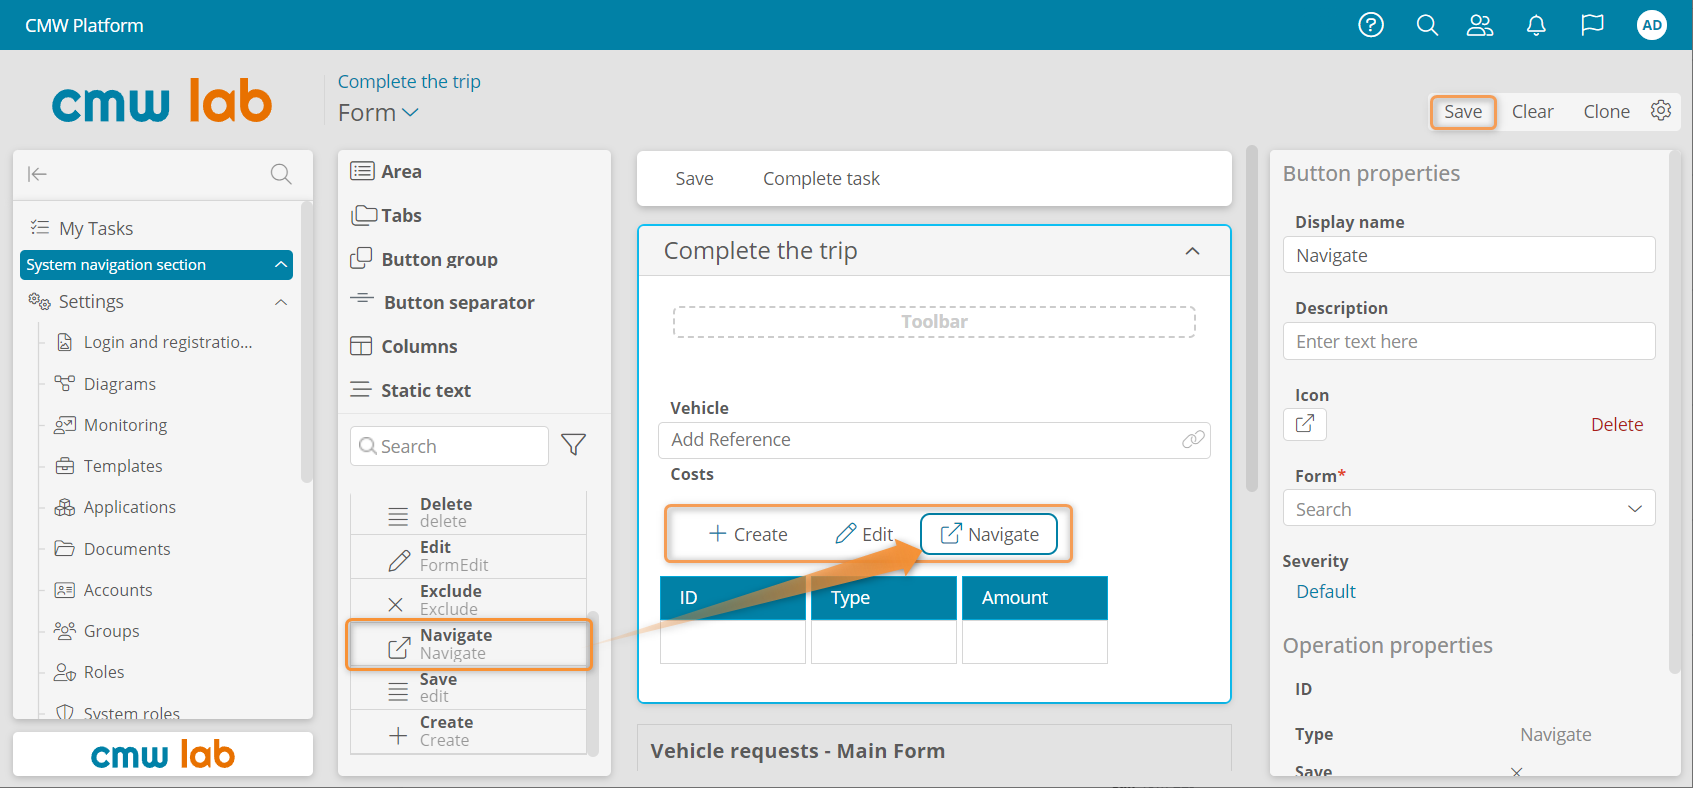
Adding buttons to the table toolbar using the form designer
Configure the Total Costs Attribute
Let's add an attribute showing the total costs incurred for a vehicle request.
1. In the Complete the trip form designer, click Add attribute next to the Vehicle requests attribute in the element pane.
2. Create a new attribute:
- Name: Total costs
- Data type: Number
- Numbers of digits after decimal point: 2

Adding the Total costs attribute to the Vehicle requests record template
3. Drag the Total costs attribute to the Complete the trip area under the Costs table.
4. Click Save.
5. Go back to the business process diagram and click Publish.
Note
Changes to the business process diagram will not take effect until the diagram is published. When publishing, you can update the current diagram version or create a new version. If you create a new diagram version, all process instances running the old version will be completed using the old version. New instances will run using the new version.
Test the Vehicle Selection and Cost Tracking
1. Go to the Ordering a corporate vehicle process template. Click Navigate to instances on the Properties tab.
2. Start a new process by clicking Create in the process instance list.
3. Fill in the fields of the start form and indicate the vehicle type. Click Create to submit the form.
4. Go to My tasks using the navigation pane on the left.
5. Open the Ordering a corporate vehicle - Approve request task and select the Approved checkbox.
6. Click Complete task.
7. Return to My tasks and open the Ordering a corporate vehicle - Accept request task.
8. Select a car from the Vehicle dropdown.
9. Select Yes in the Accepted field and click Complete task.
10. Return to My tasks and open the Ordering a corporate vehicle - Complete the trip task.
11. Click Create in the Costs table.
12. Specify the cost Type and Amount and click Save.
13. Add more entries to the Costs table.
14. Click Complete task.
Enable On-The-Fly Master Data Creation
Let's enable the Driver to add a new Vehicle record before commencing the trip.
1. Return to the business process diagram and click Edit.
2. Open the Complete the trip task form designer.
3. Select the Vehicle attribute. In the Field properties panel select the Records creation checkbox.
Note
The Records creation checkbox in the field properties enables the end-user to create records using the linked template form.
Selecting this box for the Vehicle field enables the Driver to add a new vehicle to the registry on the fly.
4. Specify the form to use when adding a vehicle — Vehicles - Main Form.
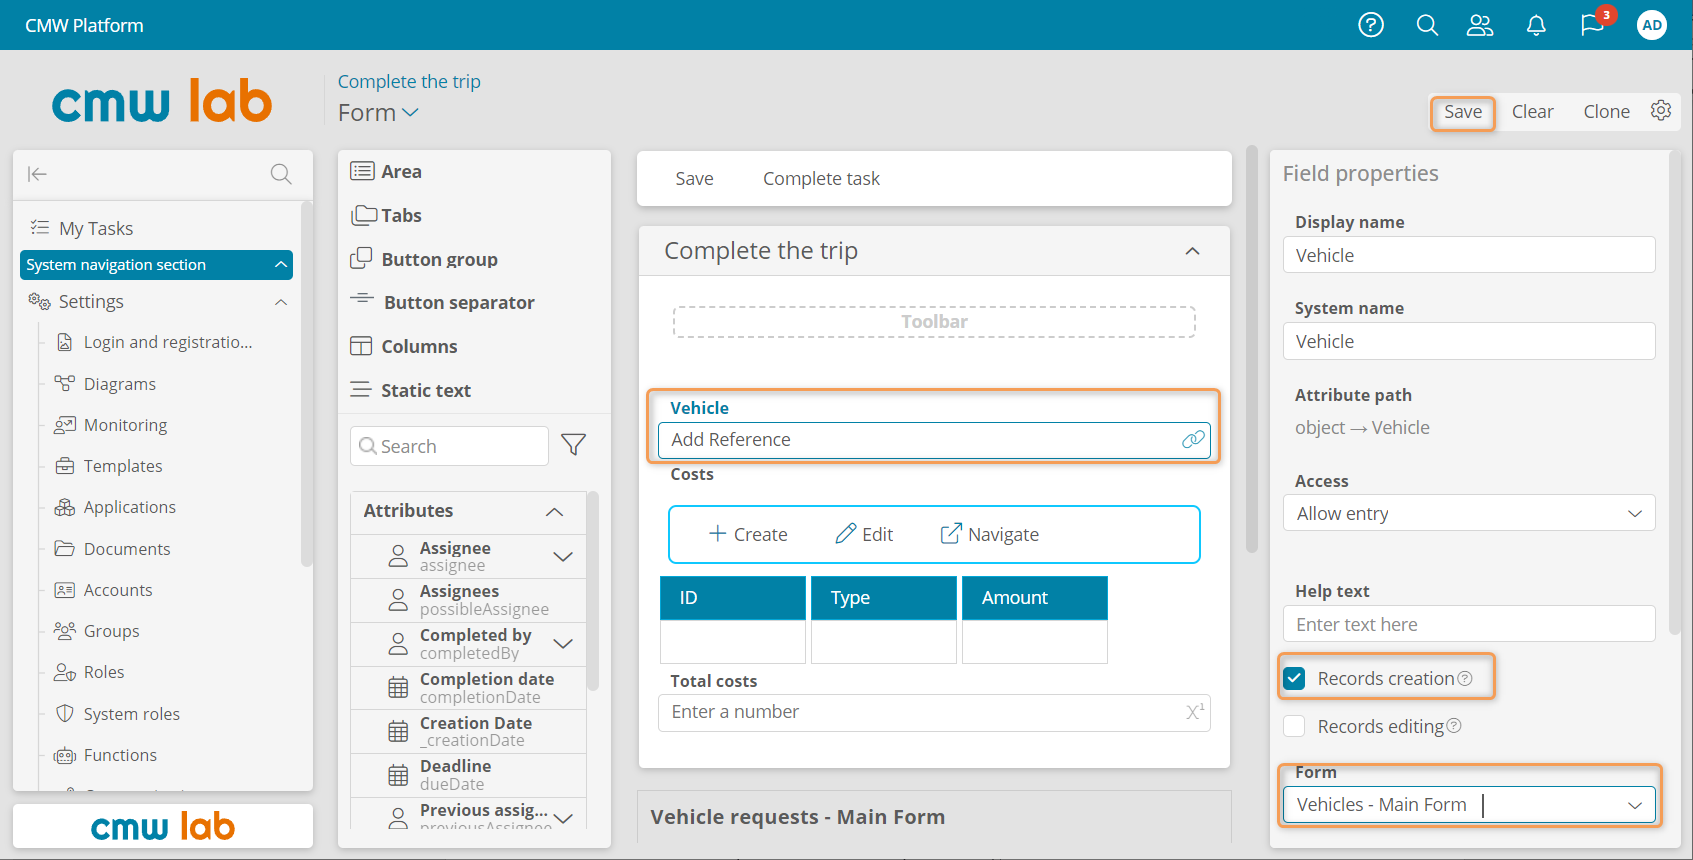
Enabling on-the-fly record creation via a record attribute on the form
5. Save the task form and publish the business process diagram.
Create a New Vehicle on the Fly
Let's test the on-the-fly new vehicle creation.
1. Start and go through the process up to the Complete the trip task.
2. Click Create in the Vehicle dropdown.
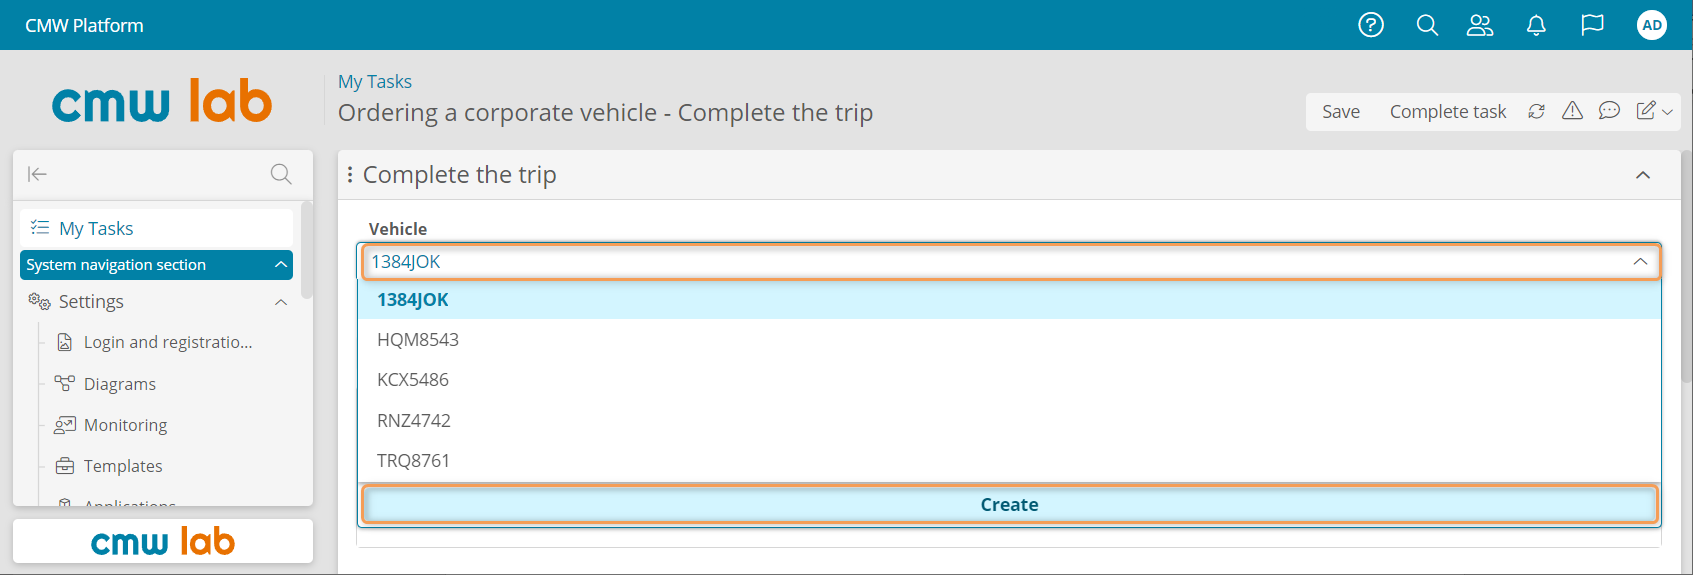
Adding a new vehicle record on the fly
3. Fill in the fields and click OK to add a new vehicle to the list.
4. Click Complete task.
Results
In this lesson, you have configured the Garage staff task forms, enabled them to select a vehicle type and create vehicle records on the fly, and tested the improved vehicle booking process.
Proceed to Lesson 7 — Automatic Calculations to configure automatic request number calculation, status, and total costs. You'll also learn how to filter vehicle records by the vehicle type.