Lesson 5 — Data Structures
Table of Contents
Introduction
In this lesson, you will learn how to use the entity relationship diagram designer to visually configure your application data model, create record templates (for reference data, master data, and transactional data), and establish relationships between them.
Estimated time to complete: 30 min
Prerequisite: complete Lesson 2 — My First Data Registry
Note: This lesson is for the CMW Platform version 4.2.571.0. In other versions, the page and menu appearance may differ from the screenshots.
Definitions
Entity Relationship Diagram — Application Data Model
In the CMW Platform, the application data model is visualized and designed using the entity relationship (ER) diagram. It shows the record templates (data registries), attributes, and their relationships with each other.
The data model diagram designer allows you to create and configure new record templates and attributes. This way, you can customize your business application while viewing its model as a whole.
Create an ER Diagram
1. In the navigation pane on the left, select Diagrams. A list of diagrams of all applications appears.
Note
By default, the diagram list contains class diagrams and business process diagrams. A class diagram is generated automatically for each application. A process diagram is generated for each process template.
2. Click Create to add a new diagram.
3. In the New diagram window, configure the diagram:
- Name: Data model - Vehicle management
- Type: Data model diagram
- Application: Vehicle management
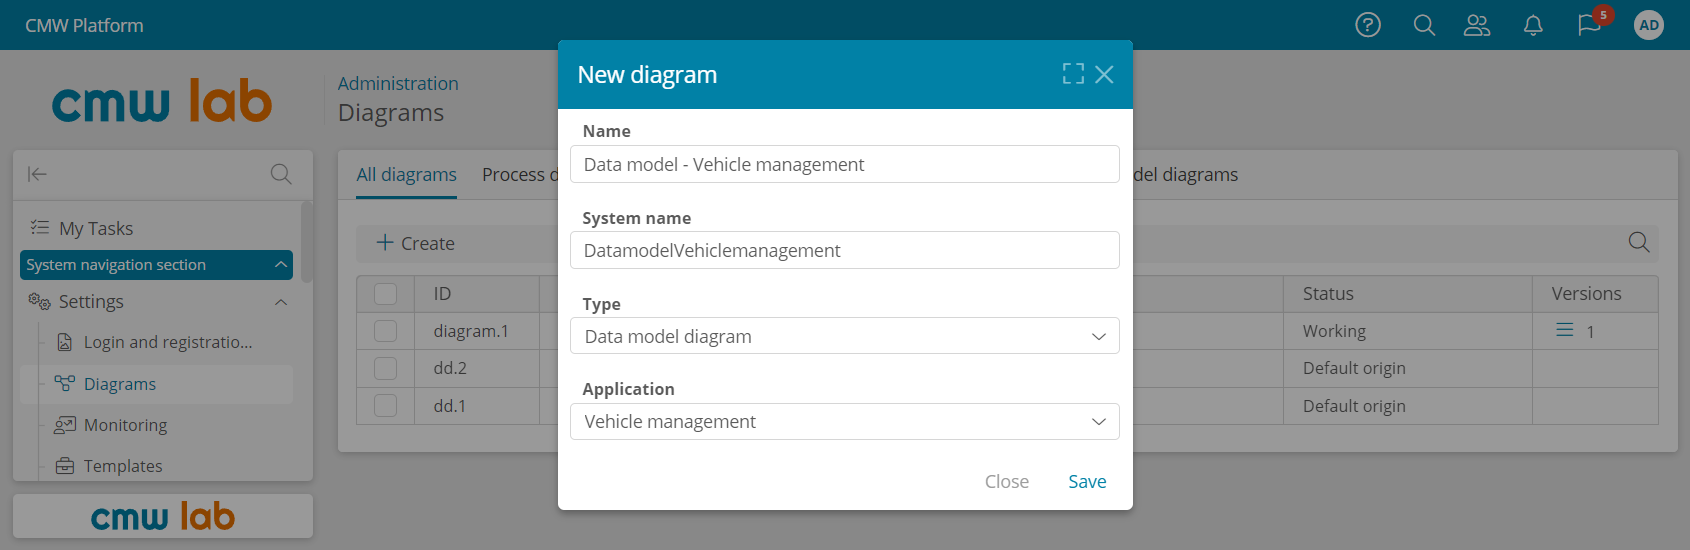
Creating a new data model diagram
4. Click Save. The data model diagram designer appears.
Data Model Diagram Designer
The data model diagram designer consists of the following areas:
- Element pane — contains the templates and elements you can add to the diagram.
- Diagram — drag and drop the elements to the diagram from the element pane.
- Toolbar
- Select version — load an earlier saved version of the diagram.
- Create new version — save the current diagram as a new version.
- Clone — create a new diagram by copying the current one.
- Settings — rename the diagram.
- Refresh data — pull the up-to-date application data model to the diagram.
- Export — export the diagram in SVG format.
- Show system names — show system names instead of display names for templates and attributes in the diagram.
- Clean — remove all elements from the diagram.
The diagram changes are saved automatically to the current diagram version.
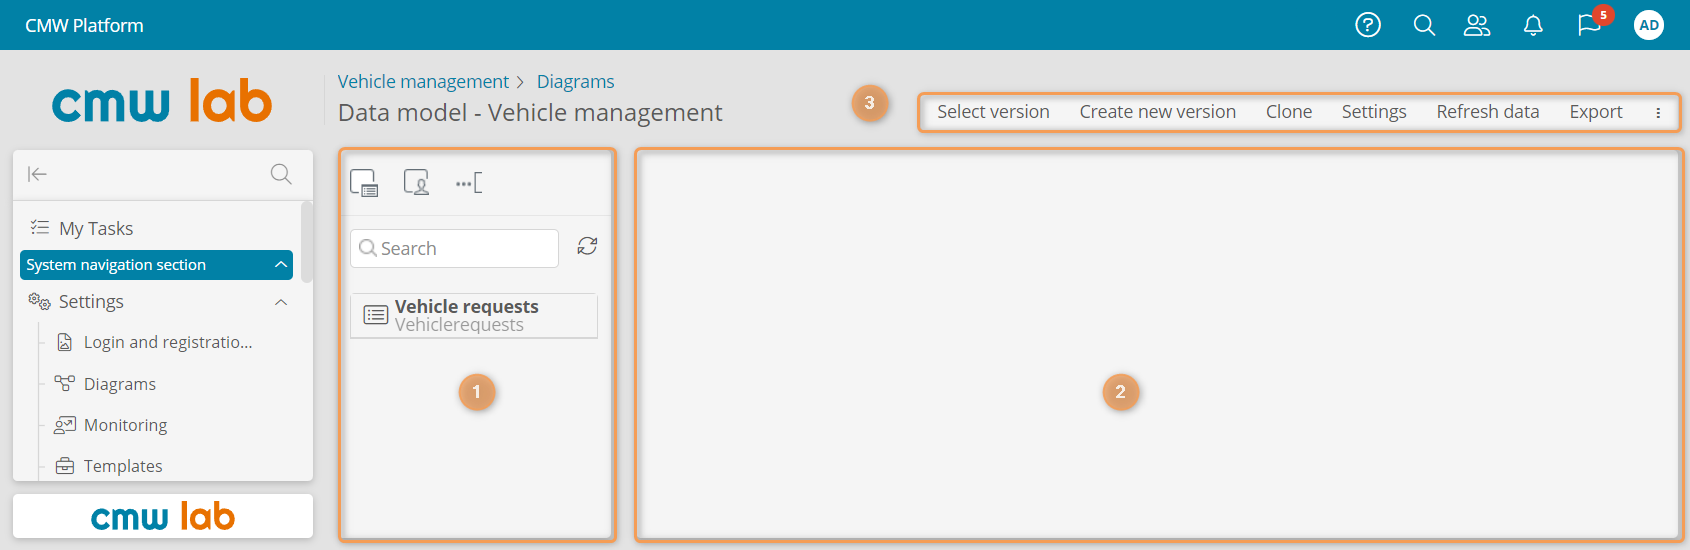
Diagram designer
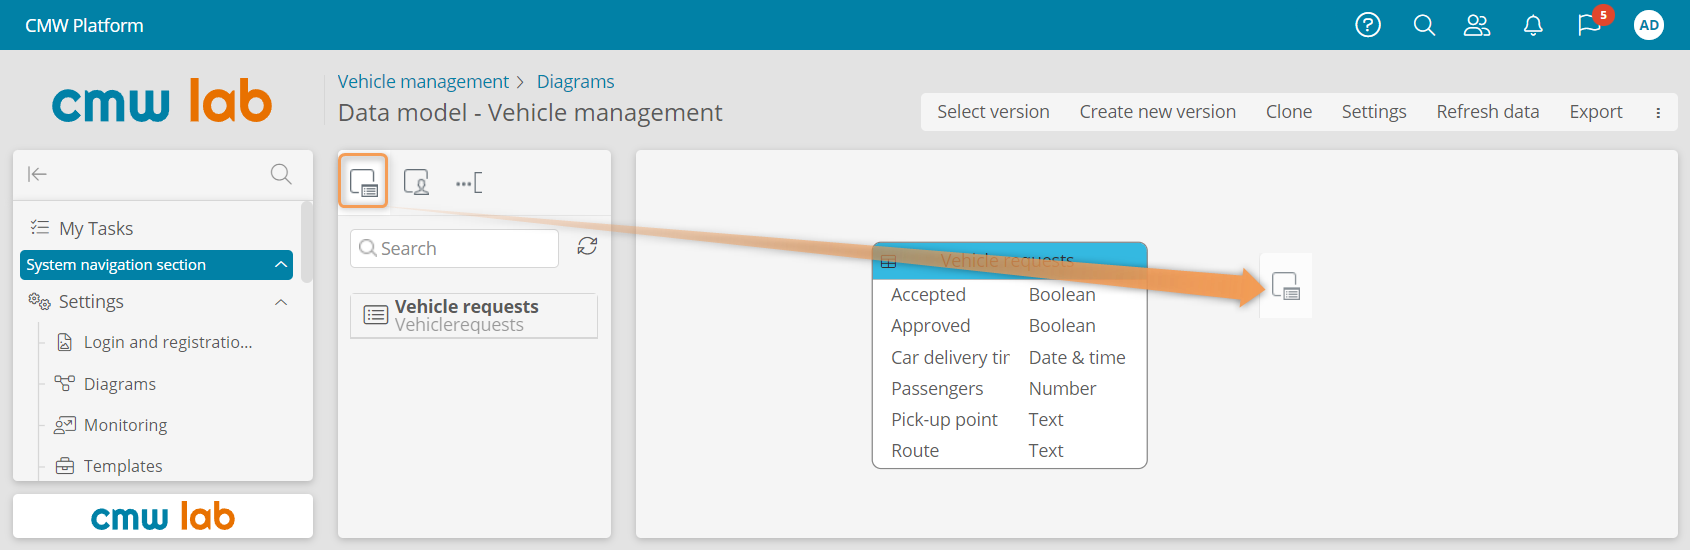
5. Drag and drop the Vehicle requests record template from the element pane to the diagram.
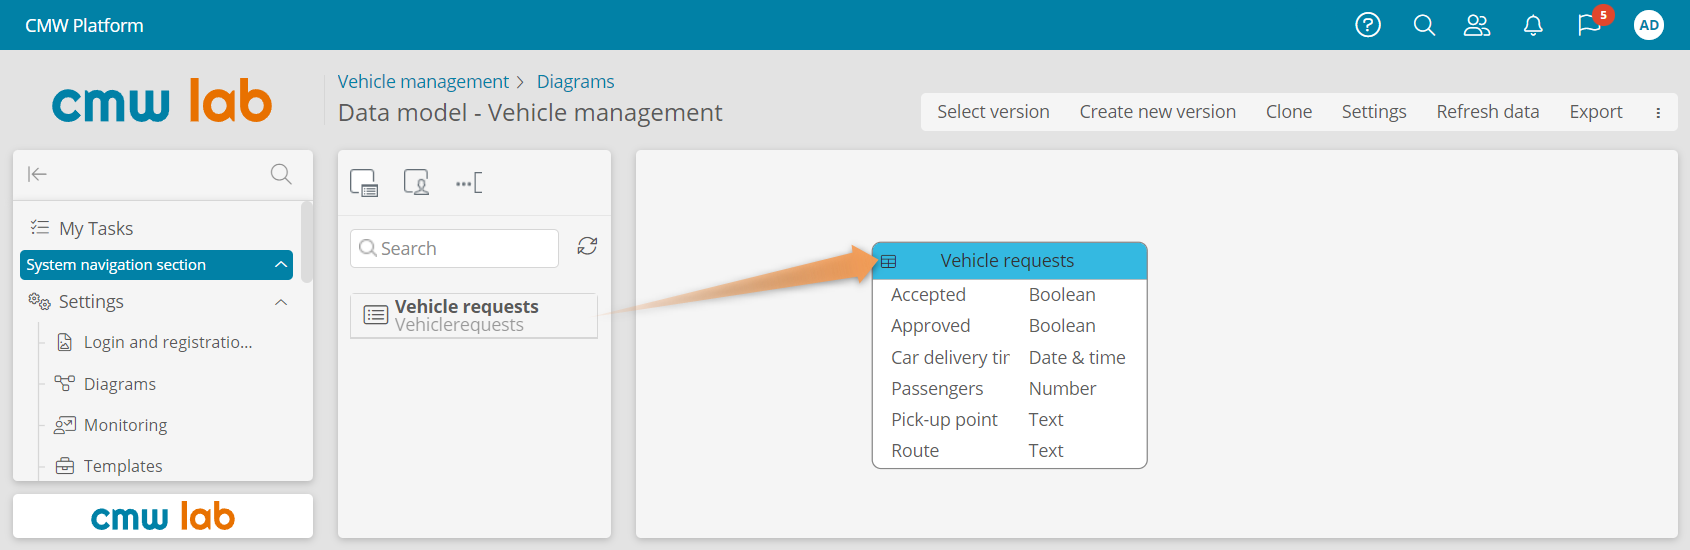
Adding a record template to the data model diagram
Configure a Reference Data Registry
Business Requirement
We need a registry of vehicle types so that the Initiator can specify the requested car type.
First, we will create the Vehicle types record template to store the reference data. Then, we will configure a form and a table for the vehicle type records. Finally, we will fill in the vehicle types.
We will use the data model diagram designer to create and configure the record template.
Create the Record Template — Vehicle Types
1. Drag the New record type from the element pane to the diagram.
Adding a new record template using the data model diagram designer
2. In the New template window, enter the template Name — Vehicle types, and click Create.
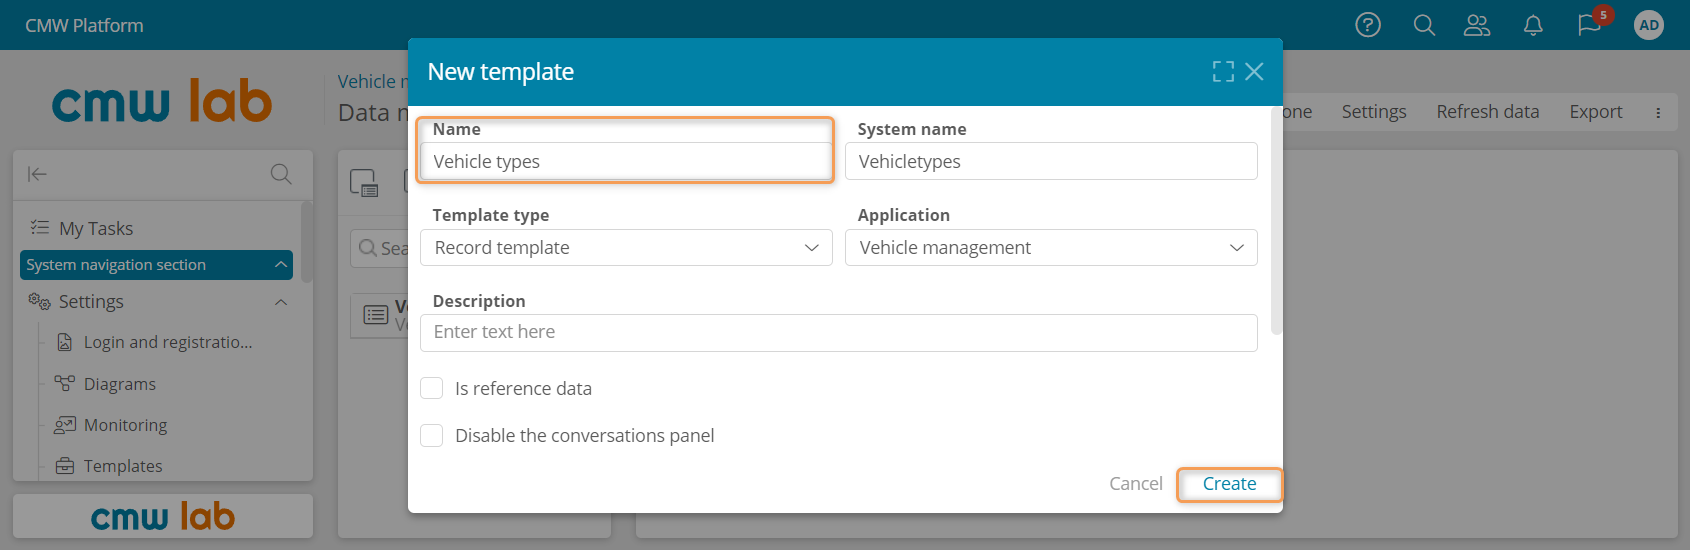
Configuring a new record template
Set a Text Attribute as a Record Title
Business Requirement
By default, the record title is an ID. So, when selecting a vehicle type, users see its ID, which is not informative. We will allow the users to specify the vehicle type by name. For this, we will create a text attribute in the Vehicle types record template and set it as a record title. You should select a record title attribute in each template to improve the end-user experience.
Record-Title Attribute
A template record has a title displayed in the forms and tables. By default, it shows the record ID — a system alphanumeric identifier.
To show a relevant record title, use an attribute value: select the Use as a record title checkbox in the attribute properties.
You can use the following attribute types as the record title: Account, Date & time, Duration, Text, and Number.
You can only use one attribute as the record title for a template.
1. Select the Vehicle types record template in the diagram.
2. In the element menu, click Add new attribute.
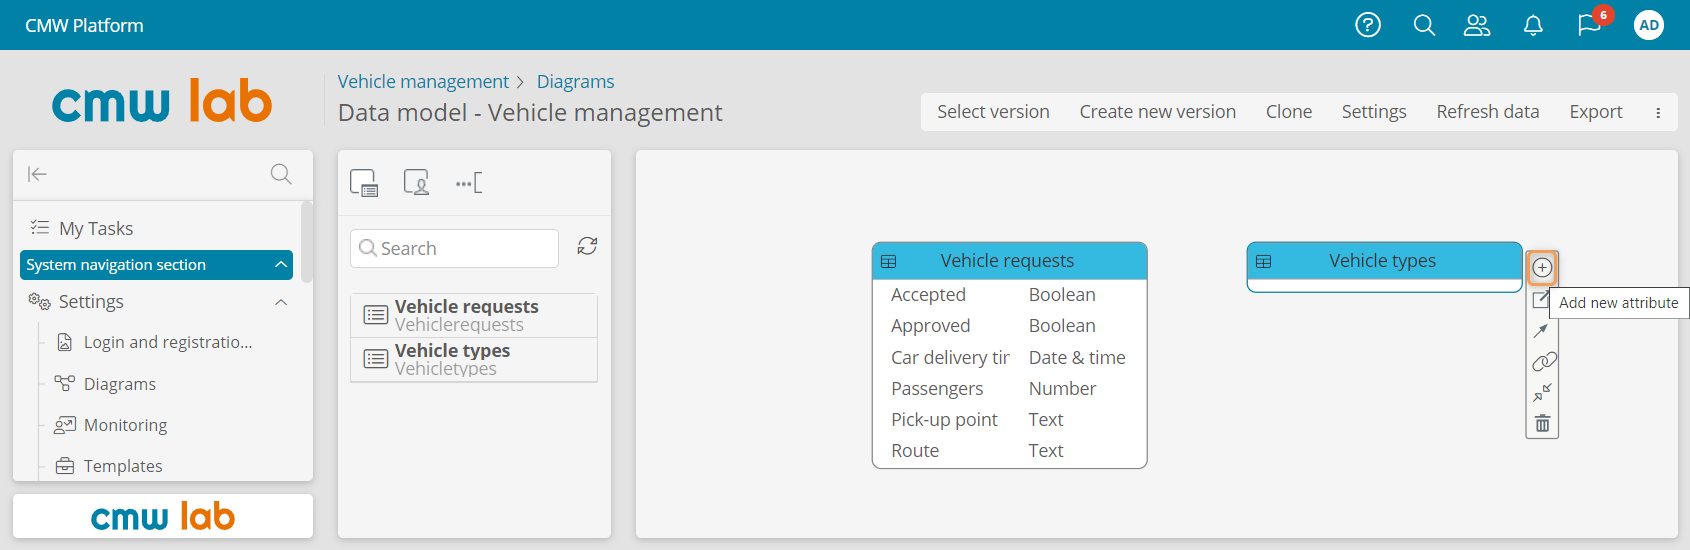
Adding a new attribute using the data model diagram designer
2. In the New attribute window, specify the attribute Data type — Text and Name — Title.
3. Select Use as a record title.
4. Click Save.
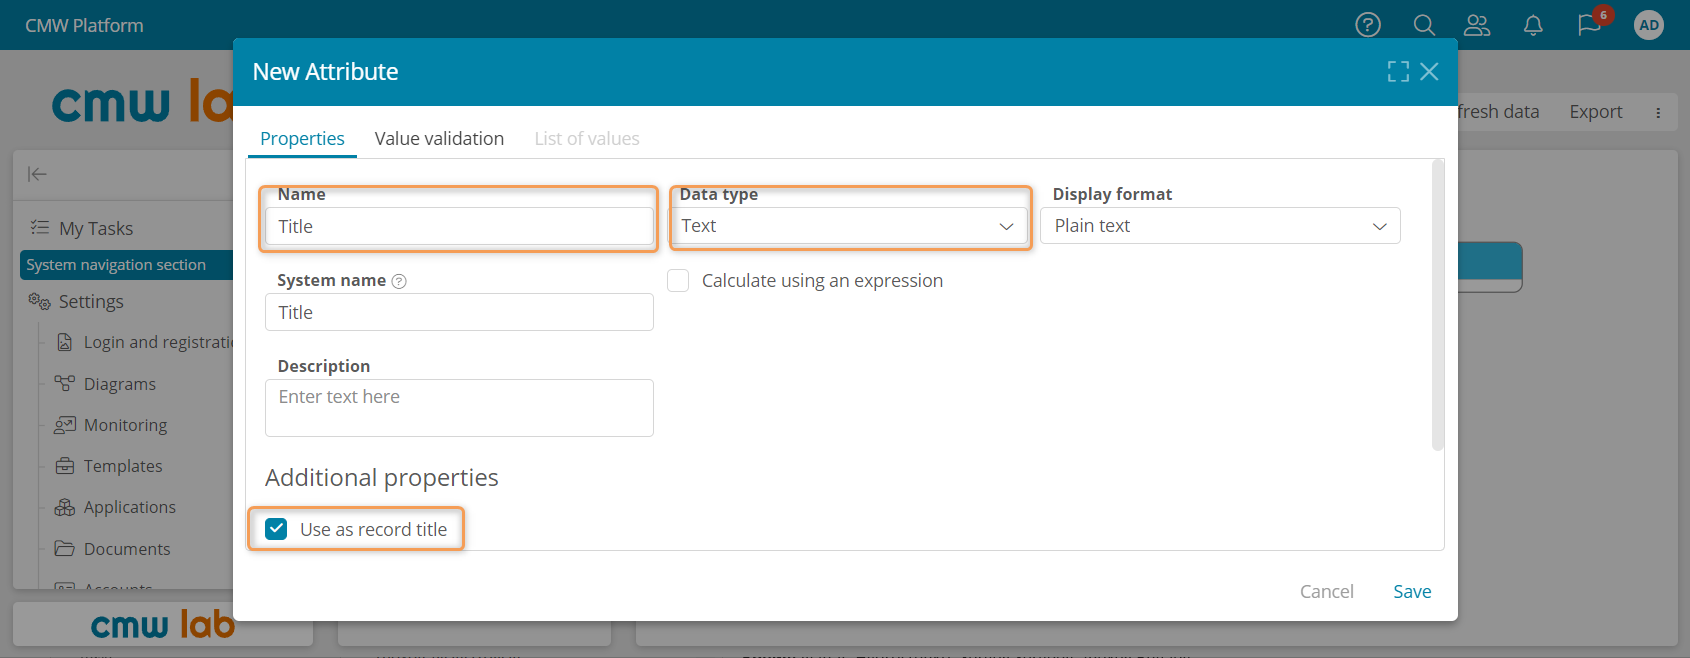
Configuring a new attribute used as a record title
Configure the Vehicle Type Form
Let's configure a form to fill out the Vehicle types records.
1. Select the Vehicle types record template in the diagram. In the element menu, click Go to template — Forms.
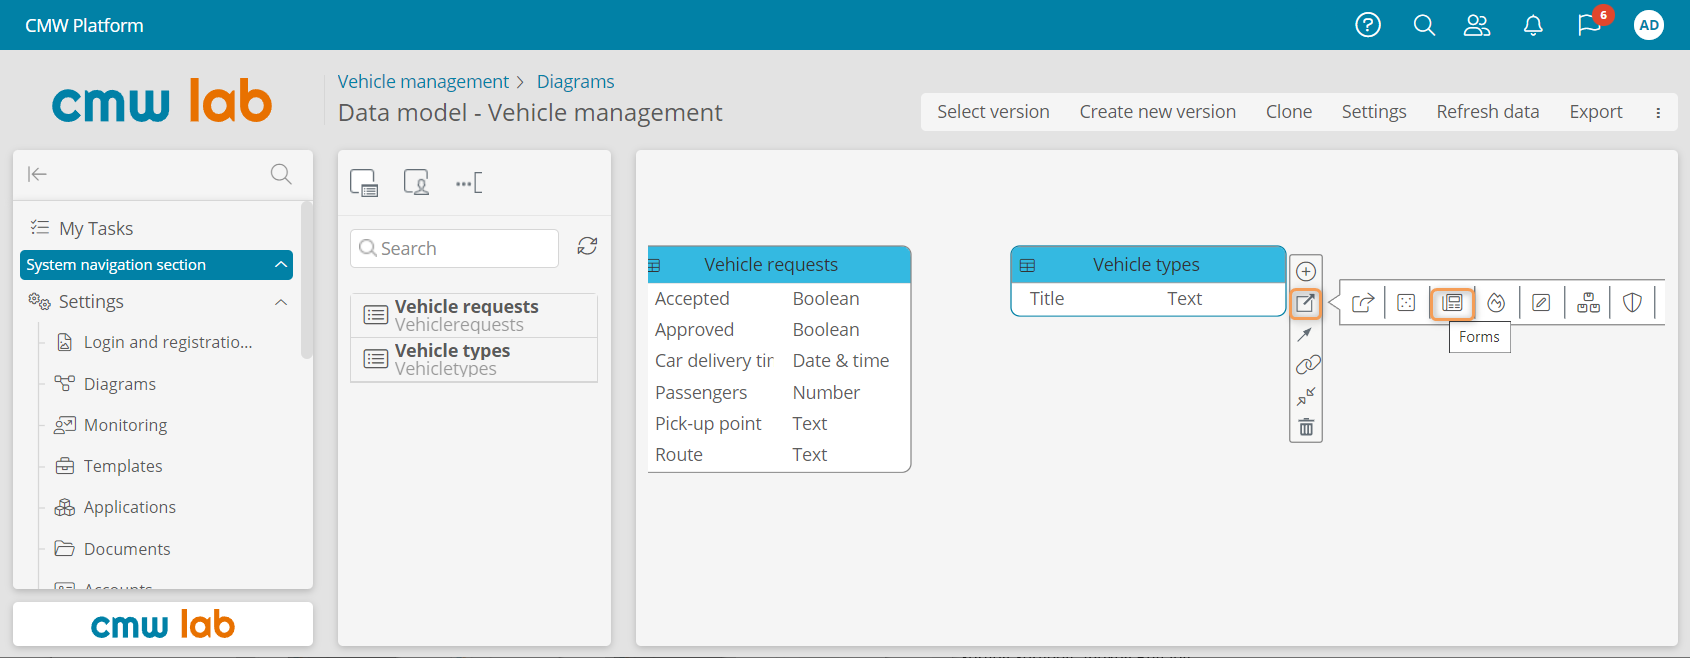
Navigating to the template form list from the data model diagram
2. In the displayed form list, double-click Vehicle types - Main Form form to open it.
3. Rename the default area to Vehicle type.
4. Drag the Title attribute from the element pane to the Vehicle type area.
5. Click Save.
6. Click Configure template .
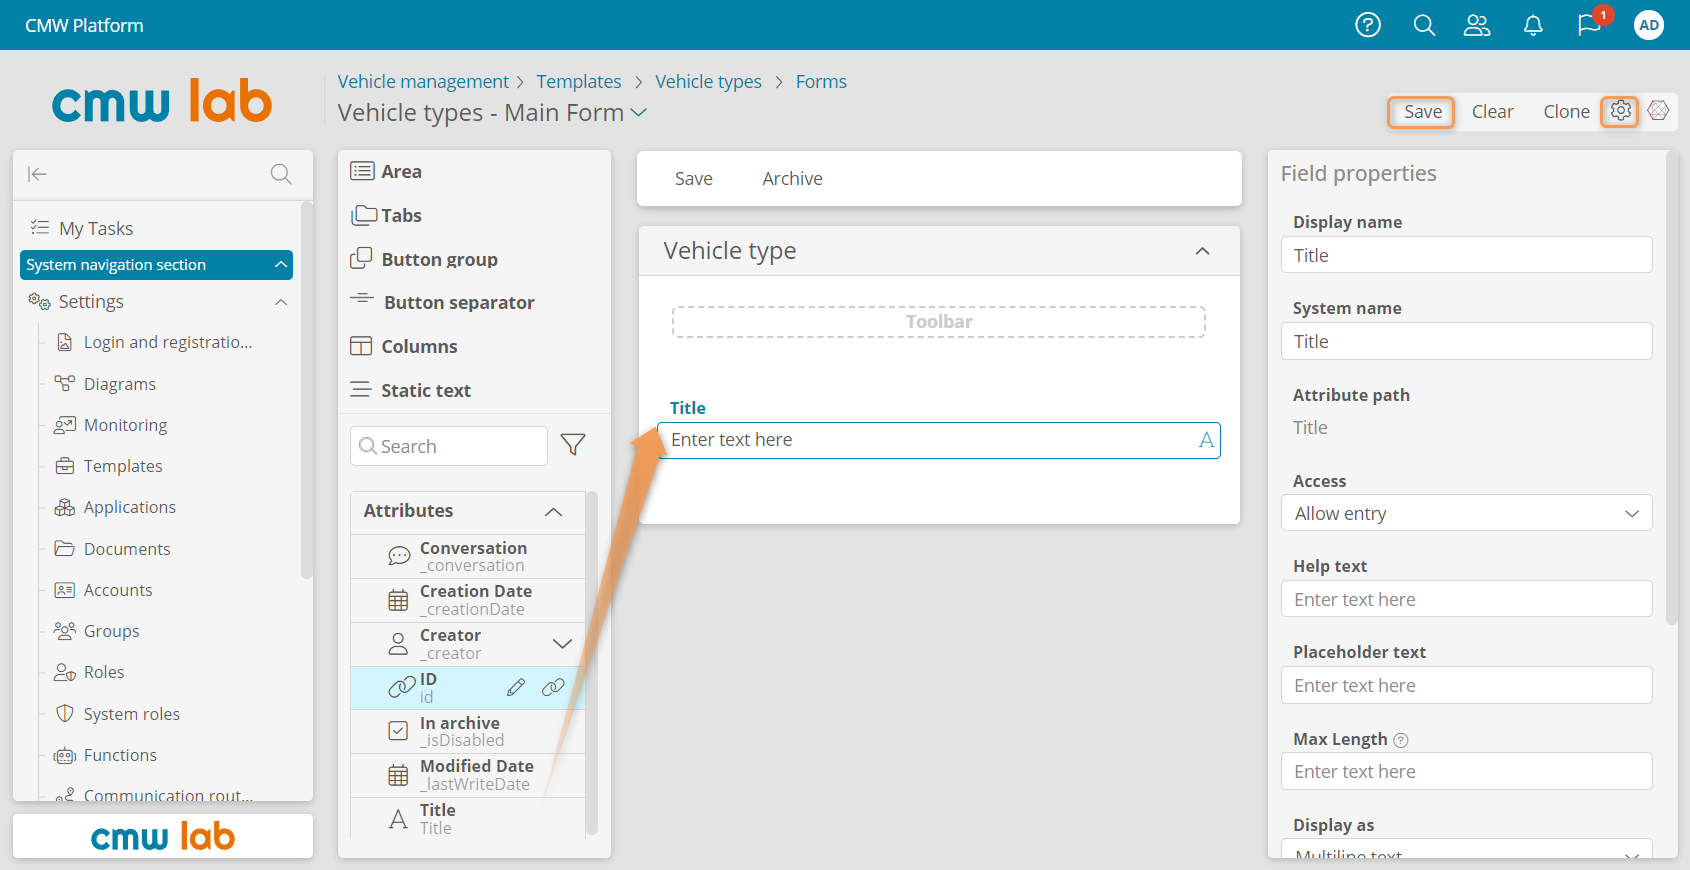
Configuring and saving the form
Configure the Vehicle Types Table
Let's configure a table to list the vehicle types.
1. In the Vehicle types template, go to the Tables tab.
2. Double-click the All records table to open the table designer.
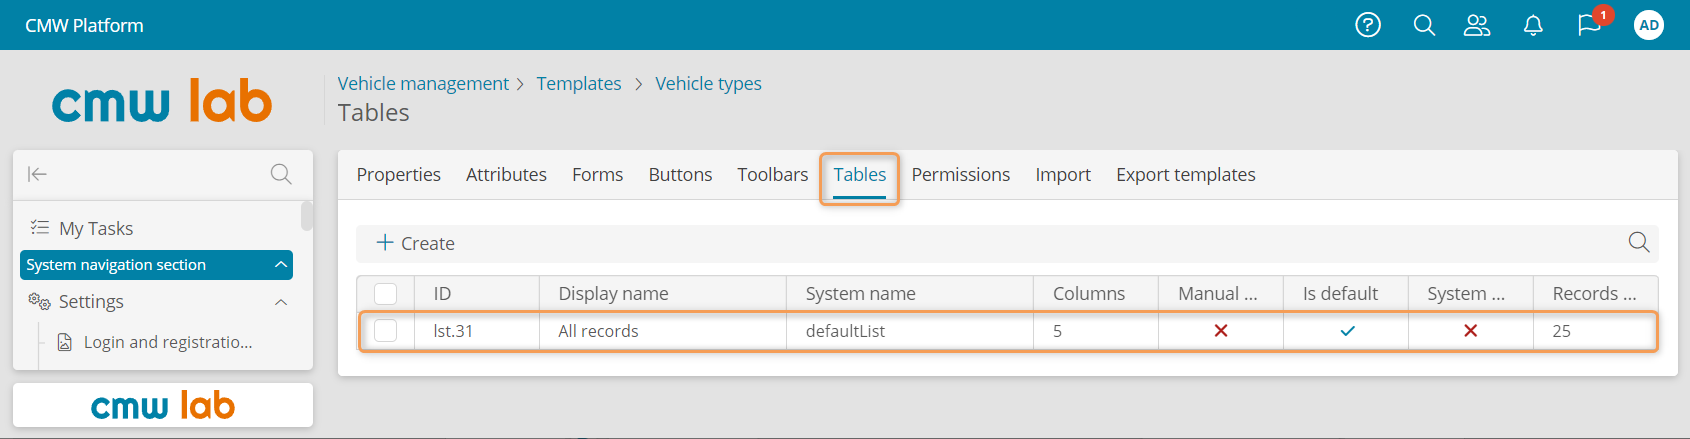
Opening the table designer from the template table list
3. In the table designer, click Clear to remove all table columns. Confirm the cleanup.
4. Drag the Title attribute to the table layout.
5. Click Save.
6. Click the Vehicle types link above the table designer to go to the record template properties.
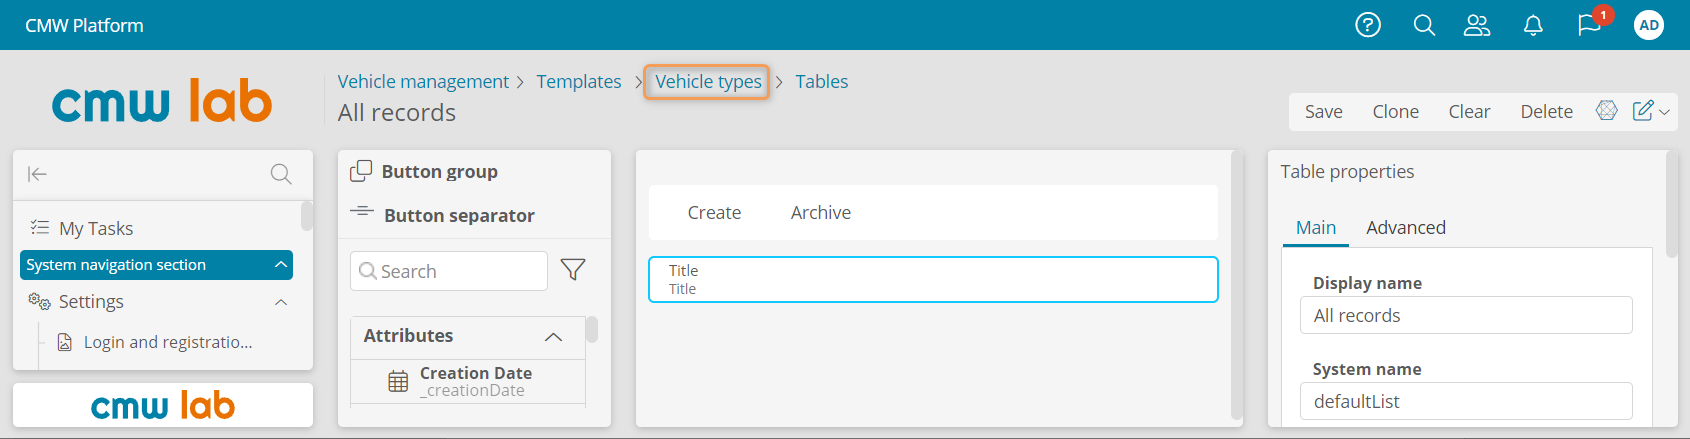
Navigating to the record template properties from the table designer
7. On the Properties tab, click Navigate to instances.
8. Click Create to add a new record.
9. In the Title field, enter Car and click Save.

Creating a new record
10. Click the Vehicle types link above the form to return to the record list.
11. Likewise, create two more vehicle types — Limo and Bus.
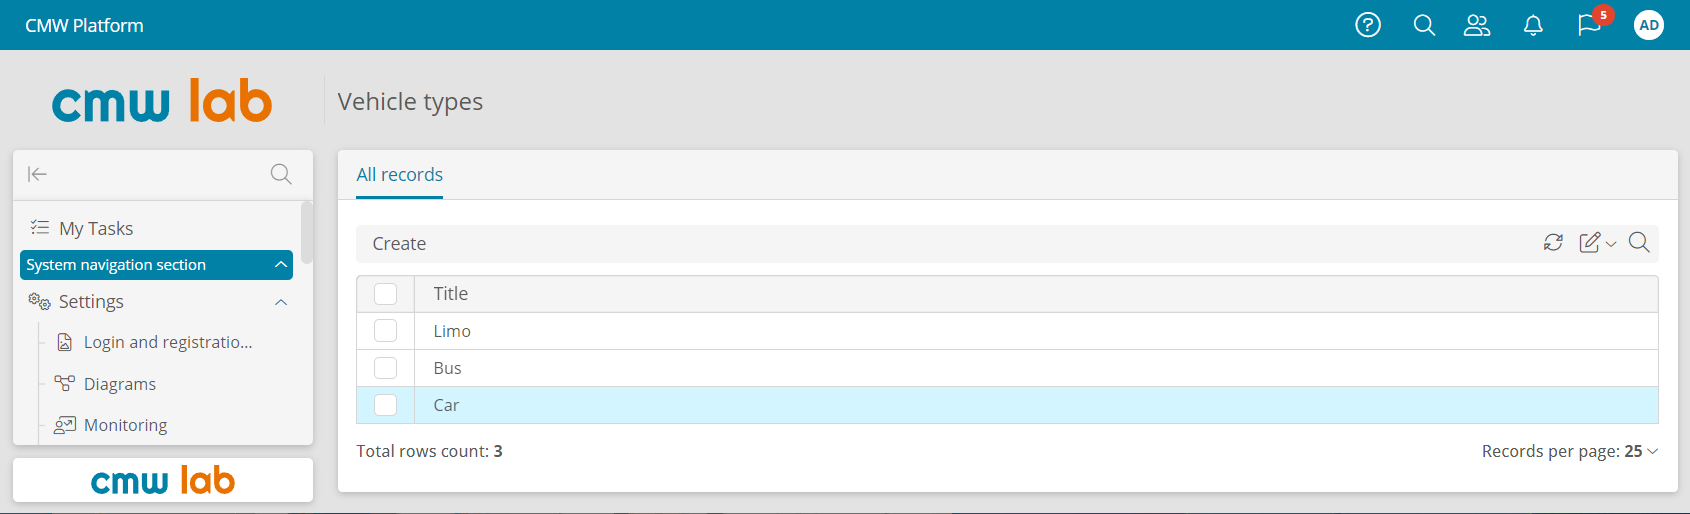
Vehicle types records
Create an Attribute Linking Two Record Templates
Business Requirement
We need to add the Vehicle type field to the vehicle request form, where the Initiator will select a record from the Vehicle types record template.
For this, we will link the Vehicle requests and Vehicle types templates using a record attribute.
Record Attribute
A record attribute links two record templates using a many-to-one, one-to-one, or many-to-many relationship.
When configuring a record attribute, you always specify a linked template.
1. Return to the data model diagram, select the Vehicle requests record template, and click Add new attribute in the element menu.
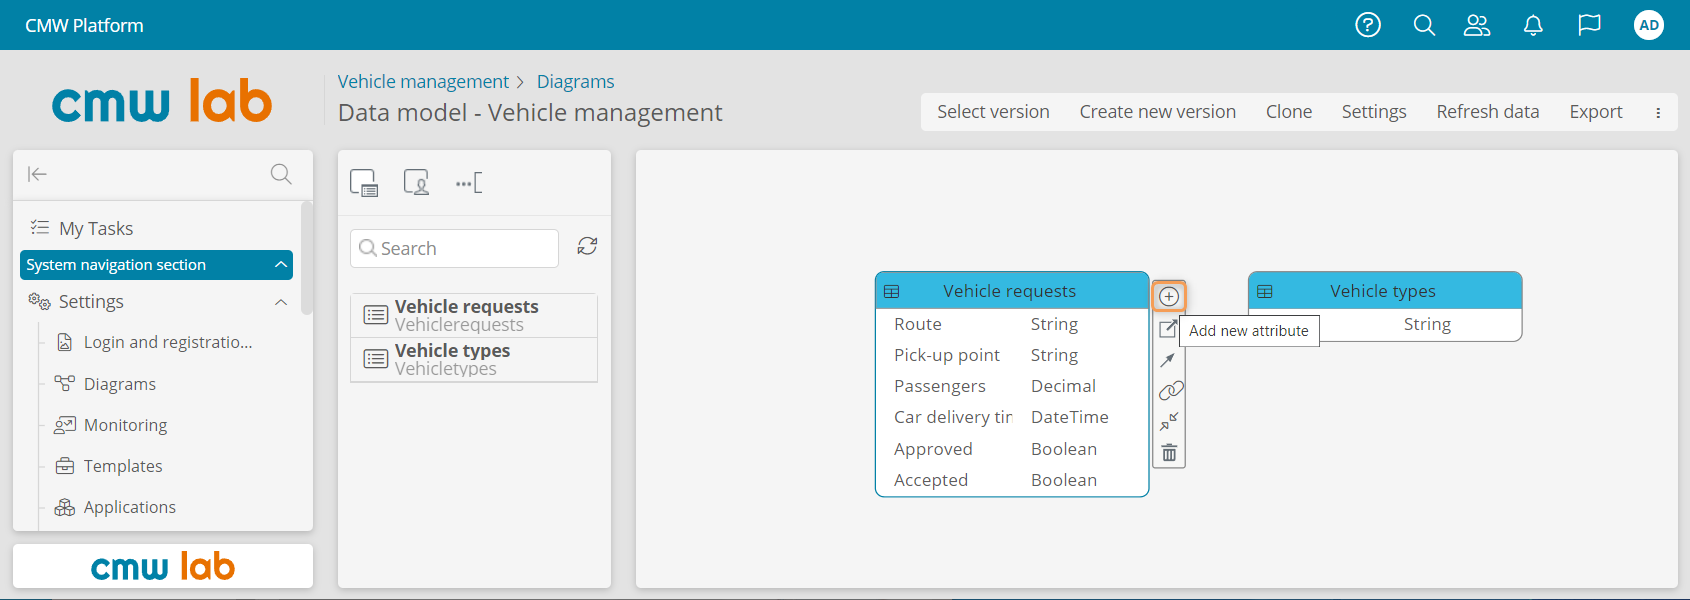
Adding a new attribute using the data model diagram
2. In the New Attribute window, specify the attribute data type — Record, and name — Vehicle type.
3. Select the linked template — Vehicle types.
4. Click Save.
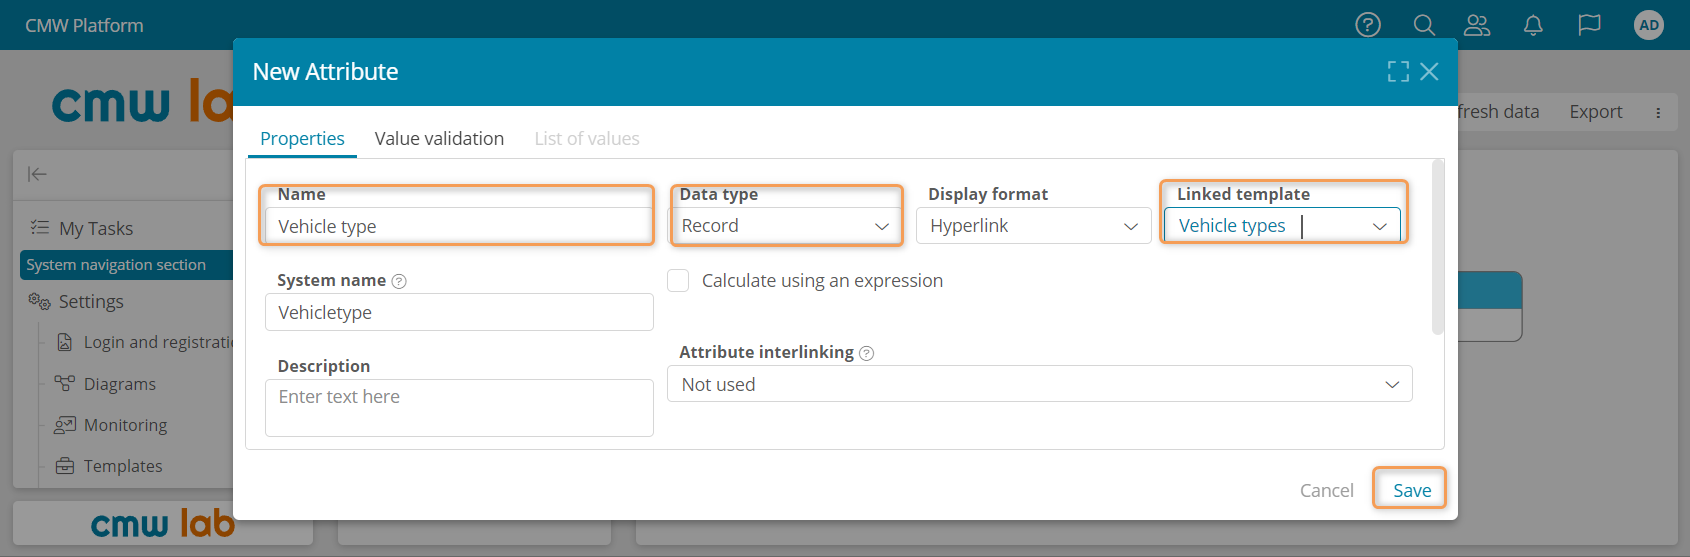
Configuring a new record attribute
5. The data model diagram shows the relationship between the record templates as a line.
Relationship Lines on the Data Model Diagram
For the templates we linked, the relationship line shows that a vehicle request can only refer to one vehicle type — the ![]() symbol, and several requests can refer to a vehicle type — the
symbol, and several requests can refer to a vehicle type — the ![]() symbol.
symbol.
Note
If a template relationship line does not appear automatically, select any template and click Show linked items in the element menu.
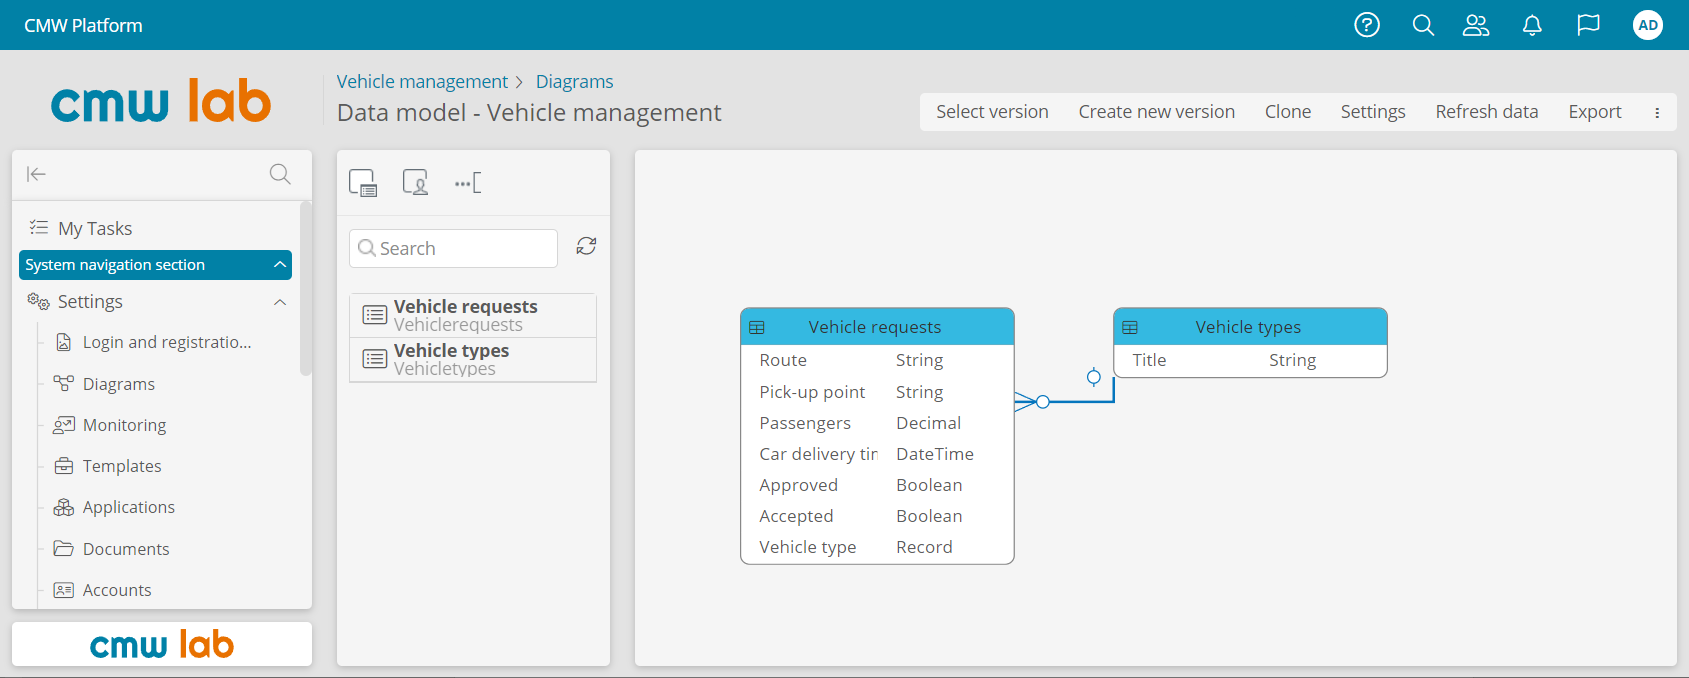
Record template relationship in the data model diagram
Configure a Master Data Registry
Business Requirement
Garage staff need to keep vehicle records and see the available vehicles.
To achieve this, we will create a record template to store the master data of each vehicle.
Master Data
Master data refers to data about business entities that provide context for business transactions, such as vehicles, customers, or product models.
Configure the Record Template — Vehicles
1. Drag the New record type to the data model diagram to create the new record template — Vehicles.
2. Select the newly added record template and click Go to template — Attributes in the element menu.
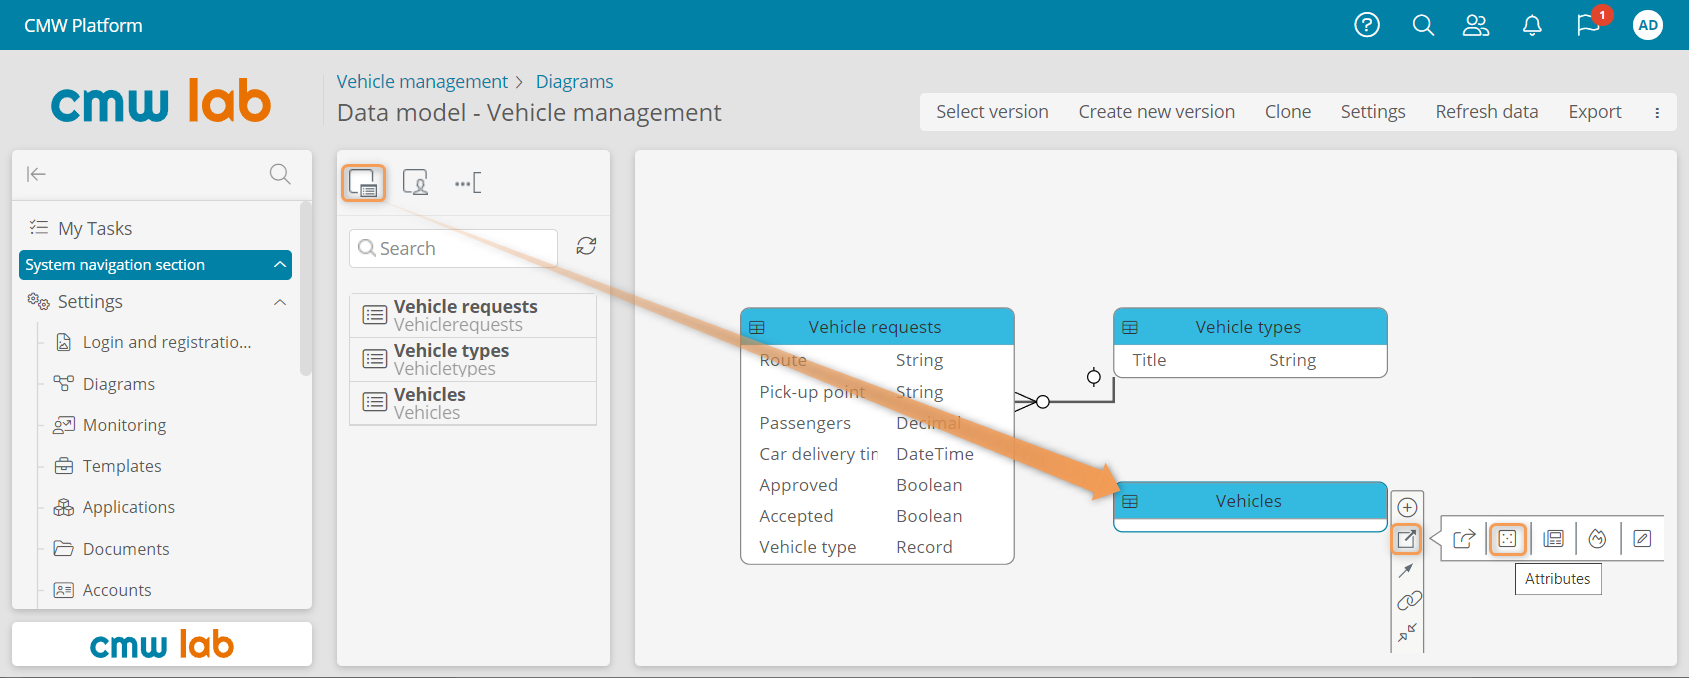
Navigating to the record template attribute list from the data model diagram
3. Add three text attributes: Brand, Model, and Registration number.
4. For the Registration number attribute, select the Custom mask display format and enter the following regular expression: [A-Z0-9]{6,7} (where [A-Z0-9] defines the allowed range of letters and numbers, and {6,7} defines the allowed number of characters). Select the Use as record title checkbox.
5. Create a record attribute — Type. For the linked template, select Vehicle types.
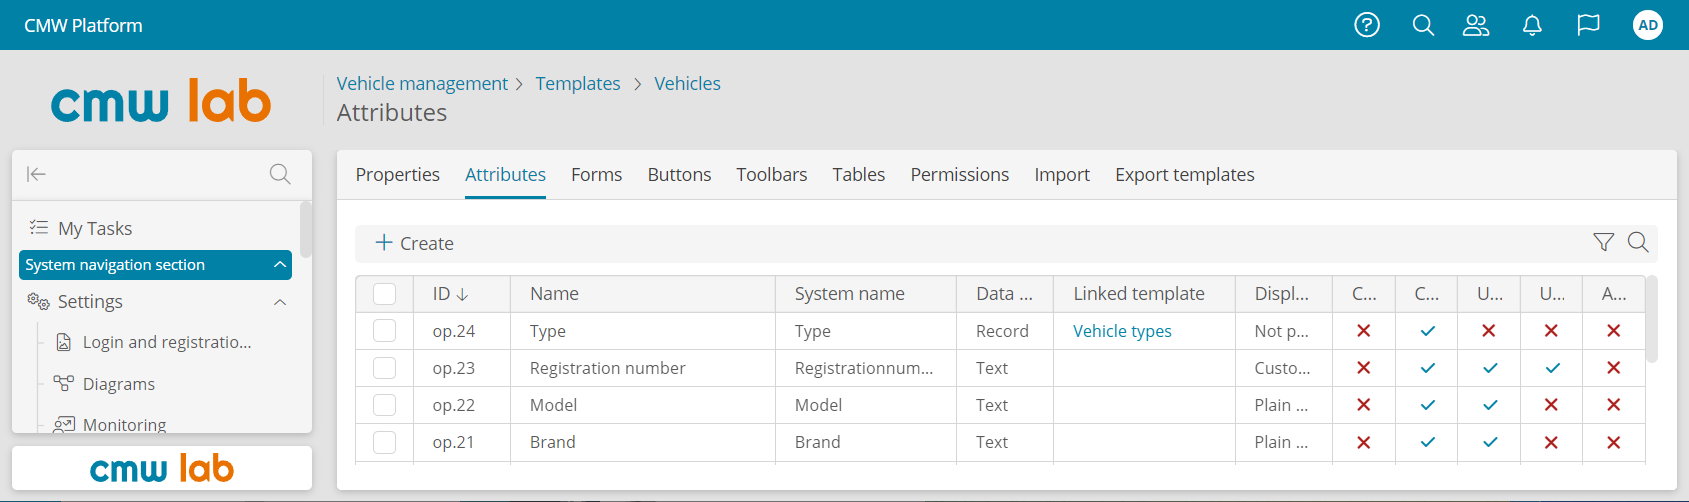
The attribute list of the Vehicles record template
Configure the Vehicle Form
1. On the Forms tab, open the Vehicles - Main Form.
2. Rename the default area to Vehicle.
3. Drag the newly created attributes from the element pane to the Vehicle area.
4. Click Save.
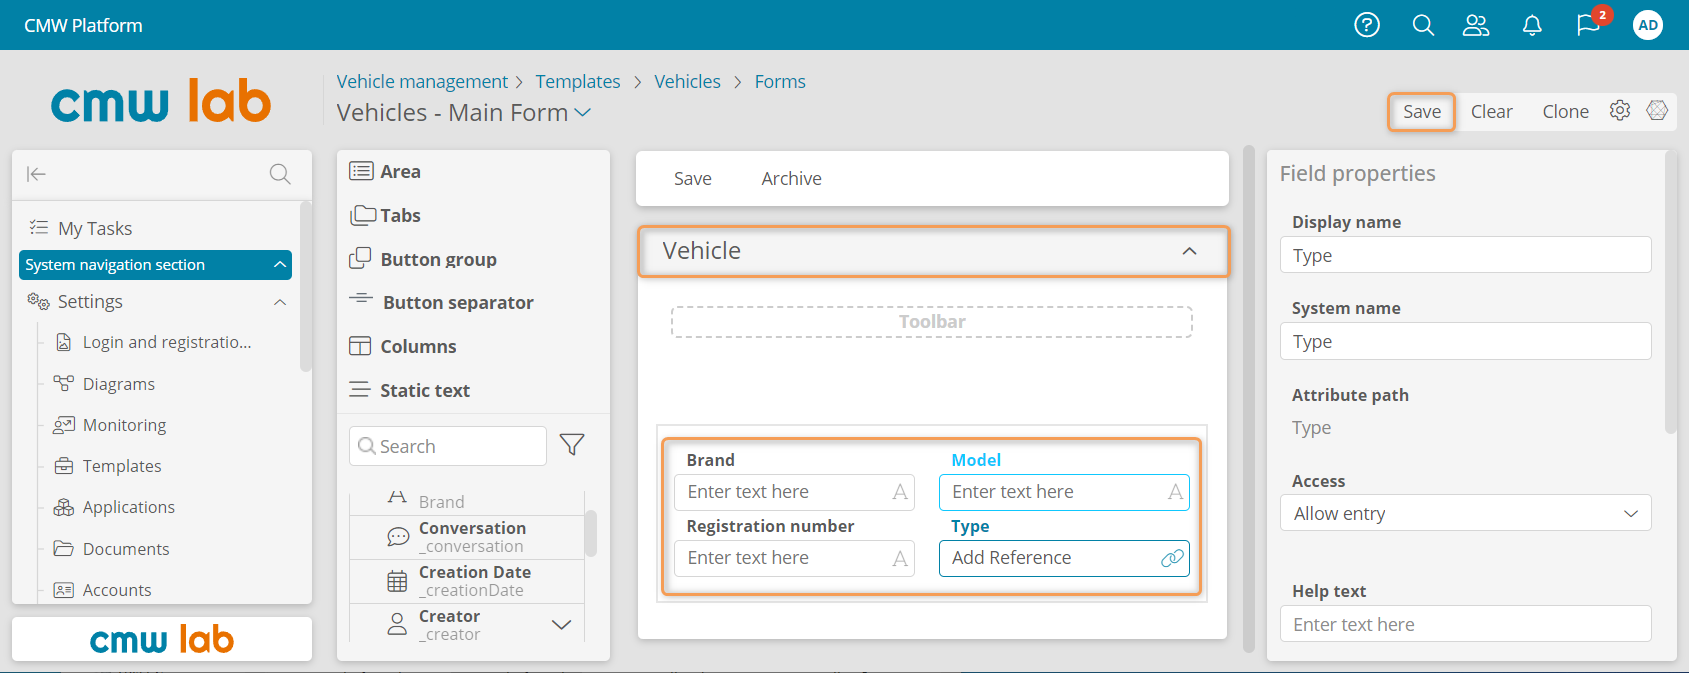
Setting up the form for the "Vehicles" record template
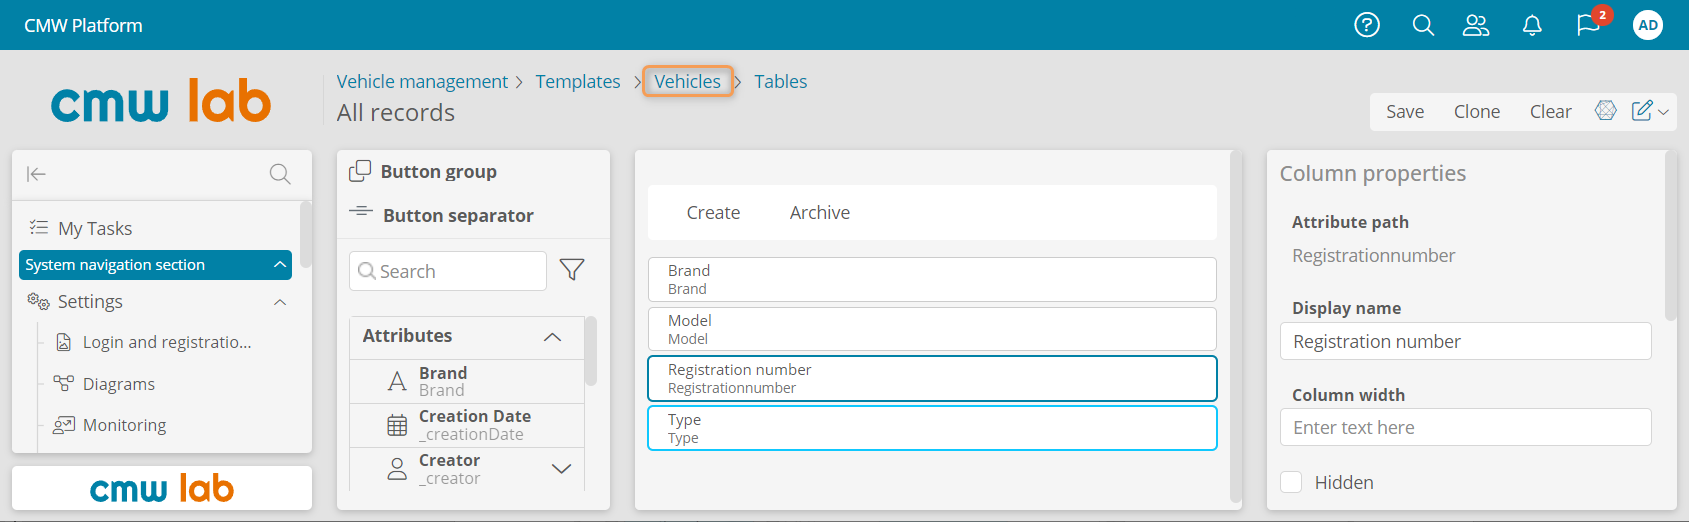
Configure the Vehicles Table
Let's configure the table to show all the relevant vehicle attributes.
1. Click Configure template and go to the Tables tab.
2. Double-click the All records table to open the table designer.
3. In the table designer, click Clear to remove all table columns. Confirm the cleanup.
4. Drag the Brand, Model, Registration number, and Type attributes to the table layout.
5. Click Save.
6. Click the Vehicle link above the designer to go to the record template properties.
Navigating to the record template properties from the table designer
Test the Reference Data and Master Data Registries
Create the Vehicle Records
Let's test the created reference data and master data registries.
1. Go to the Properties tab of the Vehicles record template and click Navigate to instances.
2. Click Create.
3. Fill out the form. In the Type field, specify the vehicle type.
4. Click Save.
5. click the Vehicles link above the form to return to the record list.
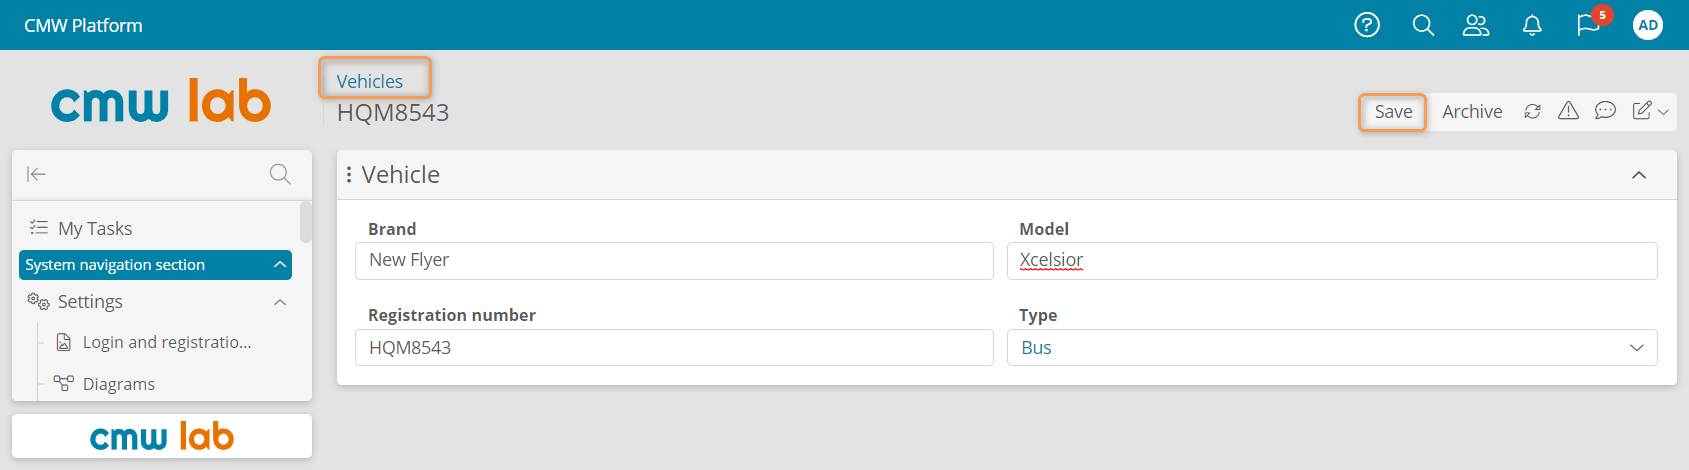
Creating a new record in the Vehicles record template
6. Create a few more records with different vehicle types.
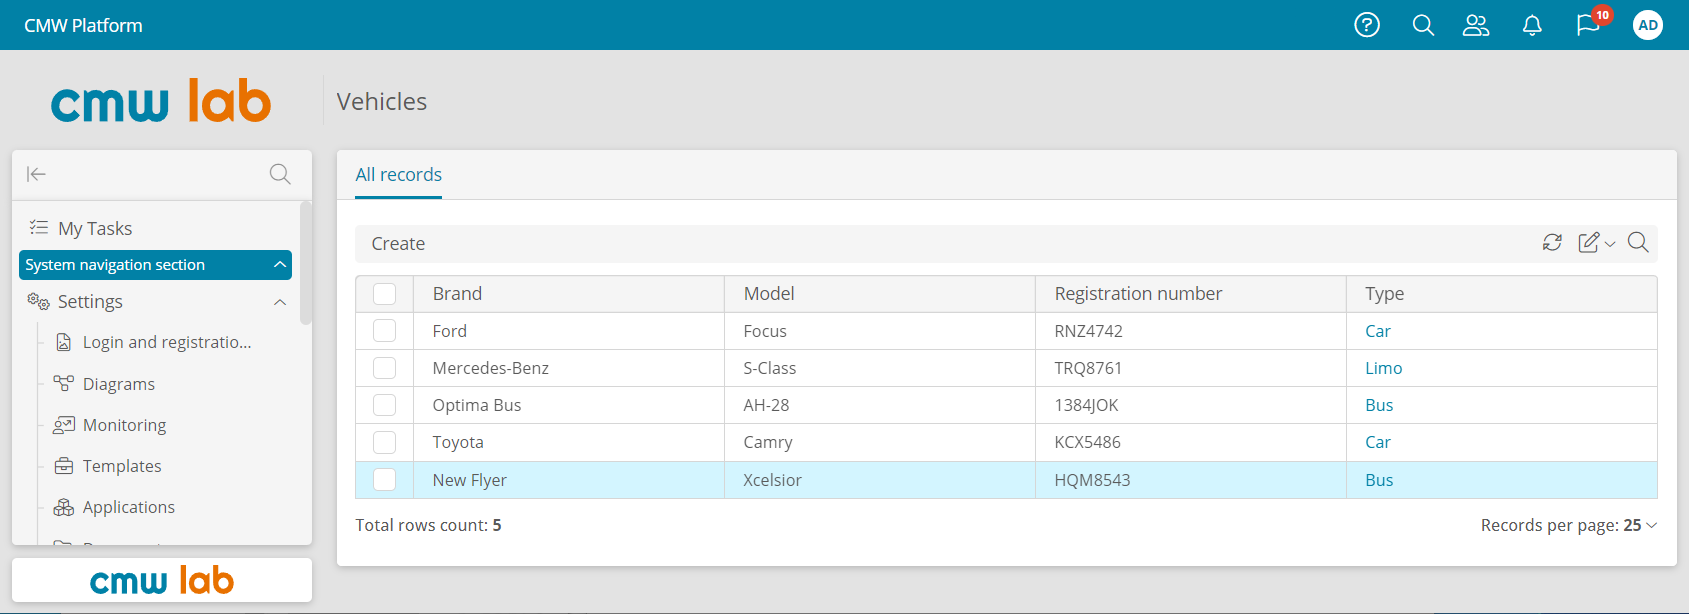
Records in the Vehicles record template
Group the Vehicles in the Table
Let's group the records in the table by vehicle type.
1. Click the icon in the Type column header.
2. Select Group by this column.
3. Click Save.
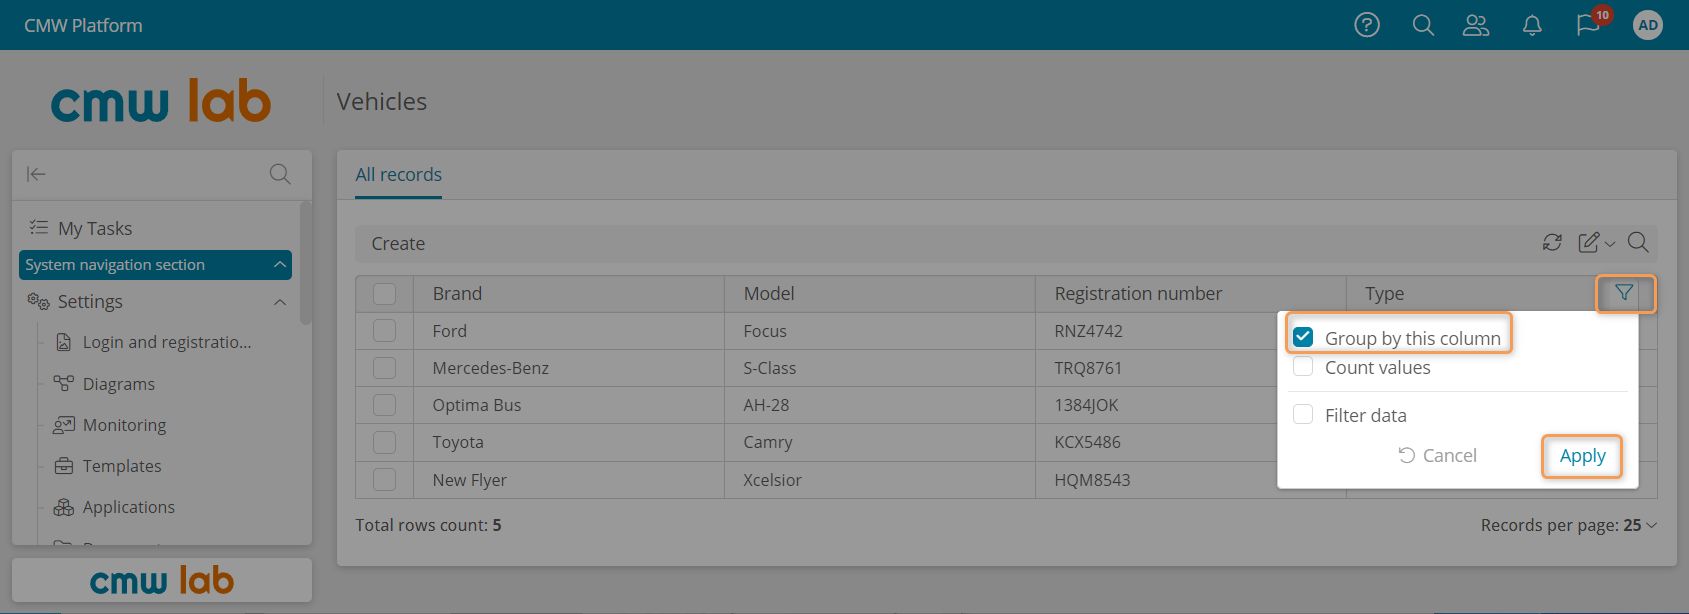
Grouping the vehicle records in the table by vehicle type
Link the Vehicles with Vehicle Requests
Business Requirement
Let's add information about completed requests per vehicle.
To do this, we need an attribute that will link Vehicles and Vehicle requests record templates with a 1:M (one-to-many) relationship — there can be several requests for one vehicle. Configure this type of relationship using a multivalue record attribute with attribute interlinking.
Multivalue Record Attribute
A record attribute allows you to store, display, and modify a collection of links to records in another template. The records can be interlinked.
When creating a record attribute, you can configure attribute interlinking by creating a new link or using an existing one. For example, when you create an attribute in the Vehicles template linked to the Vehicle requests template, you can create a new interlinked record attribute in the Vehicle requests template, and the two templates become interconnected.
Create a Multivalue Record Attribute — Vehicle Requests
1. In the Vehicles template, create a record attribute:
- Name: Vehicle requests
- Store multiple values: selected
- Linked template: Vehicle requests
- Attribute interlinking: With a new one
- New attribute properties
- Name: Vehicle
- New attribute properties
2. Click Save.
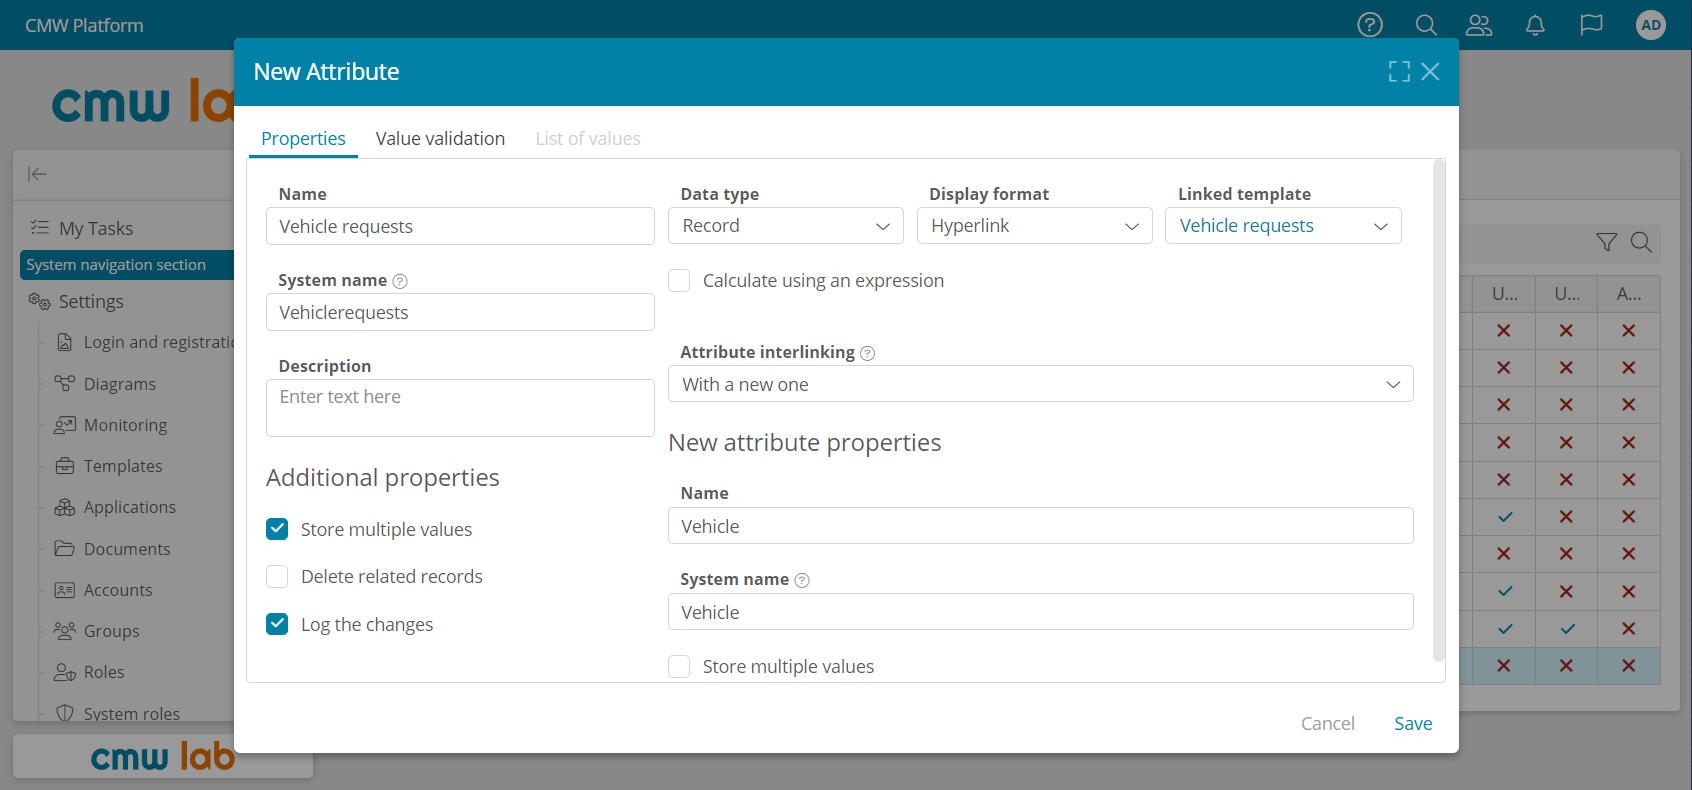
Configuring a new record attribute with interlinking
Configure the Table on the Vehicle Form to Show the Related Vehicle Requests
Table on the Form
You can display a multivalue record attribute as a table on a form. You can configure the columns to show the attributes of the linked template, access mode, child record display, and filter for the table records.
1. Go to the Forms tab of the Vehicles template and double-click the Vehicles - Main Form.
2. In the form designer, drag the newly created Vehicle requests attribute from the element pane to the Vehicle area.
3. Click the Vehicle requests field on the form, and in the Properties panel, select Table from the Appearance dropdown.

Adding a table to the form
4. Expand the Vehicle requests attribute in the element pane and drag the following attributes to the table: Car delivery time, Route, and Creator.
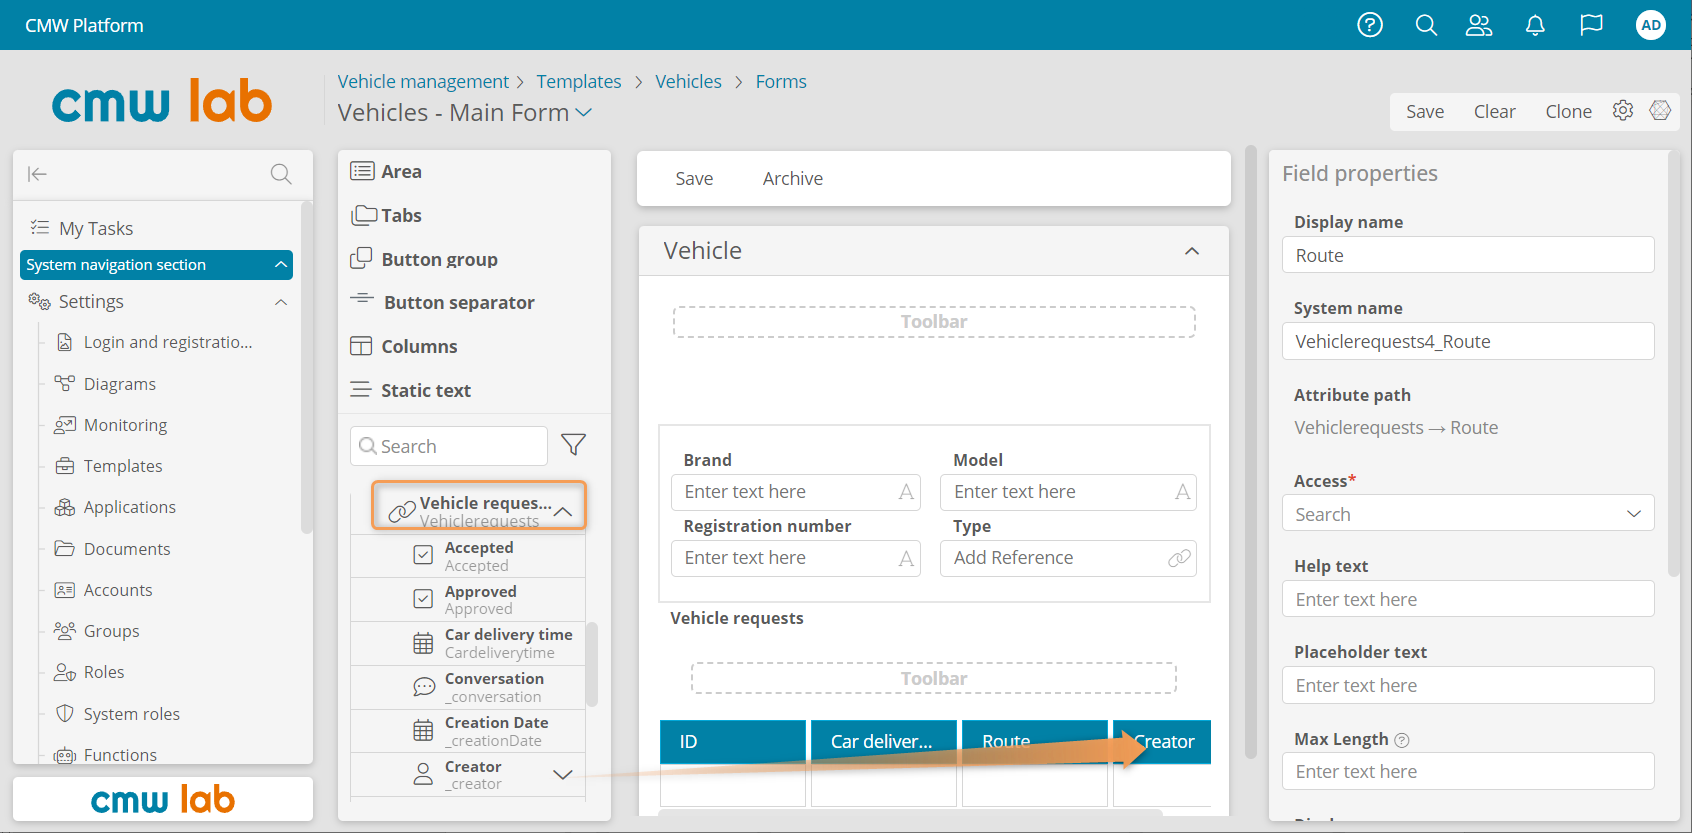
Adding columns to a table on the form
5. Select the table toolbar.
6. From the element pane, drag Add and Navigate buttons to the table toolbar. These buttons will allow you to link existing requests to the vehicle and go to the related request form.
7. Click Save.
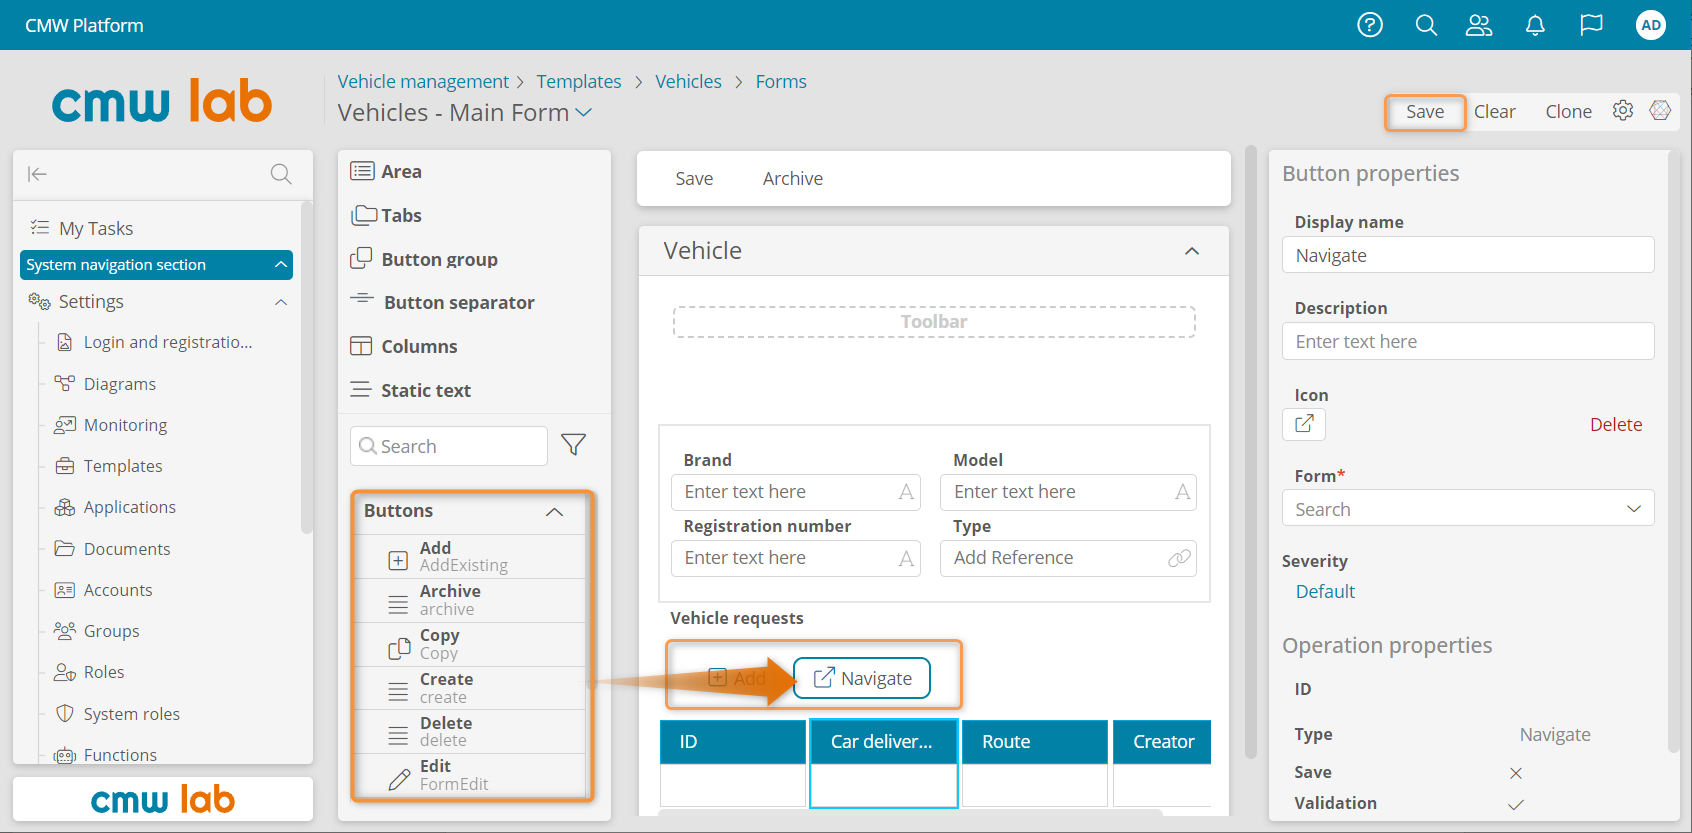
Adding buttons to the table toolbar
Configure a Transactional Data Registry
Business Requirement
We have learned how to work with reference and master data. In addition, we need transactional data for our business process.
For example, we may store a list of passengers or waypoints in addition to the final destination. Or the driver can report the costs incurred during the trip.
To do this, we need two new data registries (record templates): travel costs (transactional data) and cost types (reference data). We will link the vehicle requests with the travel costs and the costs with the cost types.
Configure the Record Template — Cost Types
Let's create a record template to store the cost types. We'll do this using the data model diagram designer.
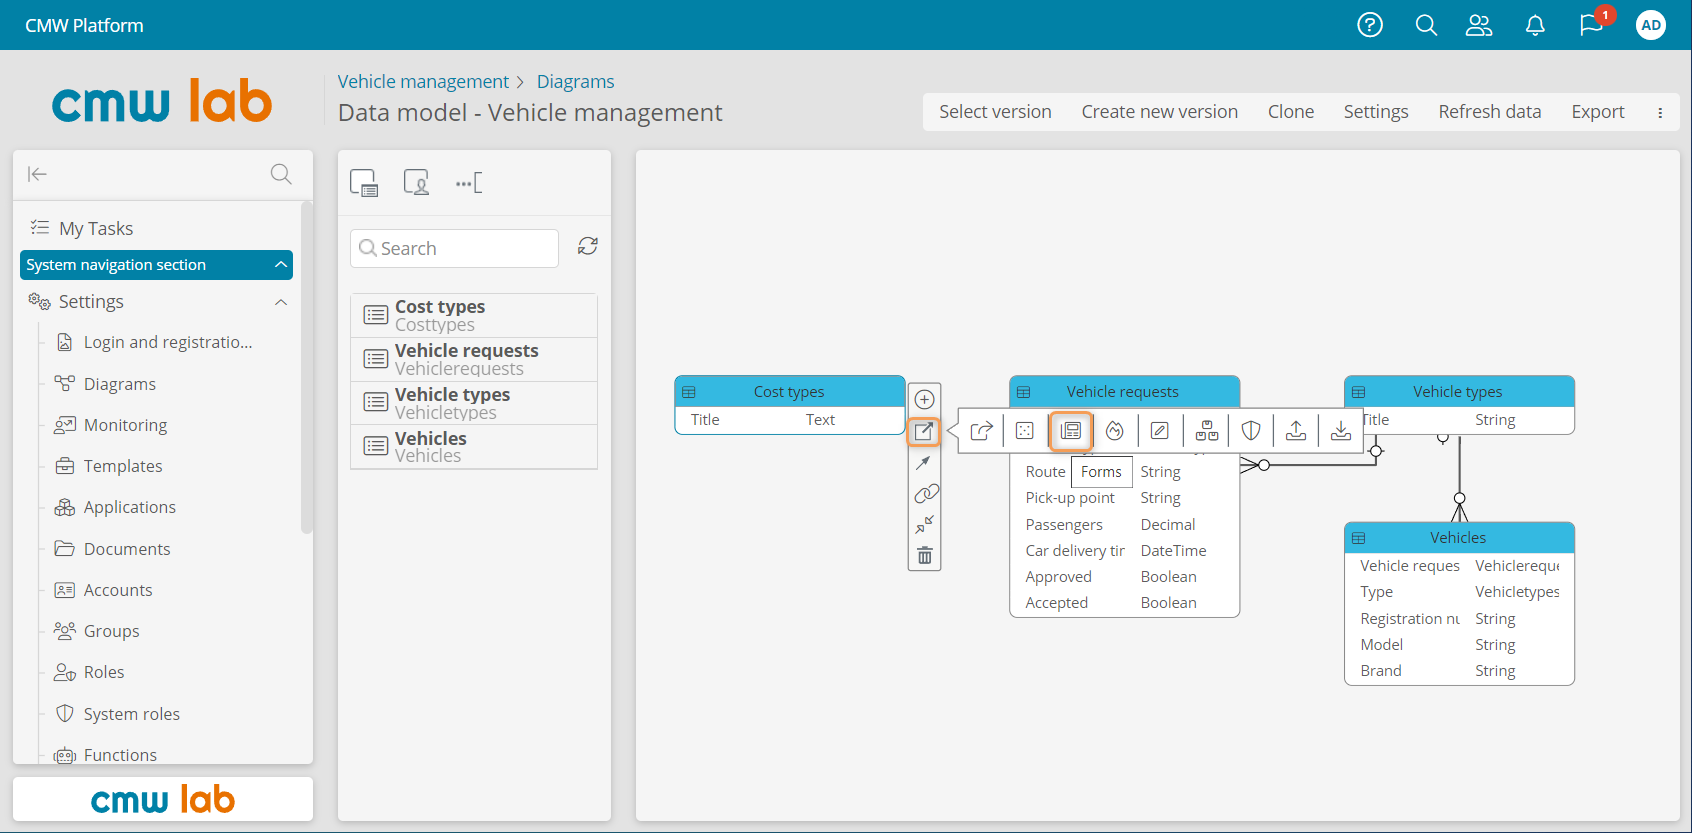
1. In the navigation pane on the left, select Diagrams.
2. Double-click the Data model - Vehicle management diagram.
3. Create a new record template — Cost types.
4. Select the Cost types record template and click Add new attribute in the element menu.

Adding a new attribute using the data model diagram
5. Create a text attribute named Title. Select the Use as record title checkbox.
6. Go to the Cost types record template's Forms tab using the element menu.
Navigating to the template form list from the data model diagram
7. In the form list, open the Cost types - Main Form by double-clicking it.
8. Rename the default area to Cost type.
9. From the element pane, drag the Title attribute to the Cost type area.
10. Click Save.
11. Click Configure template .
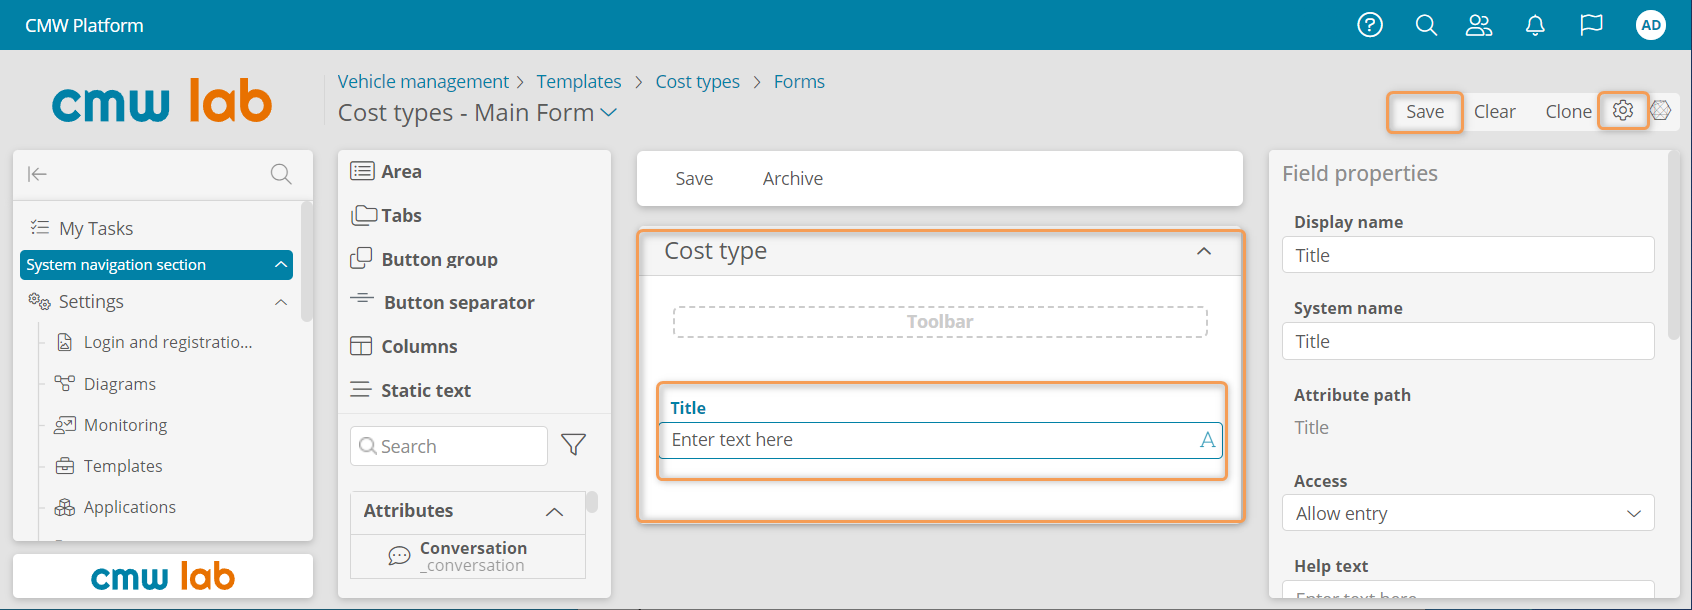
Configuring the Cost type form
12. Go to the Cost types record template's Tables tab.
13. Configure the All records table to display only the Title attribute.
14. Click Save.
15. Click the Cost types link to go to the record template properties.
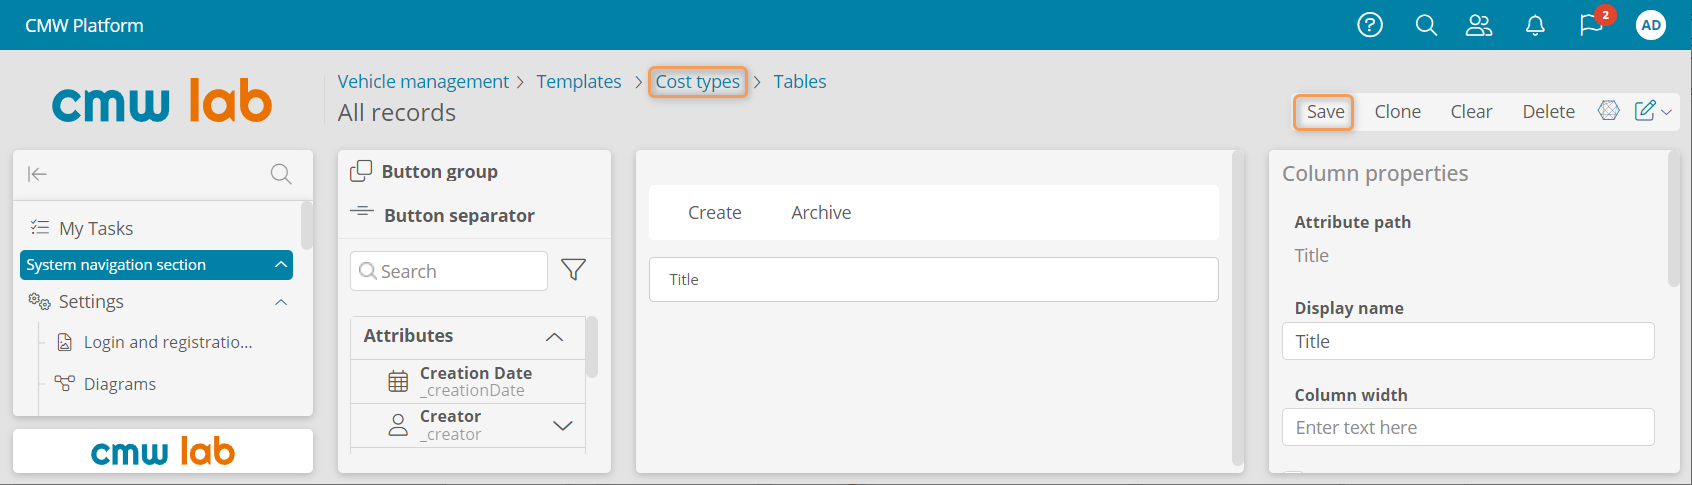
Configuring the Cost types table
16. Click Navigate to instances and create the following cost types: Fuel, Service, and Other.
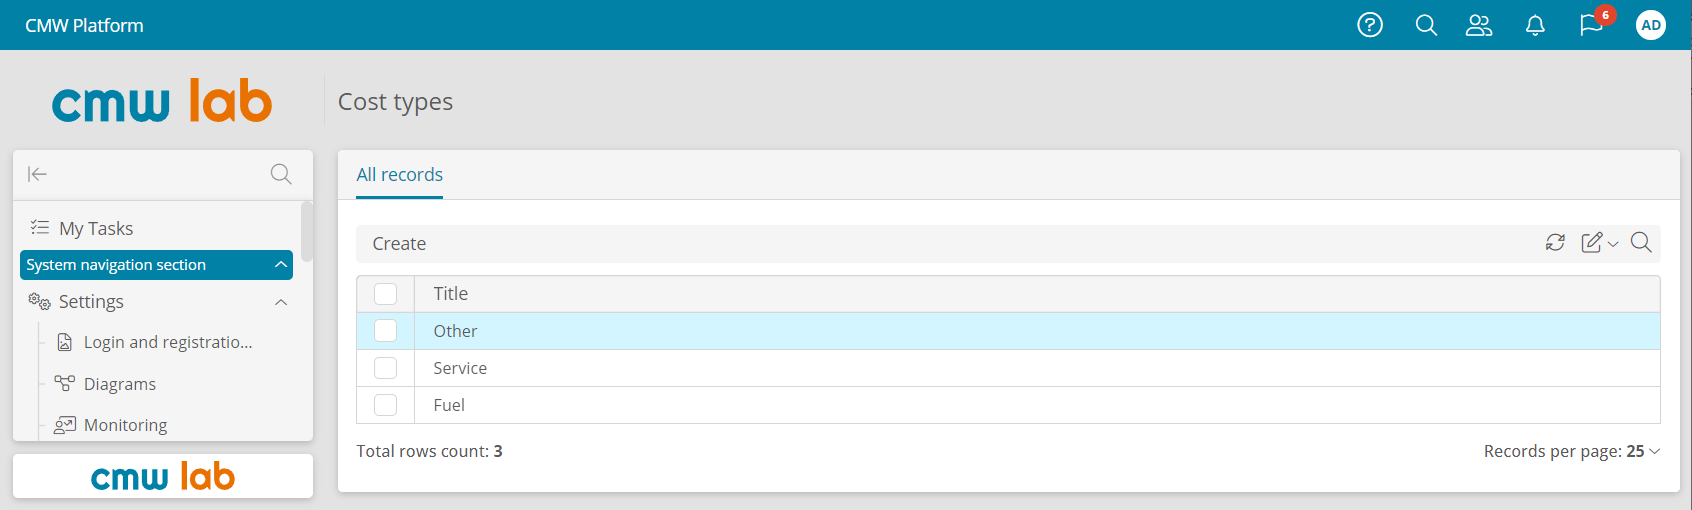
Records in the Cost types registry
Configure the Record Template — Costs
Now, let's create a record template to store the costs.
1. Using the data model diagram, create the Costs record template.
2. Add the following attributes:
- Amount
- Data type: Number
- Number of digits after decimal point: 2
- Type
- Data type: Record
- Linked template — Cost types
3. In the Costs record template's element menu, select Forms.
4. In the form list, open the Costs - Main Form form by double-clicking it.
5. Rename the default area to Cost.
9. From the element pane, drag the Amount and Type attributes to the Cost area.
10. Click Save.
11. Click Configure template .
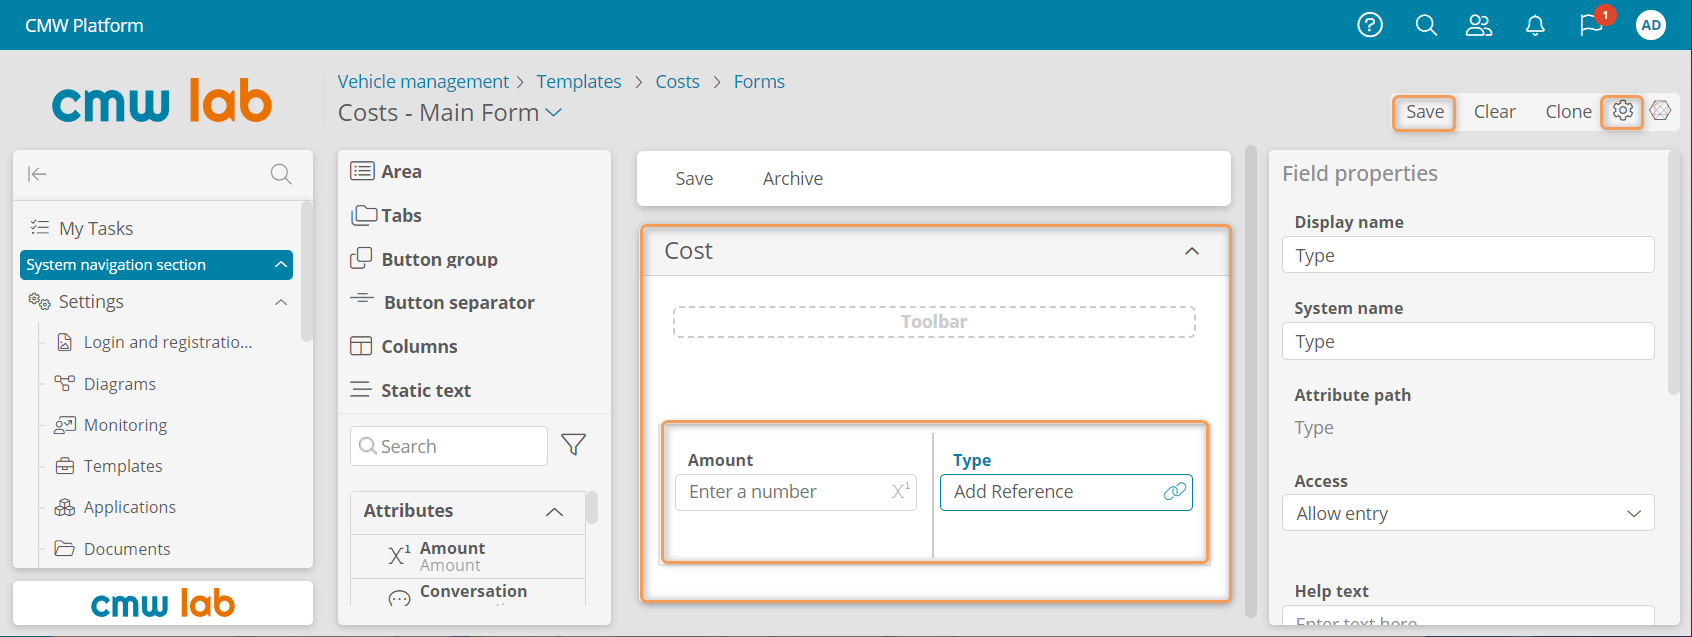
Configuring the Costs form
12. Return to the data model diagram. The diagram should show the relationship between the Cost types and Costs record templates. If you don't see the relationship line, click Show linked items in any element menu.

Relations between the record templates on the data model diagram
Link the Vehicle Requests with the Costs
Now, we will link the Vehicle requests and Costs record template using the record attribute interlinking.
1. In the data model diagram, select the Vehicle requests record template and click Add new attribute in the element menu.
2. Create an attribute with the following properties:
- Name: Costs
- Data type: Record
- Store multiple values: selected
- Linked template: Costs
- Attribute interlinking: With a new one
- New attribute properties
- Name: Vehicle request
- New attribute properties
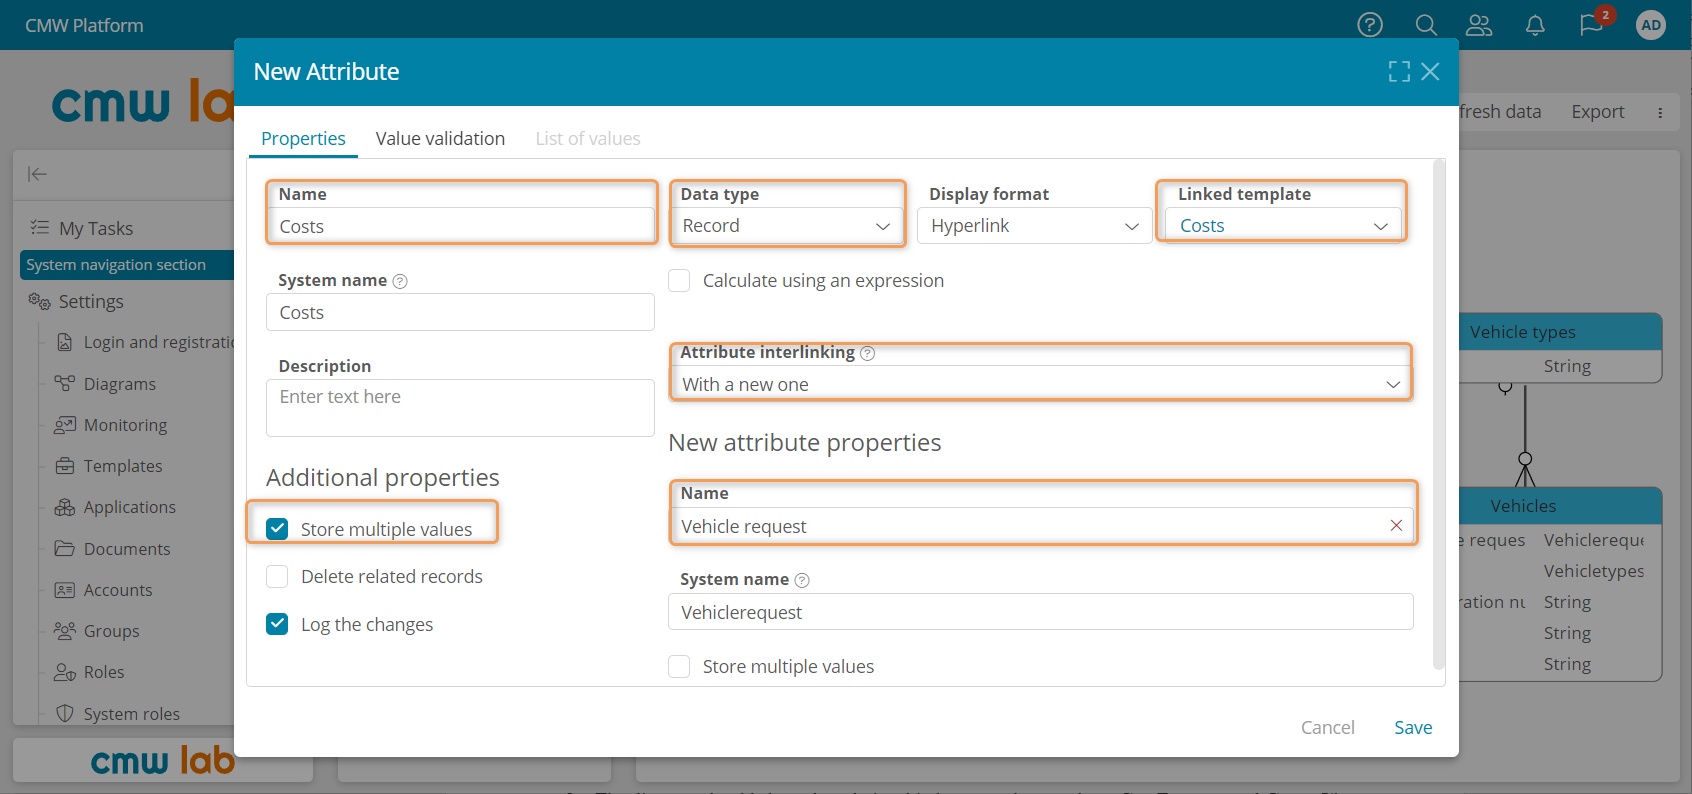
Creating a new record attribute with interlinking
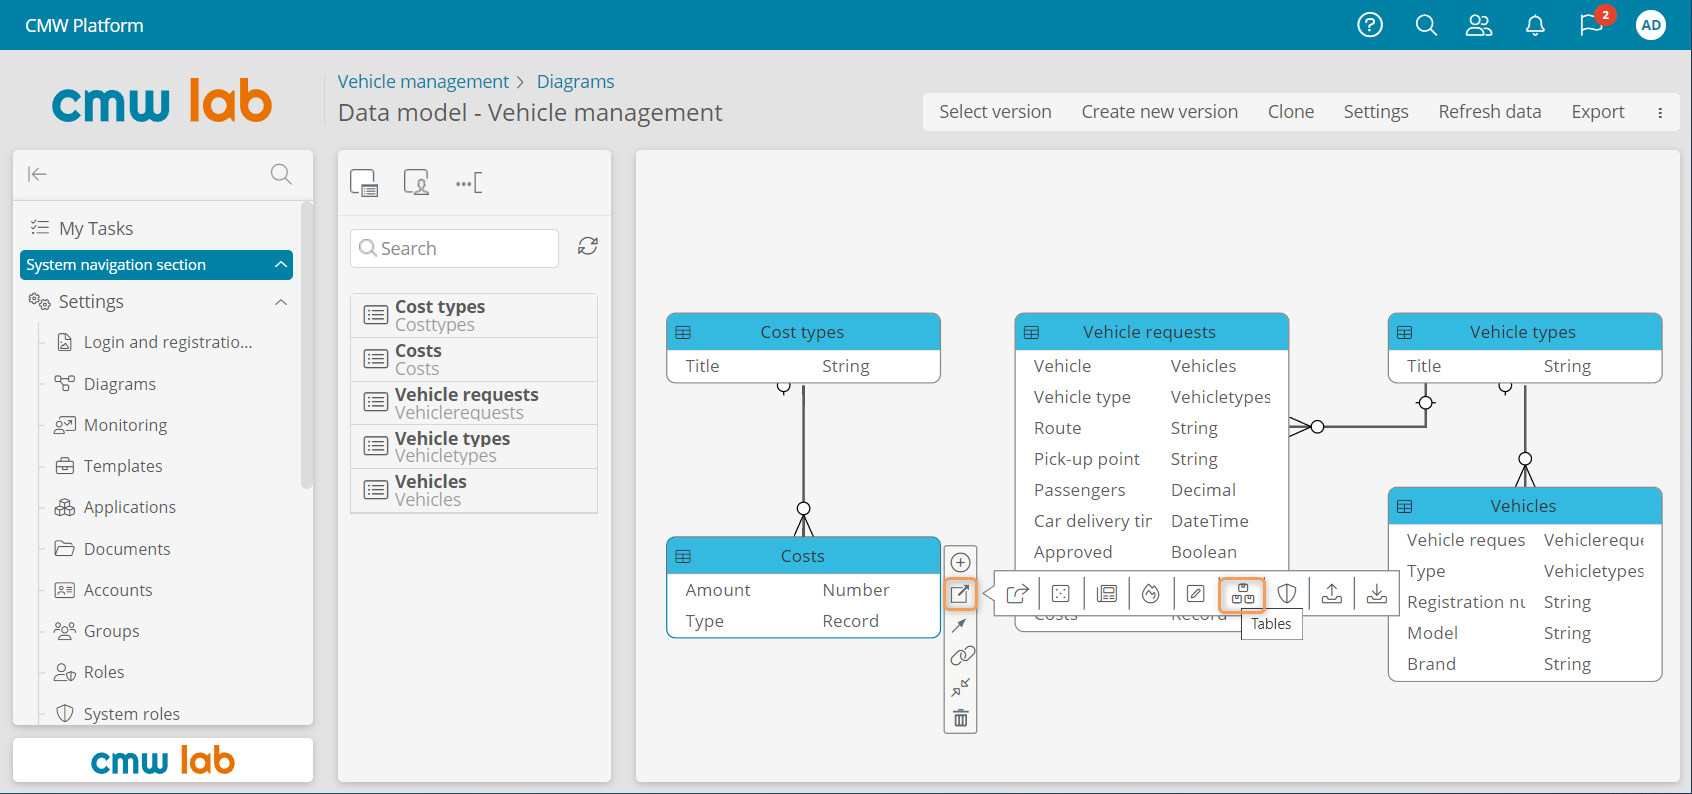
3. The diagram should show the relationship between the Vehicle requests and Costs record templates. If you don't see the relationship line, click Show linked items in any element menu.
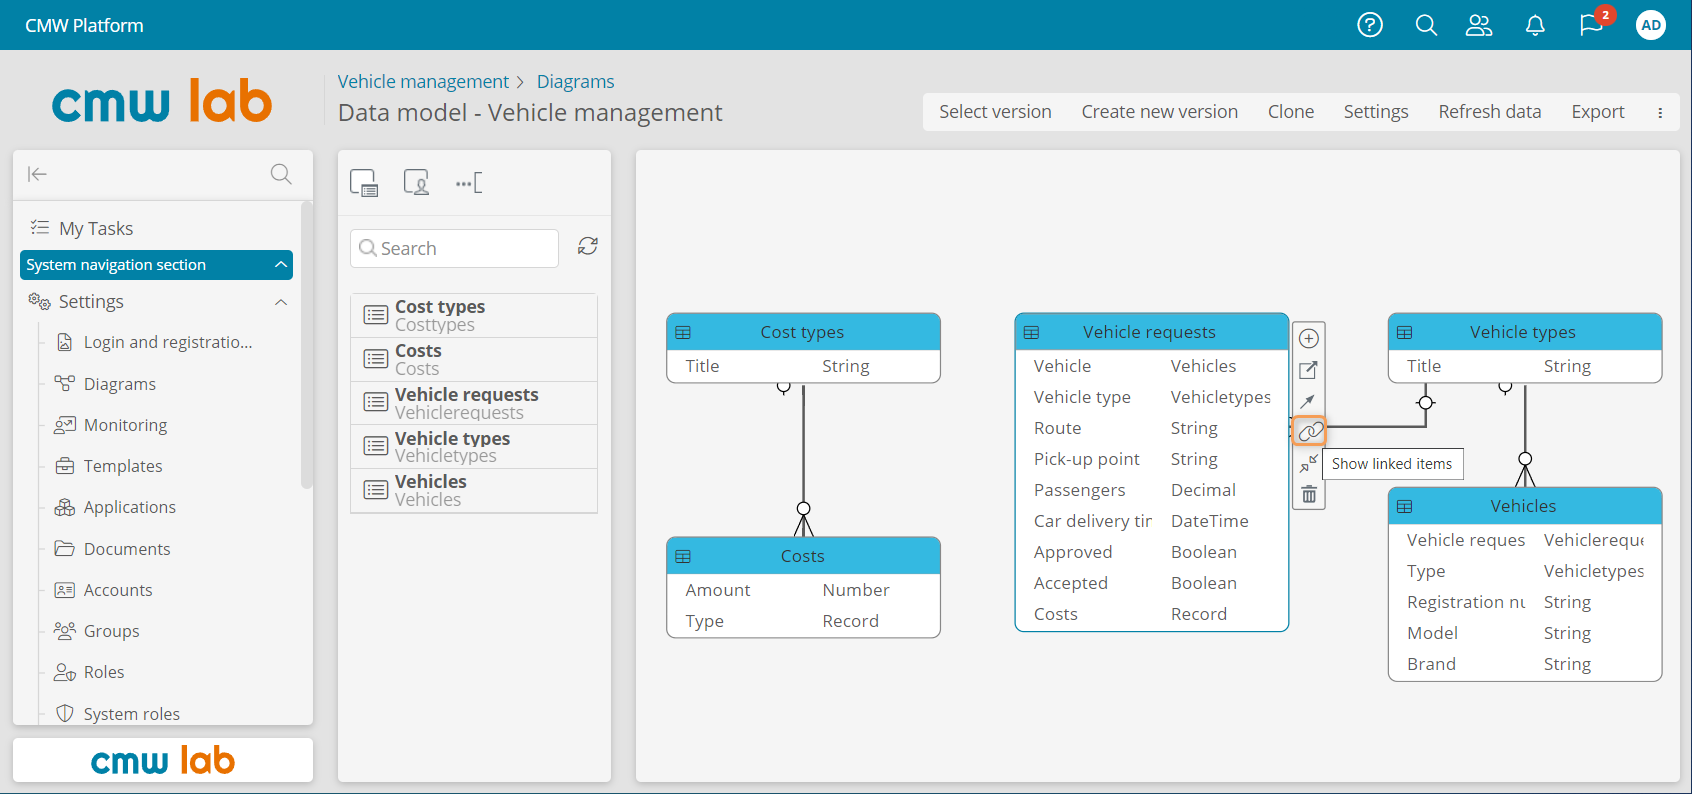
Showing linked items on the data model diagram
Configure the Costs Table
1. Go to the Costs record template's Tables tab using the element menu.
Navigating to the template table list using the data model diagram
2. Configure the All records table to display the following attributes: Vehicle request, Type, and Amount.
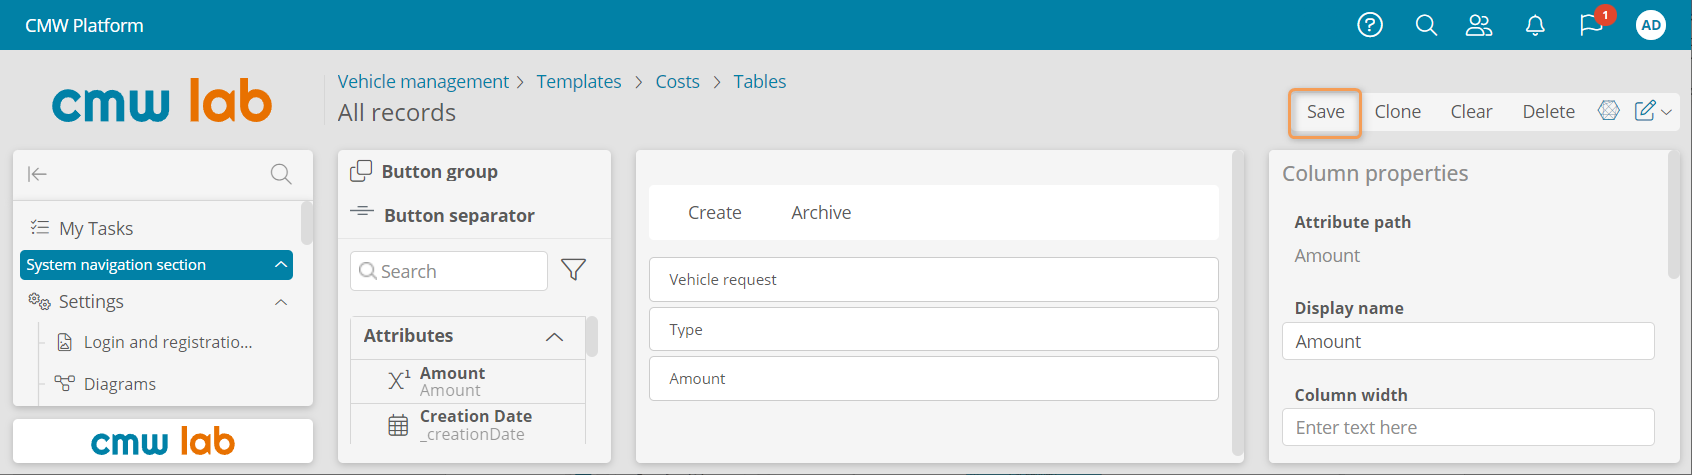
Configuring the Costs table
Results
In this lesson, you learned how to link and interlink the record templates using record attributes.
You have improved your application by adding the Vehicle types and Cost types reference data registries, Vehicles master data registry, and Costs transactional data registry.
Proceed to Lesson 6 — Advanced Process to improve the vehicle booking process using the reference, master, and transactional data.