Lesson 3 — My First Business Process
Table of Contents
Introduction
In this lesson, we'll improve the application from Lesson 2 to implement the following business logic:
- The Initiator submits a vehicle request.
- The request goes to the Secretary for review.
- The Secretary either approves or rejects the request.
- The approved request goes to the Garage manager for review.
- The Garage manager either accepts or rejects the request depending on the vehicle availability in the Garage.
- If the Garage manager accepts the request, the Initiator is notified, and the Driver completes the trip.
- If the Secretary or Garage manager rejects the request, the Initiator is notified, and the process terminates.
Estimated time to complete: 20 min
Prerequisite: complete Lesson 2 — My First Data Registry
Note: This lesson is for the CMW Platform version 4.2.571.0. In other versions, the page and menu appearance may differ from the screenshots.
Definitions
Executable Business Process
An executable business process is a process that is automated using a process engine or a business process management system (BPMS), such as the CMW Platform.
The executable business process determines who should do what and in what order. It automates task transfer between employees and departments. Thus, the system controls the entire process from the request submission to closing. In the CMW Platform, processes can communicate with each other and external systems such as email servers and web services. The executable business process replaces workflows based on e-mail and Excel, streamlining and automating them. On top of that, the CMP Platform automatically generates documents from templates.
You can regard the executable business process as an “interactive regulation.” A traditional regulatory document is an instruction for employees to refer to and follow at each process step. With an executable business process, the system orchestrates the employees and systems. A BPMN diagram is loaded into the BPMS that executes it, dispatching tasks to employees and calling the information system functions.
The executable business process allows you to increase work efficiency:
- The tasks are assigned to employees instantly, without errors, together with all the relevant data.
- The process is guaranteed to be carried out according to the approved diagram, and no additional control is needed.
- The process metrics are automatically measured and displayed on the manager's screen.
The executable business process has some similarities with a document flow, yet it gives business advantages:
- The data is stored in a structured, semantic, and searchable form rather than in Excel, Word, or PDF documents.
- The process route can be designed granularly.
Process Template
In the CMW Platform, you can set up an executable business process using a process template.
A process template stores a process diagram, the process instances, and properties that define how each process instance is executed. Each process template is linked to a record template that stores records for process instances.
Create Process Template
Let's create a vehicle booking process template.
1. In the left navigation pane, select System navigation section — Templates.
2. Go to the Process templates tab.
3. Click Create.
4. Enter the template Name — Ordering a corporate vehicle.
5. Select the Application — Vehicle management.
6. Select Associate with an existing template.
7. Select Linked record — Vehicle requests.
8. Click Create.
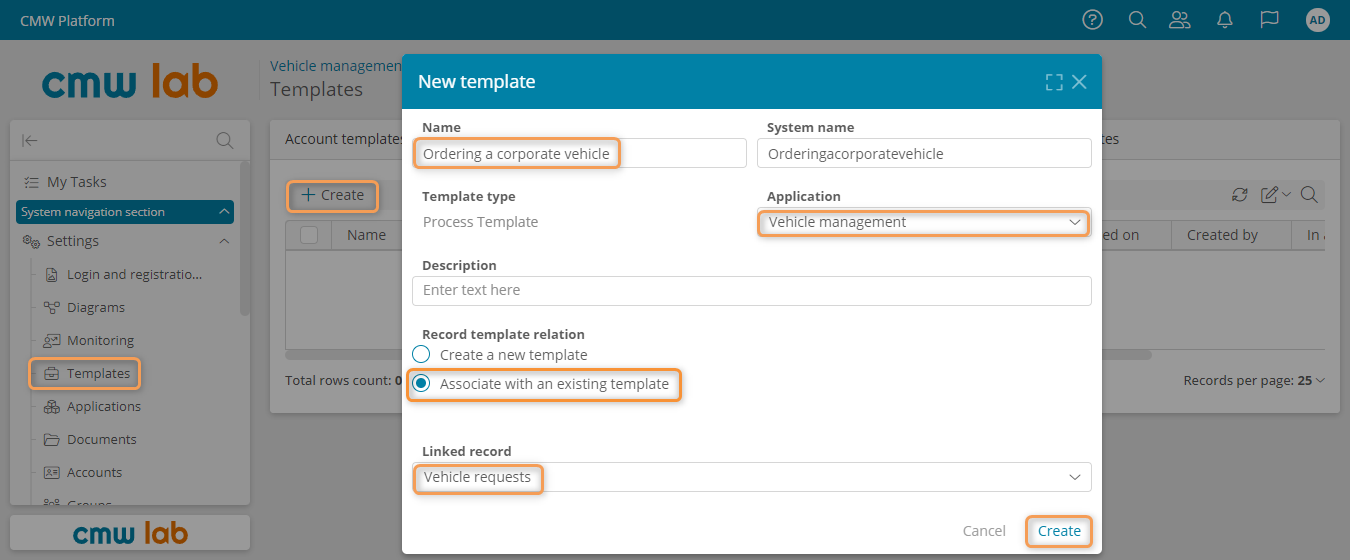
Creating a new process template
Draw Process Diagram
Using the business process diagram designer, you can draw a BPMN diagram simply by dragging and dropping the elements.
BPMN 2.0 Notation
In the CMW Platform, you draw the process diagrams using BPMN 2.0 notation.
BPMN notation is simple and widely adopted by businesses. Thanks to straightforward BPMN interpretation, the business stakeholders, analysts, and IT specialists get a common understanding of the diagram.
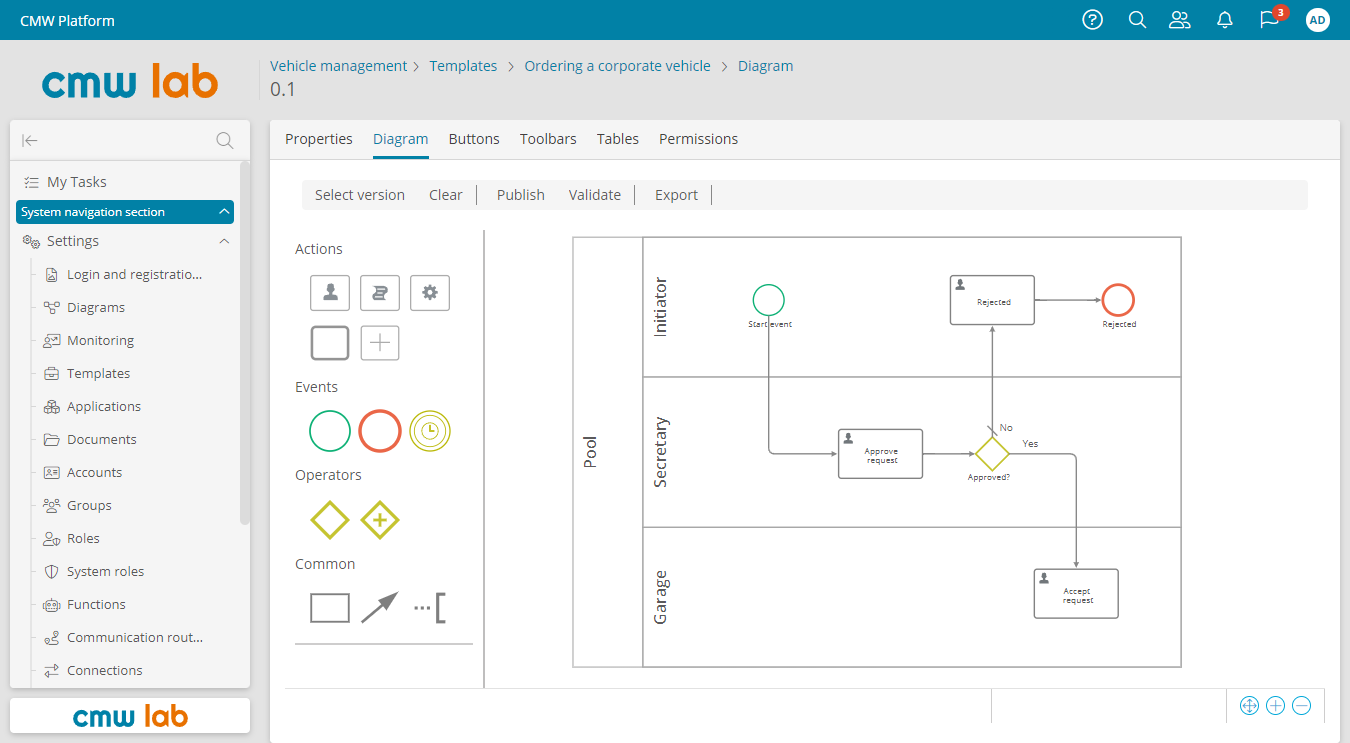
1. On the process template page, go to the Diagram tab.
2. The business process diagram designer appears.
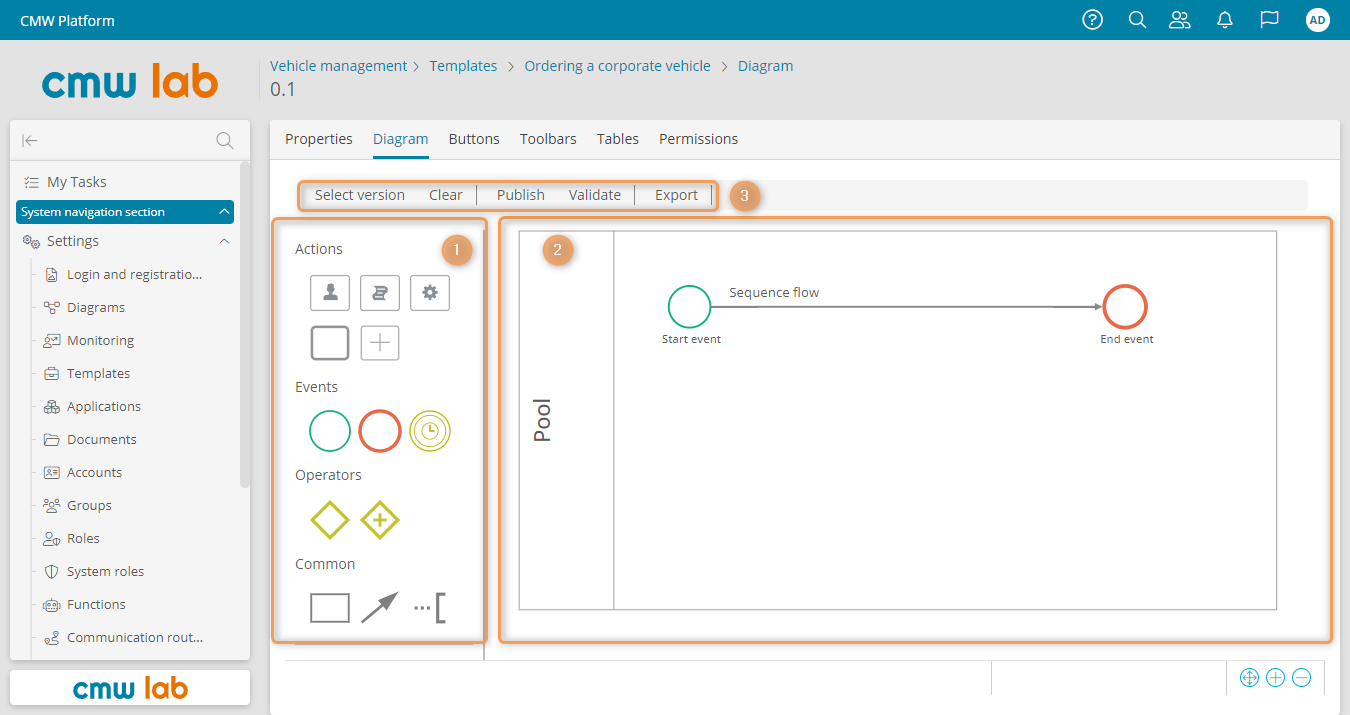
Business process diagram designer
Business Process Diagram Designer
The business process diagram designer consists of three areas:
- Elements pane — contains the elements to drag and drop on the diagram:
- Actions:
- User task
- Script task
- Service task
- Process call
- Embedded subprocess
- Events:
- Start event
- Intermediate event
- End event
- Operators:
- Exclusive gateway
- Parallel gateway
- Common:
- Swimlane
- Sequence flow
- Text annotation
- Business process diagram.
- Buttons — Select version, Clear, Publish, Validate, Export.
3. Drag three swimlanes to the process diagram from the element pane.
Swimlane
A swimlane or lane in BPMN is a box that represents the business process participants. The lanes can be configured arbitrarily at the discretion of the process designer. Typically, they represent a customer, department, position, role, or team. For example, in our process, the Initiator is a role (the Initiator can belong to any department), the Garage is a department, and the Secretary is a position.
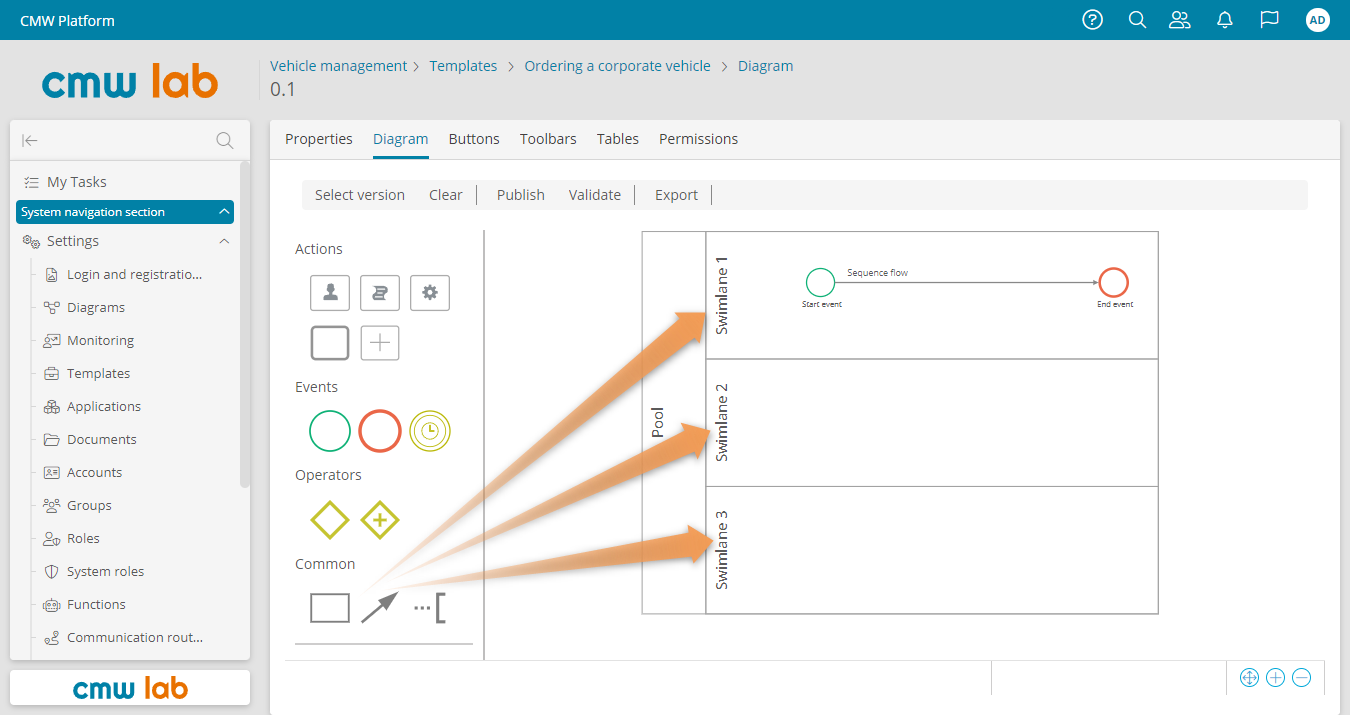
Dragging the swimlanes to the diagram
4. Rename the swimlanes as follows: Initiator, Secretary, Garage. To do this, select each swimlane by clicking its name and then click Properties in the element menu.
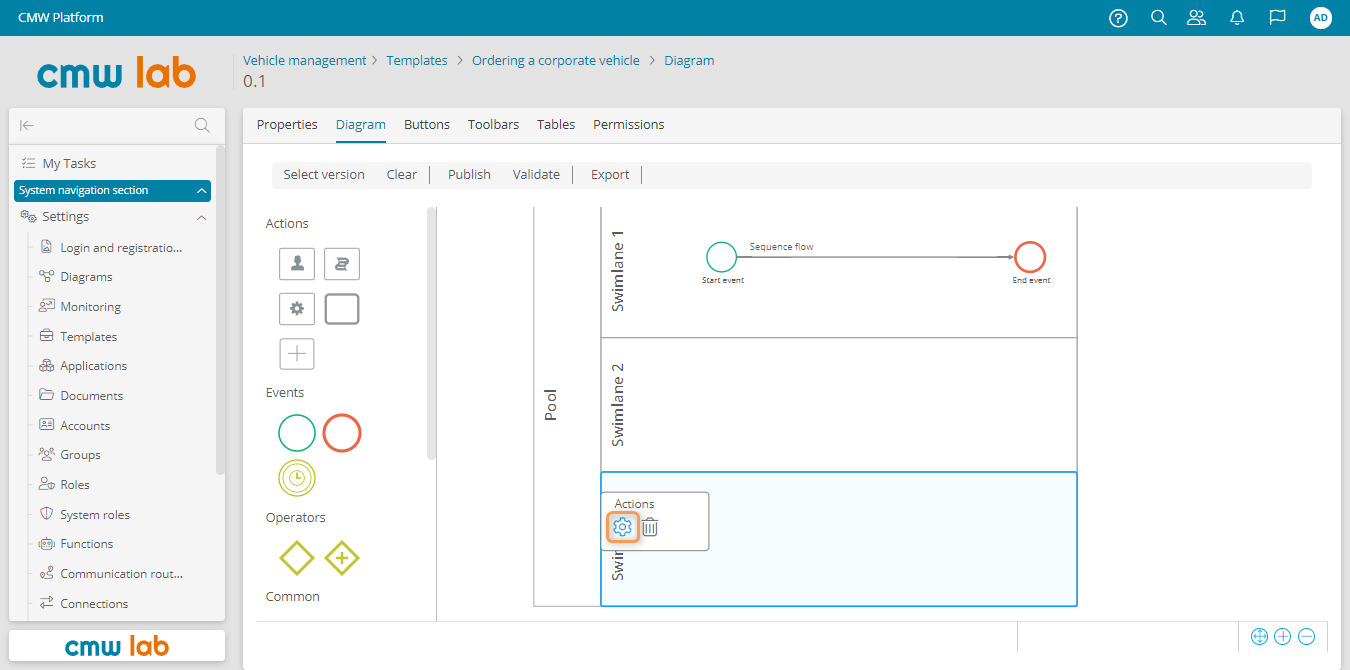
Navigating to swimlane properties
5. In the Lane properties window, enter a new Name and click Save.
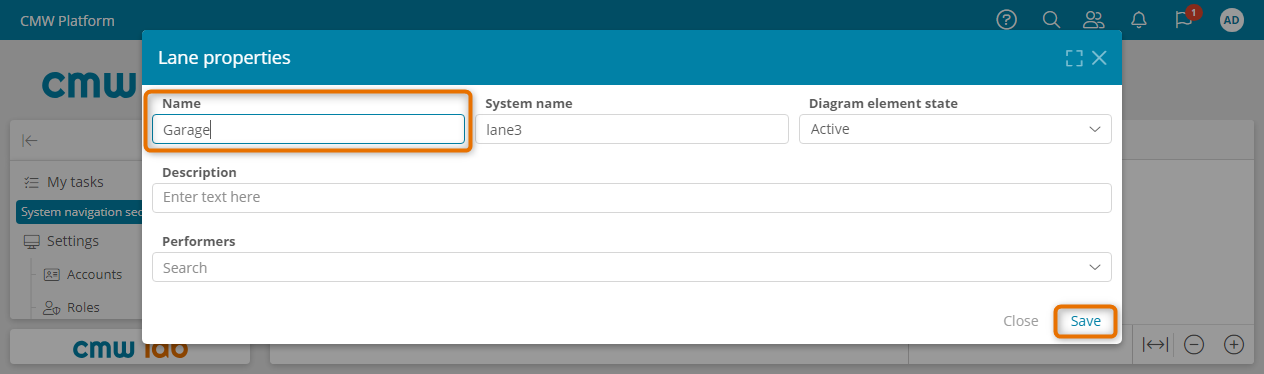
Renaming a swimlane
6. Remove the end event. To do this, select it and click Delete in the element menu.
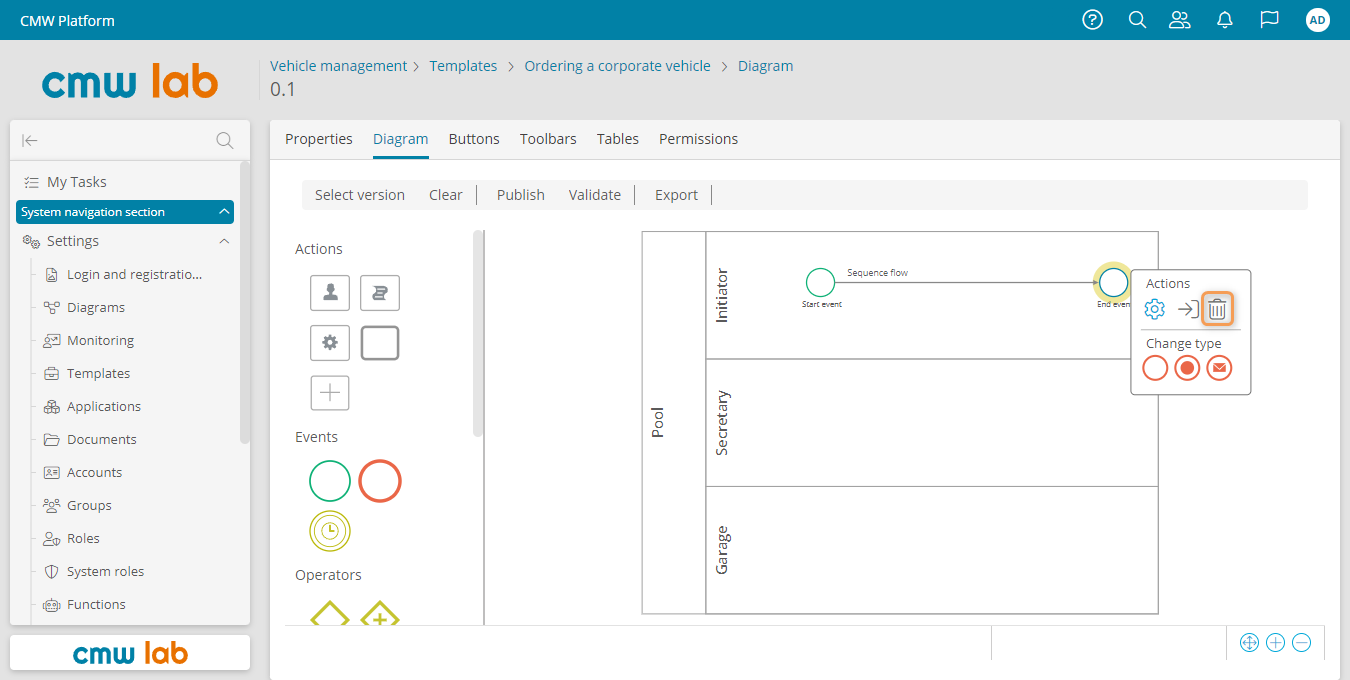
Deleting an element from the process diagram
7. Drag the user task to the Secretary lane from the element pane.
User Task
The user task is executed by a person. When the process moves to this element, the task is automatically assigned to one or several performers.
8. Rename the user task to Approve request. To do this, double-click the task name and enter the new name.
9. Attach the sequence flow from the start event to the Approve request task.
10. Drag the exclusive gateway to the diagram and connect it with the sequence flow to the Approve request task.
Exclusive Gateway
The exclusive gateway defines alternative sequence flows, of which the process can follow only one.
For each outgoing flow from the gateway, a Boolean condition is specified. The process follows the first flow for which the condition returns true. Additionally, you can select the default flow, which the process follows if none of the other conditions are met.
11. Attach two sequence flows to the exclusive gateway exit.
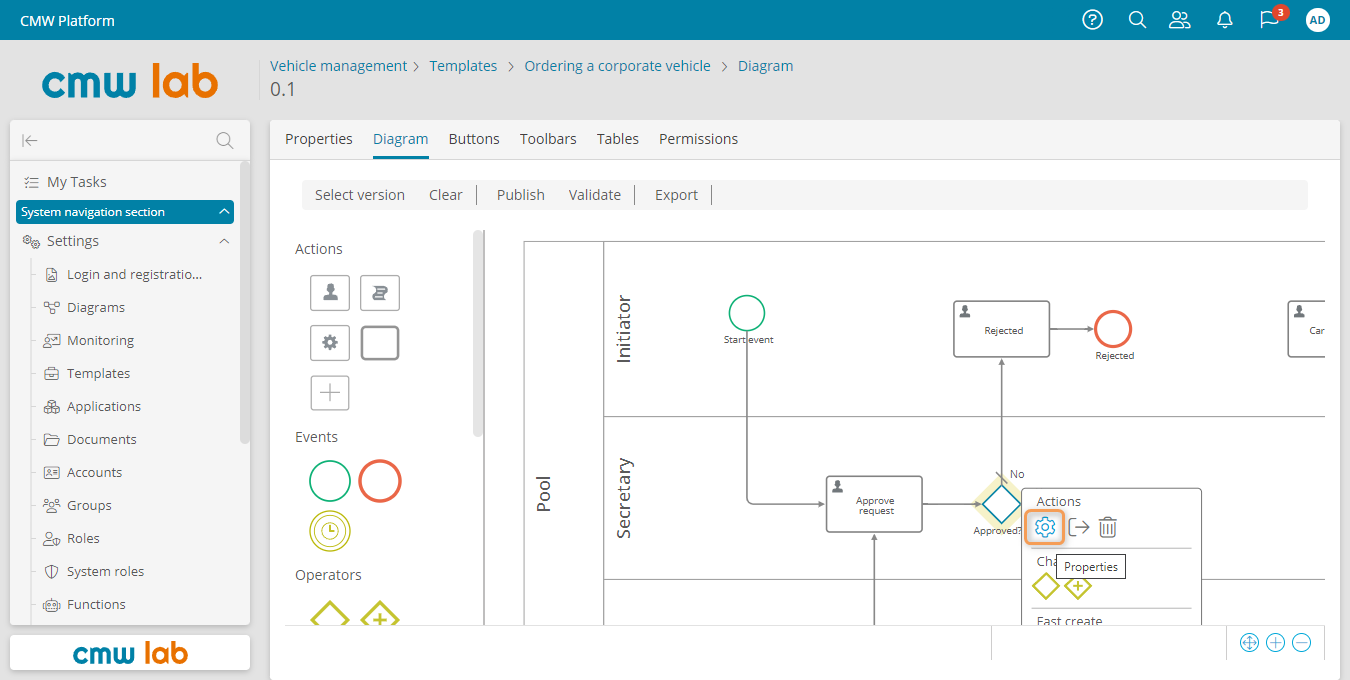
12. Rename the exclusive gateway to “Approved?” To do this, double-click the gateway name and enter the new name, or select the gateway, click Properties in the element menu, and enter the new name in the Exclusive gateway properties window.
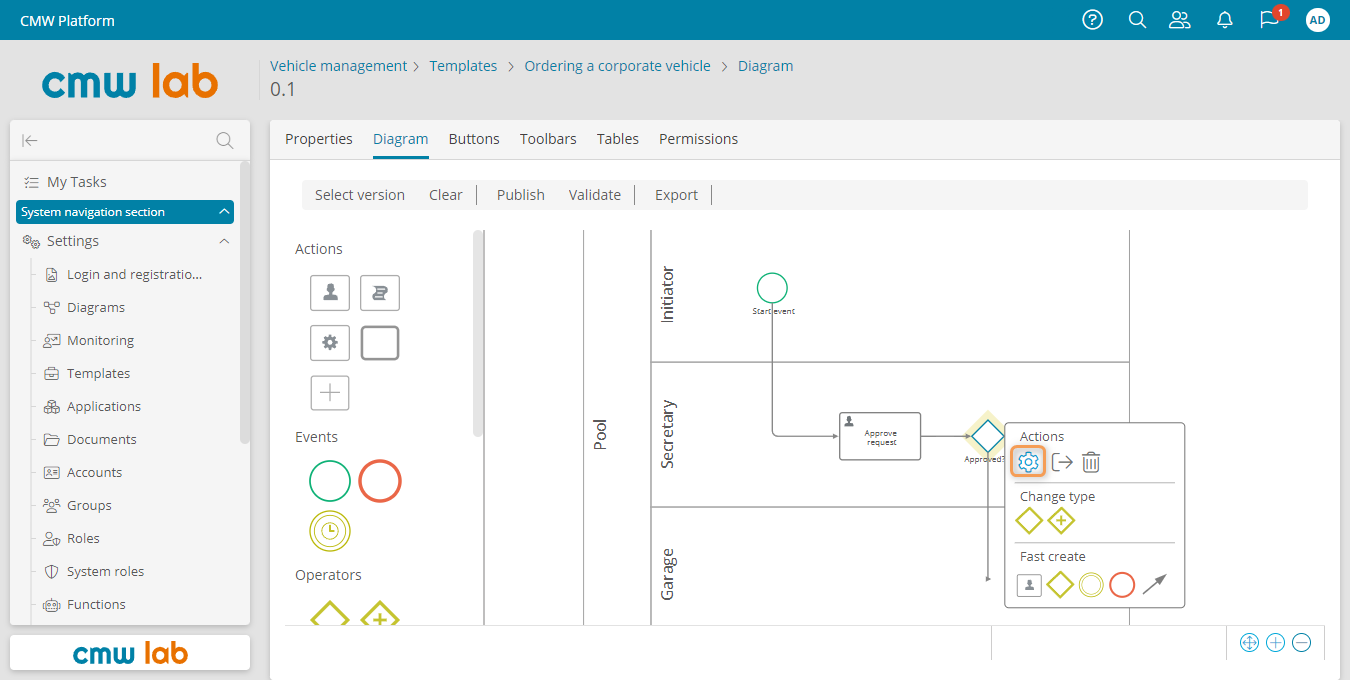
Navigating to gateway properties
Business Requirement
If the Secretary rejects the request, the Initiator receives a notification about this, and the process ends. If the Secretary approves the request, the Garage manager processes it further. Let's draw this on the process diagram.
13. Add two user tasks after the “Approved?” gateway: Rejected on the Initiator lane and Accept request on the Garage lane.
14. Select the gateway and click Properties in the element menu. The Exclusive gateway properties window appears.
15. In the Advanced tab, enter the Name for each outgoing flow: Yes and No, by double-clicking the appropriate fields. Click Save.
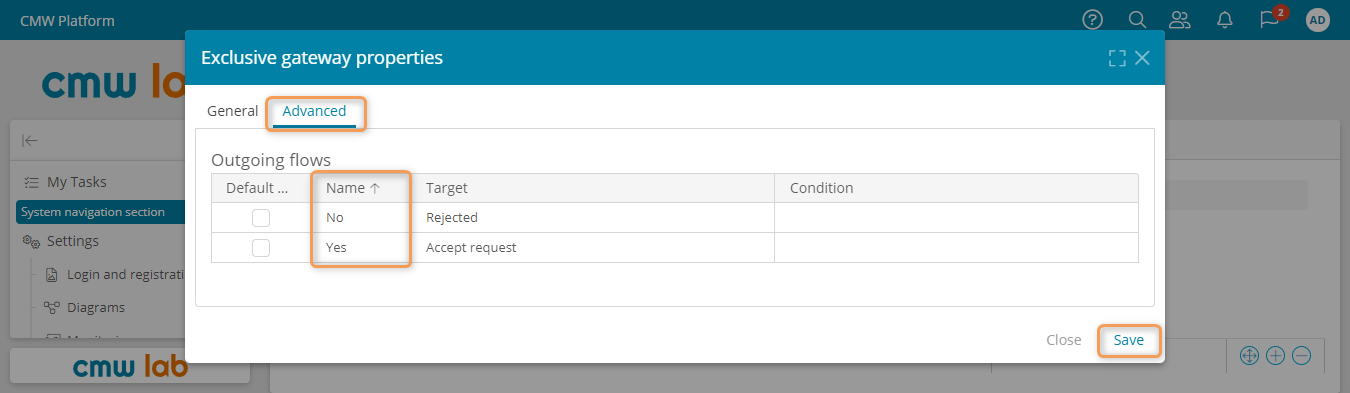
Renaming the sequence flows in the exclusive gateway properties
16. Add the end event after the Rejected task.
17. Rename the end event to Rejected.
Events
You can interpret Events in BPMN as process stages — start, milestones, and completion. The process can have only one start event. Yet, it can have several end events for different process outcomes.
Intermediate process diagram
Business Requirement
When the request is accepted, the Garage manager checks if a car is available. If there is no car, the request is returned to the Secretary.
18. Add the exclusive gateway after the Accept request task.
19. Add the sequence flow from the gateway to the Approve request task.
20. Rename the gateway to “Is there an available car?”
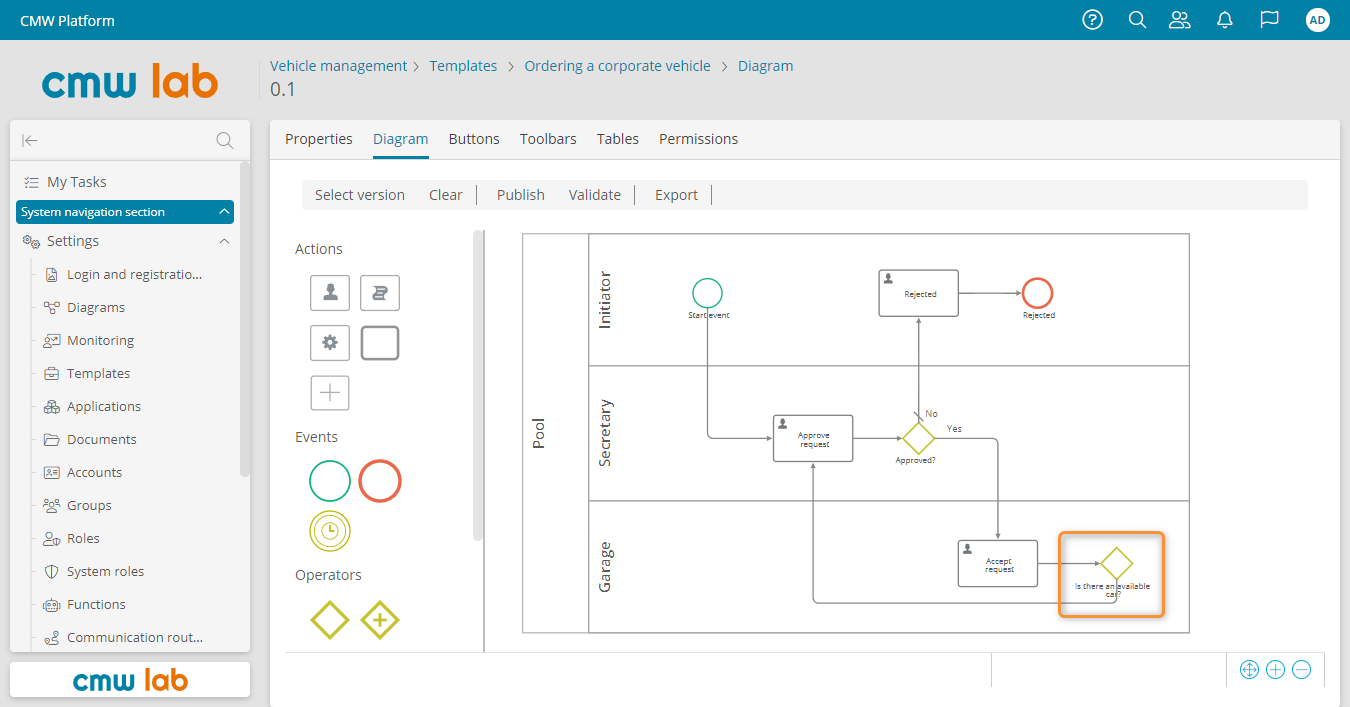
The “Is there an available car?” gateway
Business Requirement
If a car is available, the Initiator receives the Car assigned notification, and the Garage commences the trip.
21. Add the parallel gateway after the “Is there an available car?” gateway.
Parallel Gateway
The parallel gateway can split the process into multiple flows that run simultaneously.
22. Add two user tasks after the parallel gateway: Car assigned for the Initiator and Complete the trip for the Garage.
23. Name the outgoing flows from the “Is there an available car?” gateway as Yes and No.
24 Add another parallel gateway and connect it to the Car assigned and Complete the trip tasks.
25. Add the end event and rename it to Success.
The resulting diagram should look as shown below:
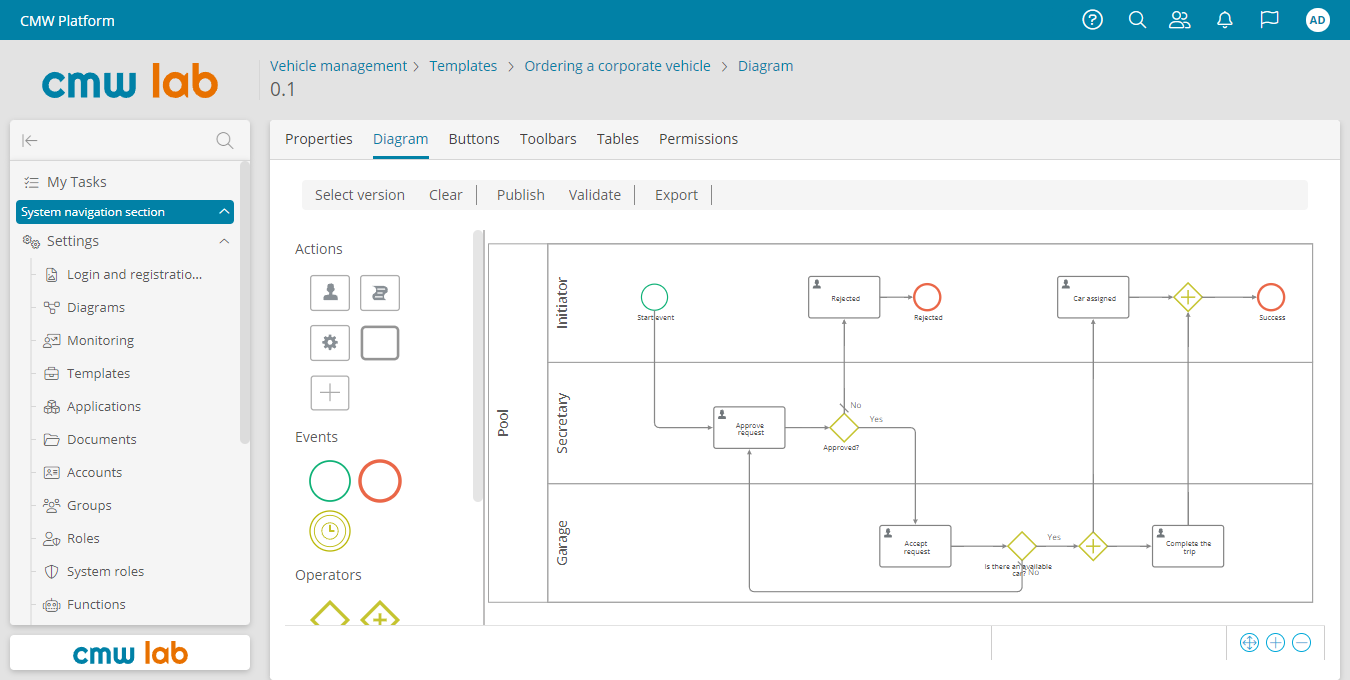
The vehicle booking process diagram
Vehicle Booking Process Diagram
Let's summarize the flow of the vehicle booking process diagram.
- The Initiator submits a request.
- The Secretary reviews it:
- If the Secretary approves the request, Step 4 is executed.
- If the Secretary rejects the request, Step 3 is executed.
- The Initiator receives notification that their request has been rejected. The vehicle booking process ends as rejected.
- The Garage manager accepts the request:
- If a car is available, the Garage manager sends the request for execution to the Driver — Step 5 is executed.
- If no car is available, the request is returned to the Secretary — Step 2 is executed.
- The Initiator receives notification that the car has been allocated, and the Driver starts the trip.
- The process ends successfully.
Configure User Task Forms
Initiator Start Form
Let's create the start form, which will be shown to the Initiator when the process starts.
1. Select Start event on the diagram and click Start form in the element menu.
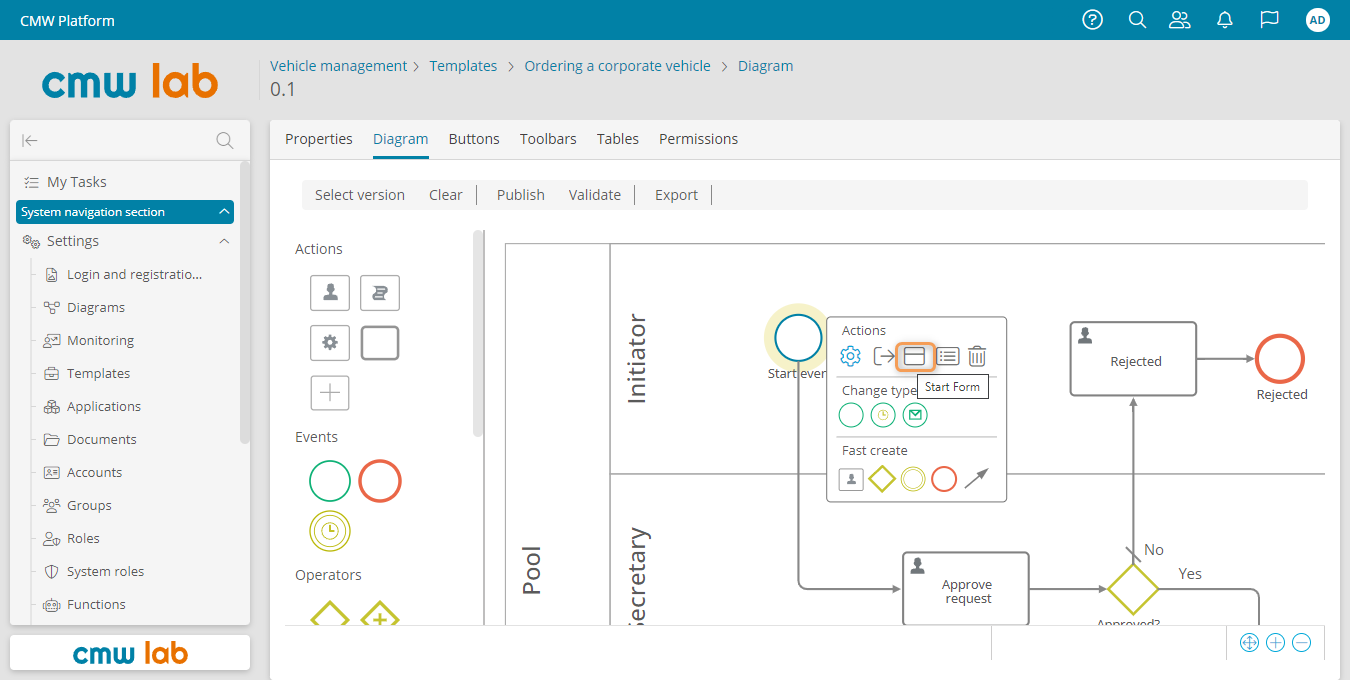
Navigating to the start form settings
2. The form designer will appear.
3. To reuse the existing Vehicle requests - Main Form, drag it to the form layout from the element pane. Click Save. Return to the process diagram by clicking Back in the browser.
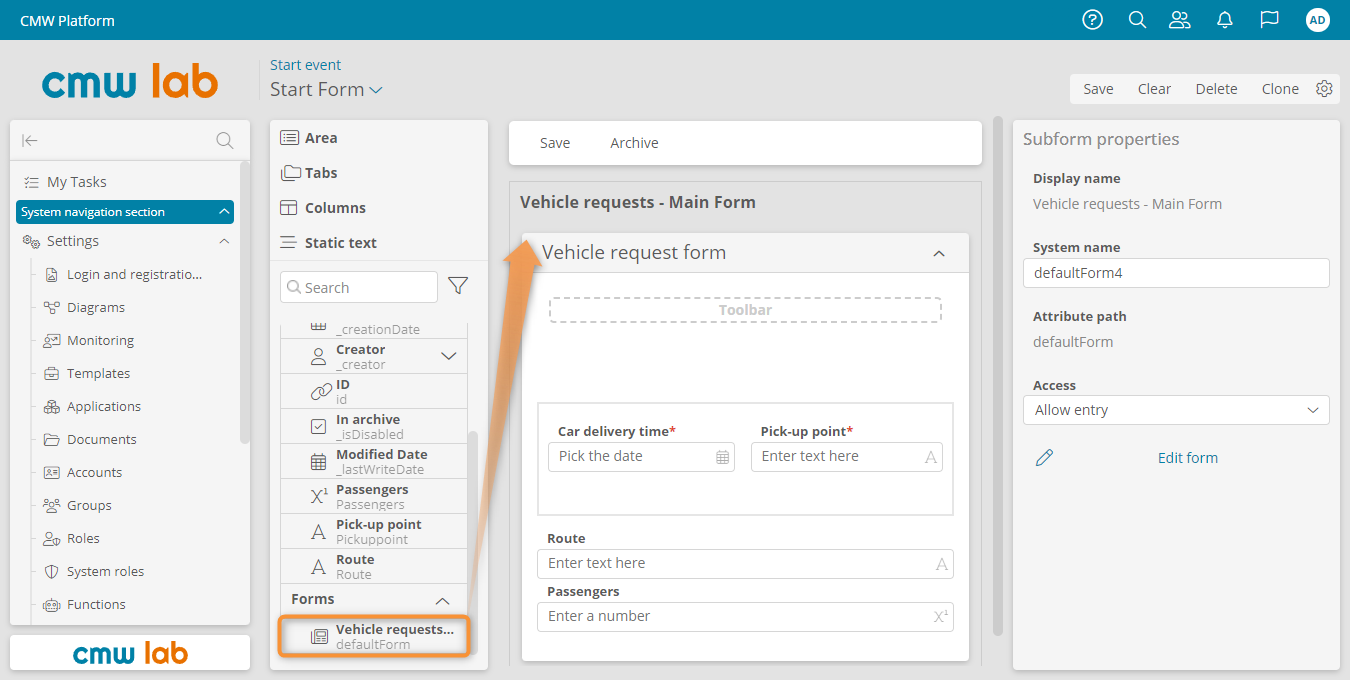
Configuring the start form
Secretary Task Form — Approve Request
Let's configure the form for the Secretary task.
1. Select the Approve request task and click Form in the element menu.
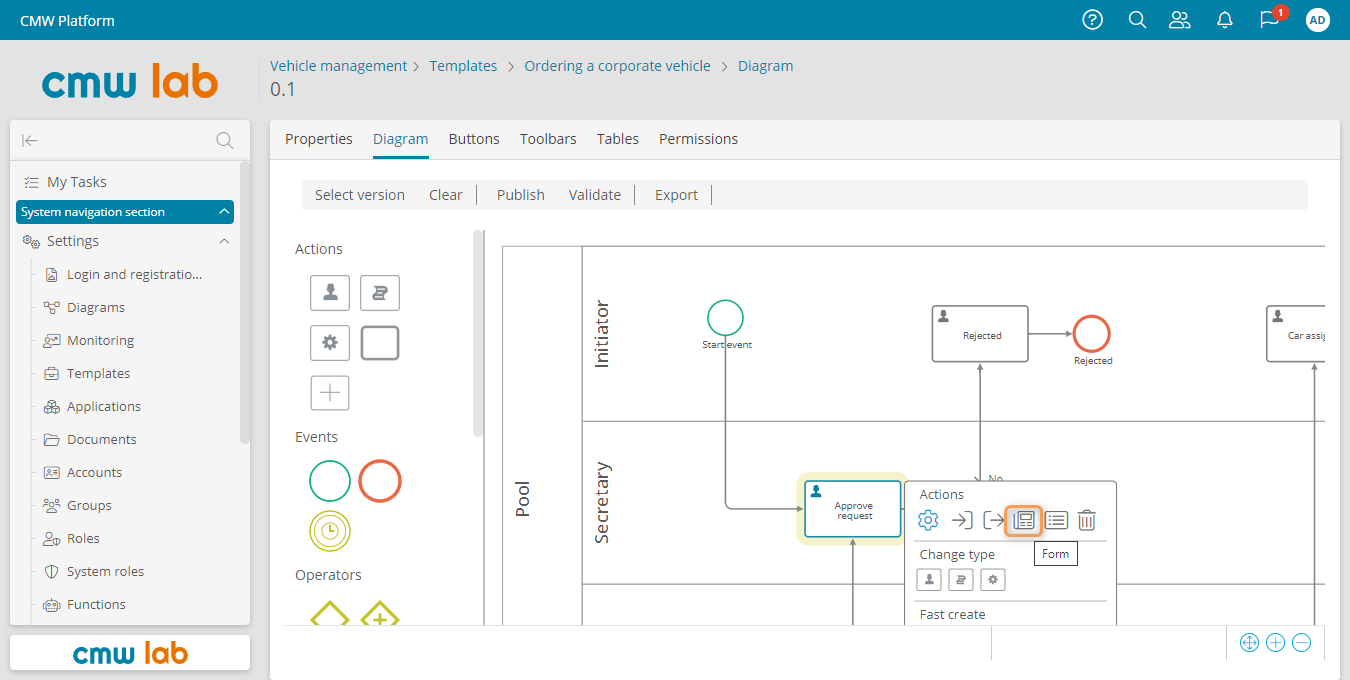
Navigating to the task form settings
2. In the form designer, expand the Vehicle requests item in the element pane, and drag the Vehicle requests - Main Form to the form layout.
Business Requirement
The Secretary should not edit the Initiator's vehicle request form fields, so let's change the access to the subform.
3. Select the Vehicle requests - Main Form subform and set Access to Read only in the Subform properties panel.
4. Drag a new area to the form layout under the Vehicle requests - Main Form and set its display name to Approval using the Area properties panel.
5. Drag the Approved attribute to the Approval area from the element pane.
6. Save the form and return to the process diagram by clicking Back in the browser.
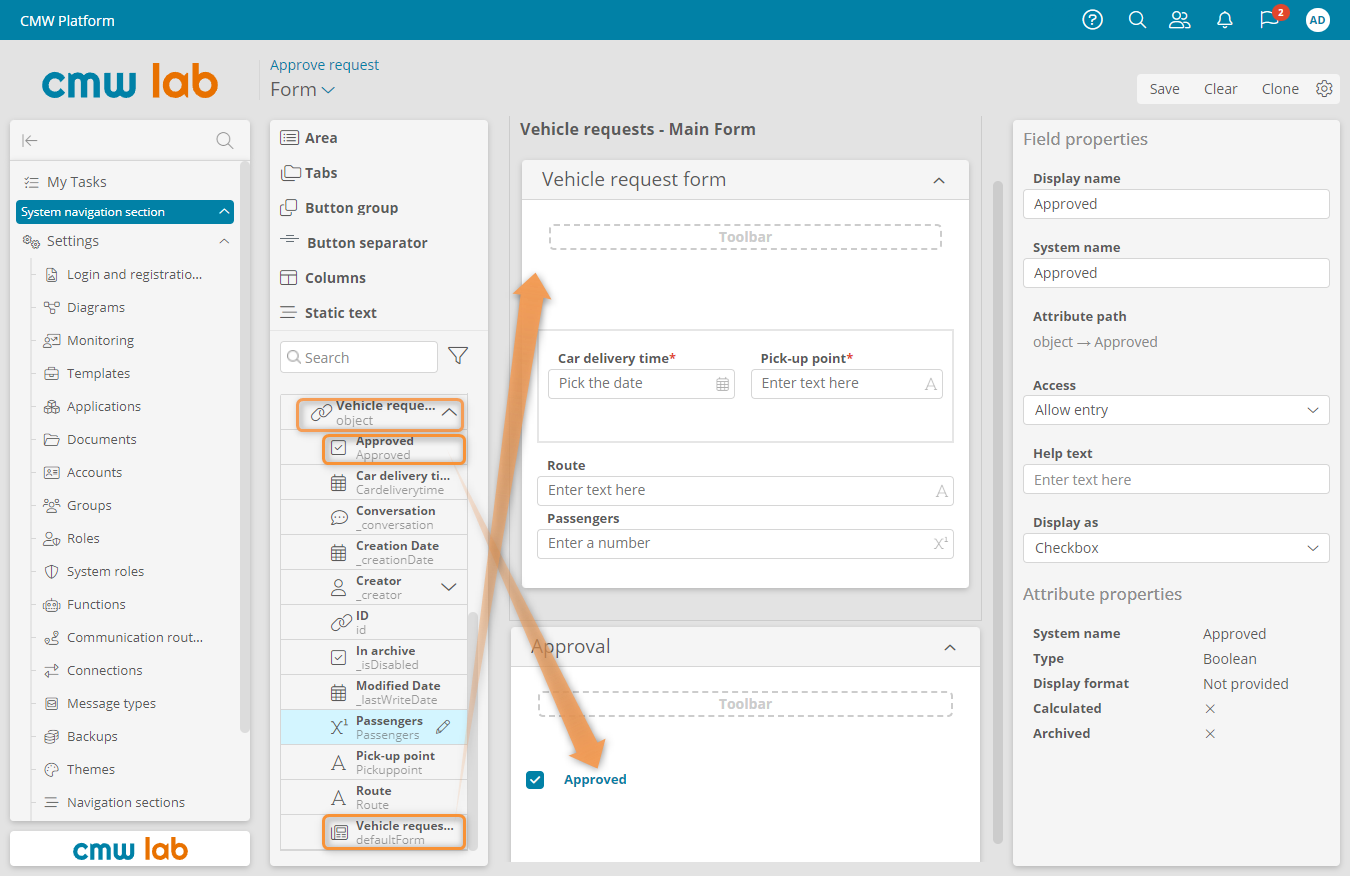
Editing and saving the task form
Garage Manager Task Form — Accept request
Let's configure the form for the Garage manager task.
1. Select the Accept request task and click Form in the element menu. The form designer appears.
2. Expand the Vehicle requests item in the element pane, and drag the Vehicle requests - Main Form to the form layout.
3. In the Subform properties panel, set Access to Read only to prevent the Garage manager from editing the request.
Business Requirement
The Garage manager should accept or decline the request depending on the car availability in the garage. We will add an attribute for this.
The CMW Platform allows you to add attributes without leaving the form or table designer.
4. Click the Add attribute icon on the Vehicle request item to add an attribute to this record template.
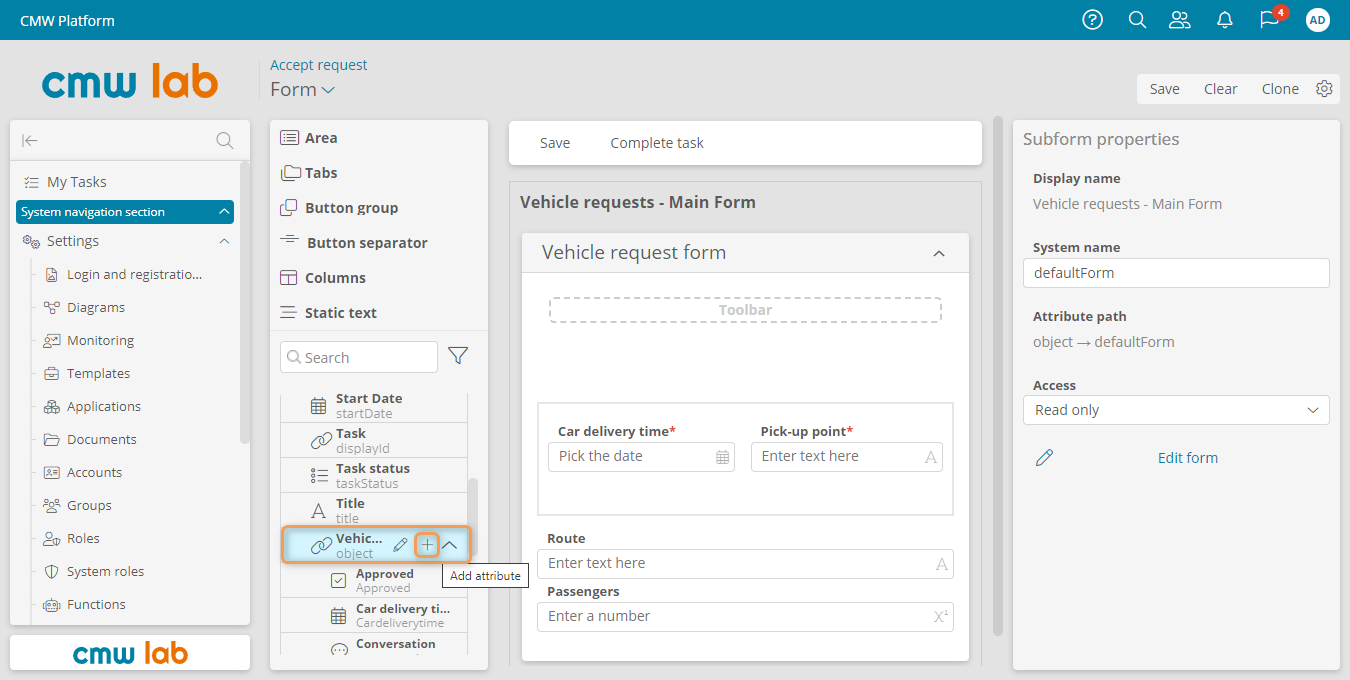
Adding an attribute using the form designer
5. In the New attribute window, set Boolean as the data type and enter the name — Accepted.
6. Click Save.
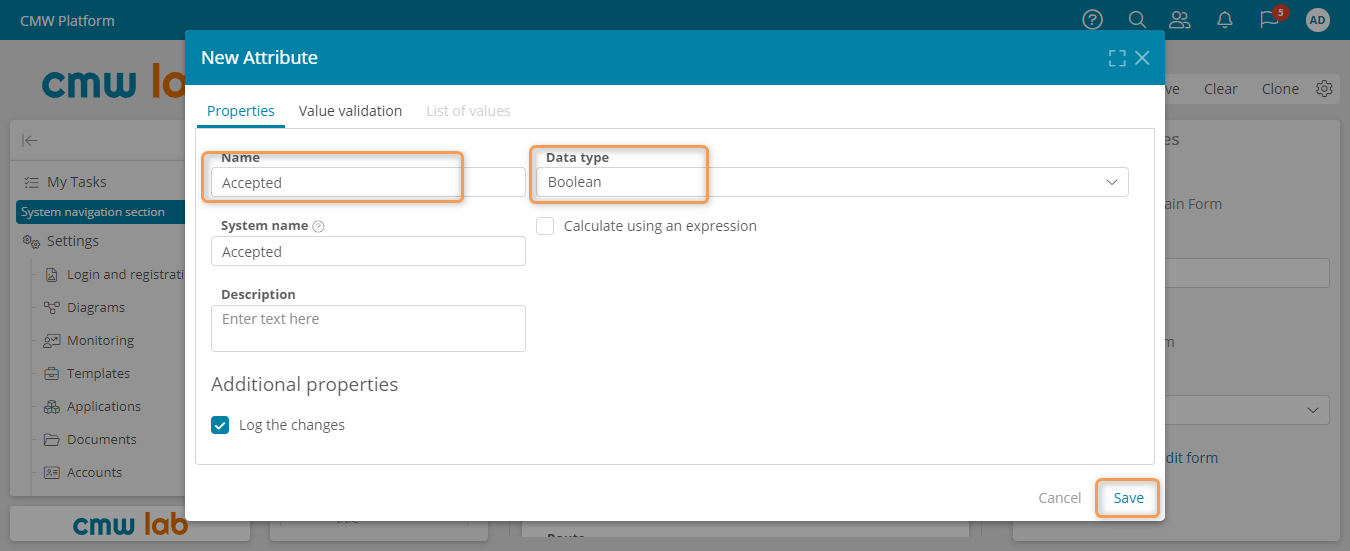
Creating and saving a new attribute on the fly
7. Drag a new area to the form layout and rename it to Acceptance using the Area properties panel.
8. Drag the created Accepted attribute to the Acceptance area.
9. Select the Accepted field, and in the Field properties panel, select Display as Radio button.
10. Click Save and return to the process diagram using the browser's Back button.
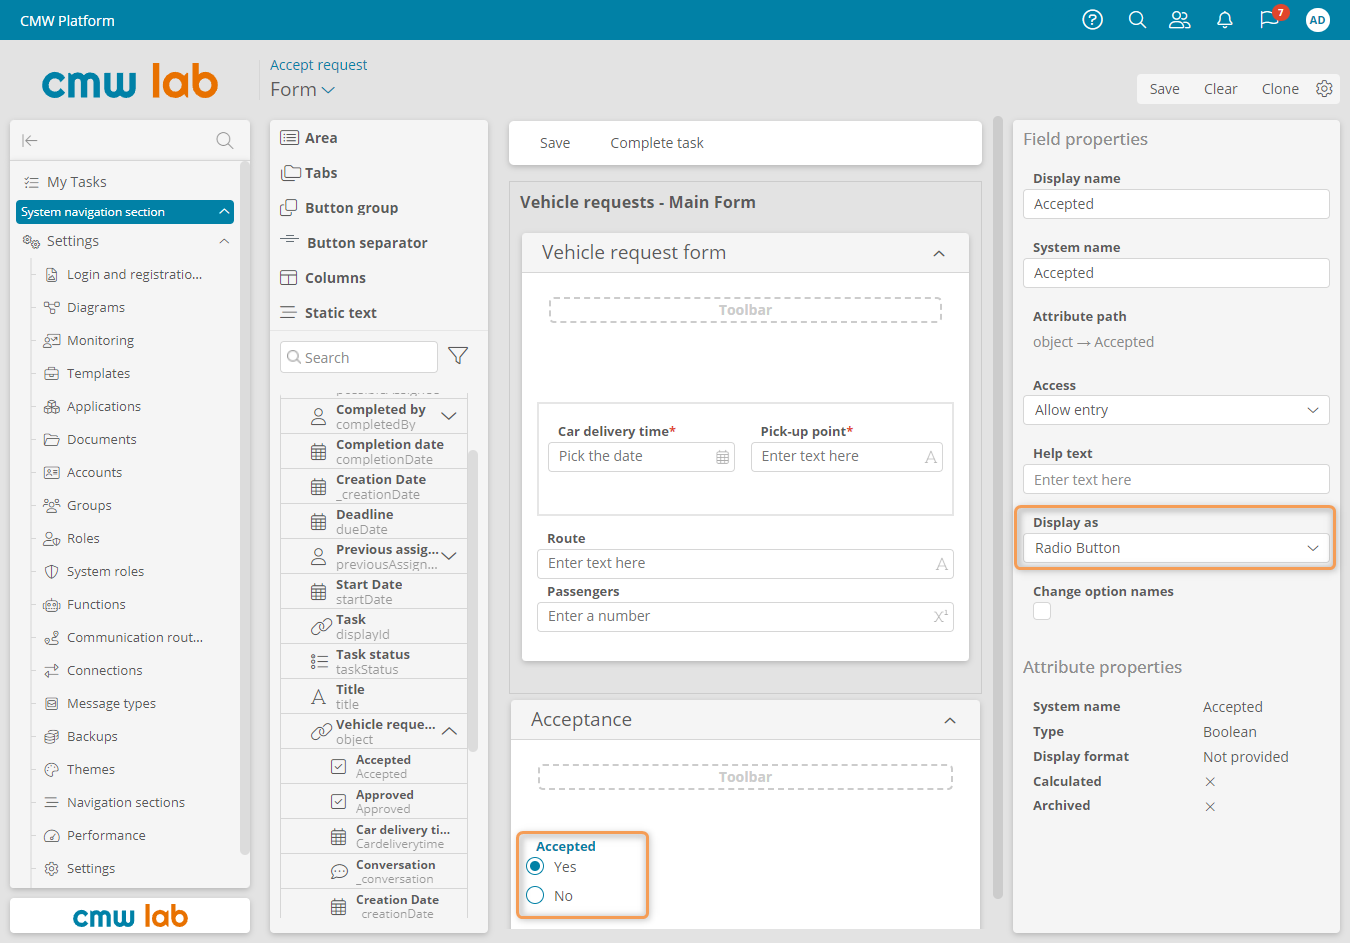
Changing the display mode of the Boolean attribute on the form
Initiator Task Form — Request Rejected
Business Requirement
The Initiator should be informed about the rejected request. The user task form will contain only the text “Your request was rejected” and the read-only request data.
1. On the process diagram, select the Rejected task and click Form in the element menu. The form designer appears.
2. Drag a new area to the form layout and rename it to Your request was rejected using the Area properties panel.
3. Expand the Vehicle requests item in the element pane, and drag the Vehicle requests - Main Form to the form layout below the Your request was rejected area.
4. In the Subform properties panel, set the Access to Read only.
5. Save the form and return to the process diagram.
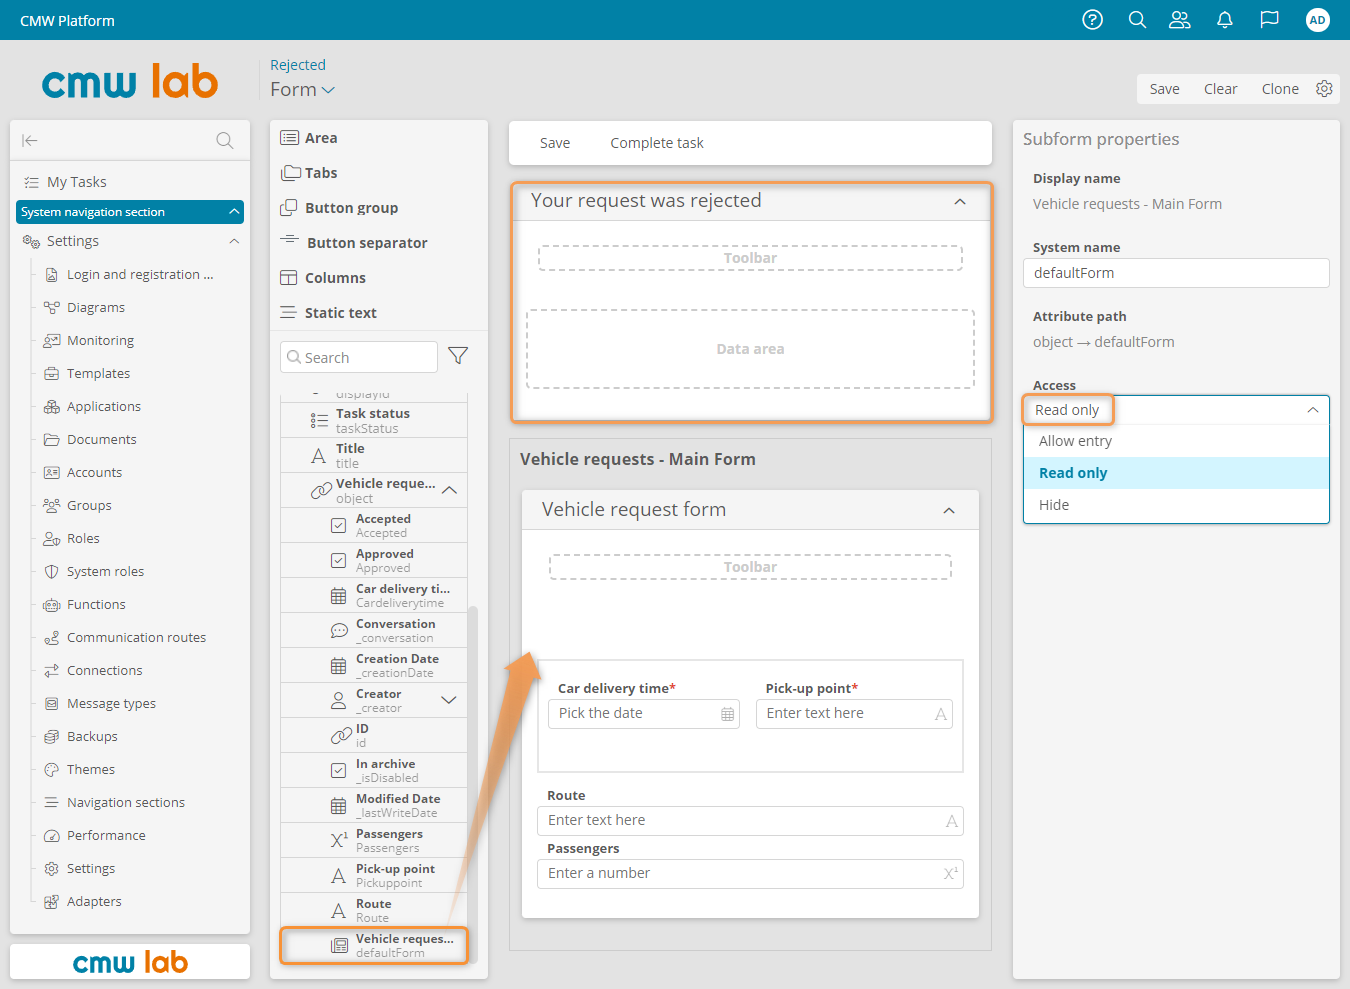
Changing the subform access mode
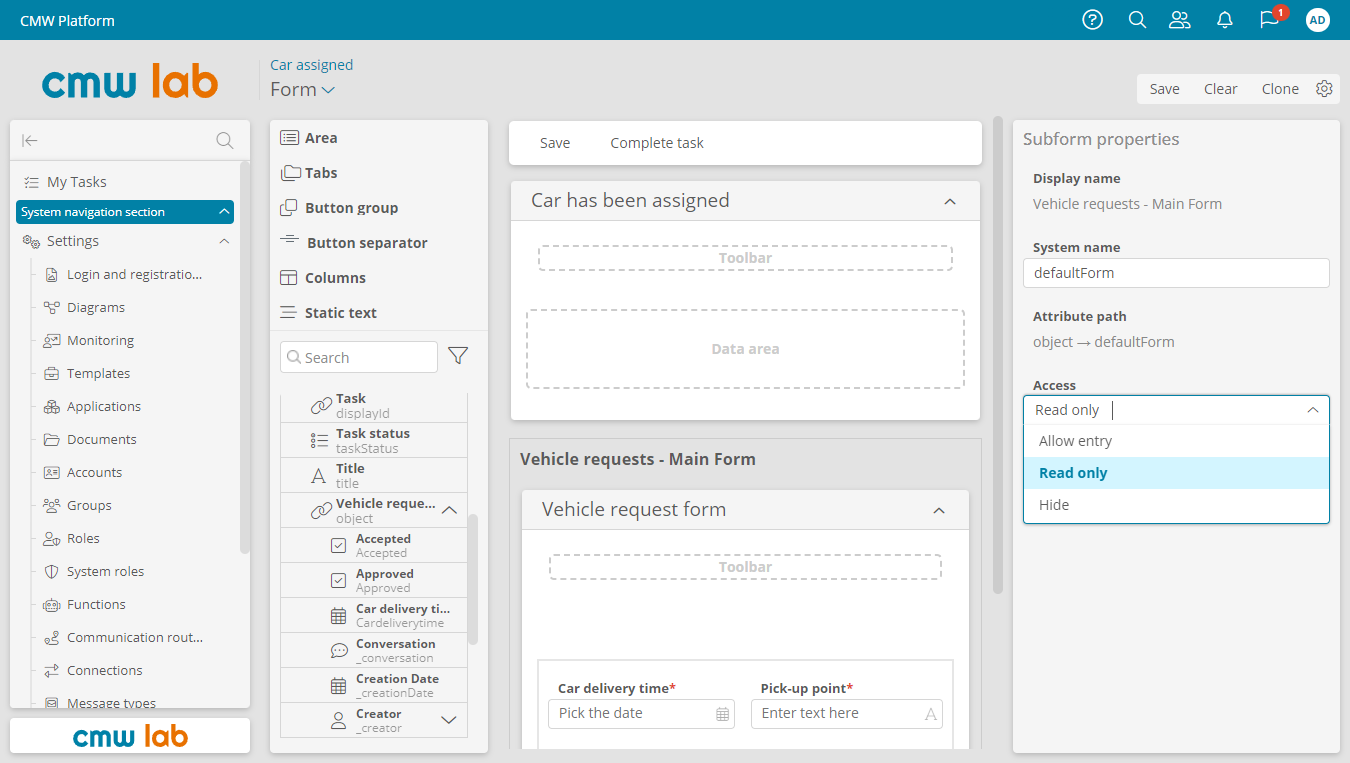
Initiator Task Form — Car Assigned
1. On the process diagram, select the Car assigned task and click Form in the element menu.
2. Configure the Car assigned task form — add a new area and the Vehicle requests - Main Form with Read only access. Save the form and return to the process diagram.
Configuring the Car assigned task form
Driver Task Form — Complete the Trip
1. On the process diagram, select the Car assigned task and click Form in the element menu.
2. Configure the Complete the trip task form — add the Complete the trip area and the Vehicle requests - Main Form subform below it. Set the subform access mode to Read only. Save the form and return to the process diagram.
Configure Exclusive Gateway Outgoing Flows
Let's configure the outgoing sequence flows from the gateways: “Approved?” and “Is there an available car?”
“Approved?” Gateway
Business Requirement
The flow that the process follows after the “Approved?” gateway to the Accept request task is defined by the Approved attribute value set by the Secretary while reviewing the request.
To control the process flow, we'll define the condition for the Accept request flow based on the Approved attribute value.
1. Select the “Approved?” gateway and click Properties in the element menu.
Navigating to the gateway properties
2. In the Exclusive gateway properties window, go to the Advanced tab and check the Default flow box next to the Rejected task flow.
Exclusive Gateway Default Flow
From an exclusive gateway the process follows the default flow if none of the conditions for the other flows are met (the condition returns false).
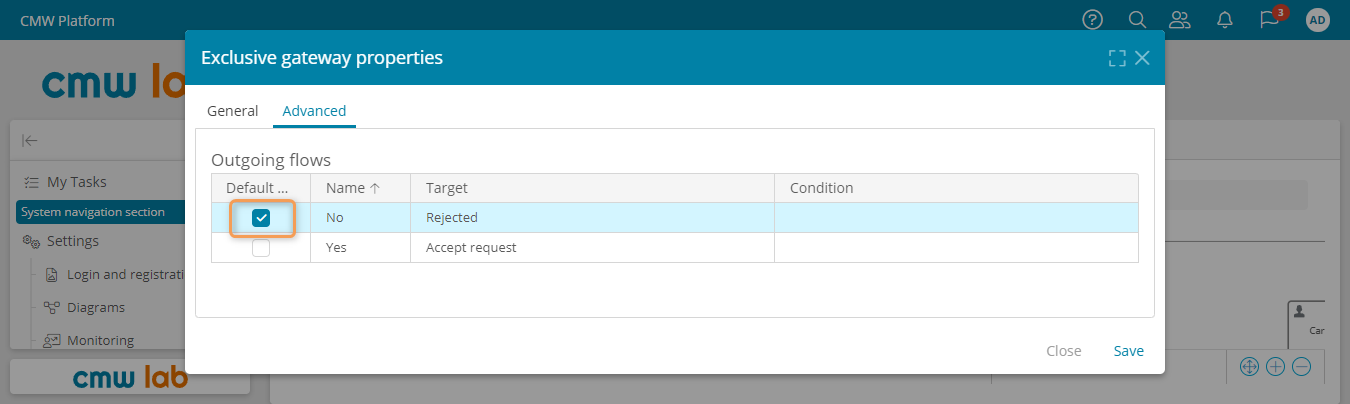
Setting up the default flow
3. On the Advanced tab, click the Condition column next to the Accept request flow. The compact expression editor appears.
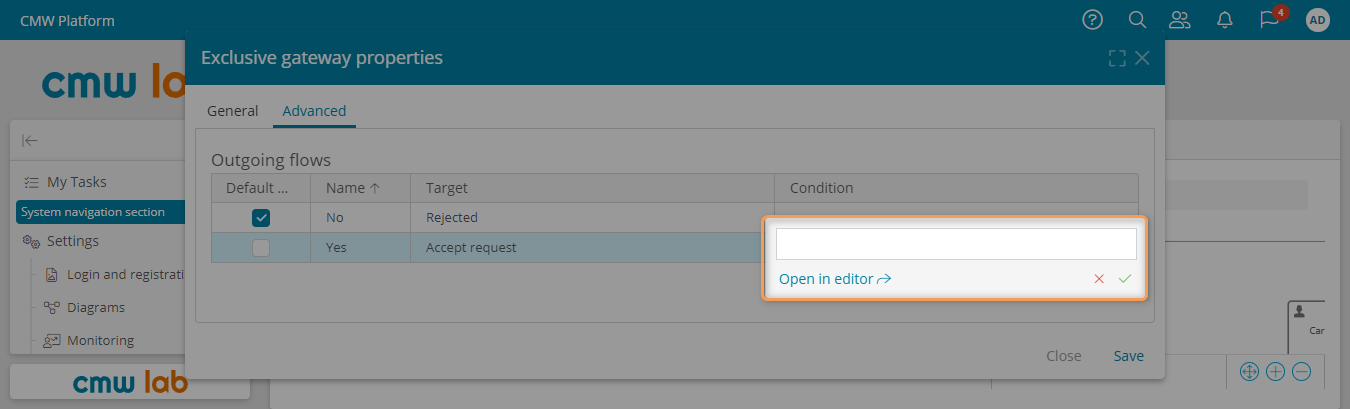
Compact expression editor
4. Enter $ and double-click the Approved attribute system name in the dropdown to enter it in the formula.
Referencing the Attributes in Formulas
In the formulas, the $ symbol followed by an attribute system name denotes a reference to attributes of the current object.
So the formula $Approved returns the Approved attribute value: false or true.
5. Click the green button.
6. Click Save.
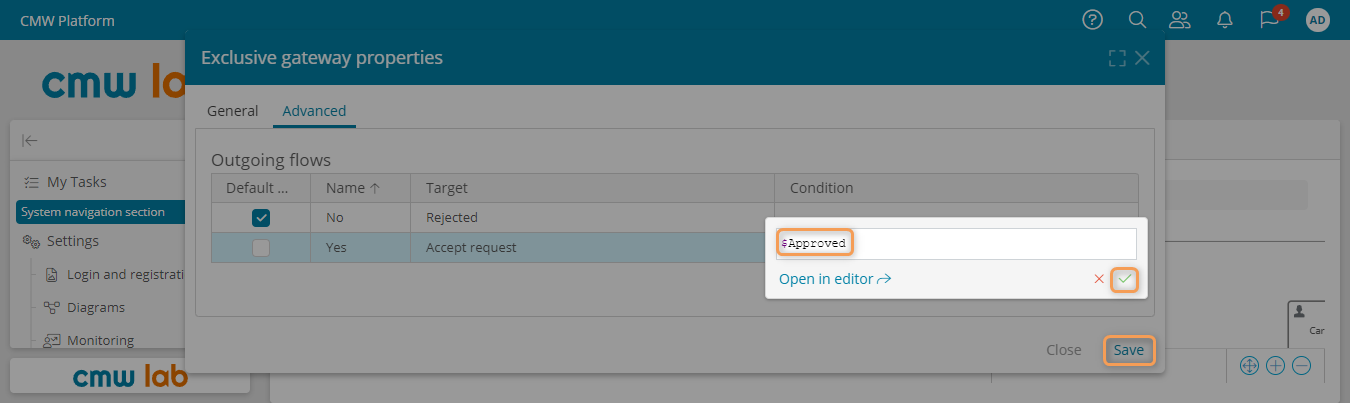
Entering the condition for a sequence flow
“Is there an available car?” Gateway
Business Requirement
The process should go from the “Is there an available car?” gateway to the parallel gateway if the Garage manager sets the Boolean attribute Accepted to true.
1. Select the gateway “Is there an available car?” and click Properties in the element menu.
2. Go to the Advanced tab.
3. Enter an expression for the "Yes" flow ($Accepted). Click the green check button.
4. Set the default flow next to the flow that goes to the task "Approve request".
5. Click Save.

Setting up and saving the “Is there an available car?” gateway properties
Configure User Task Performers
Let’s specify performers for the user tasks.
Approve Request, Accept Request, and Complete the Trip Tasks
1. Select the Approve request user task and click Properties in the element menu.
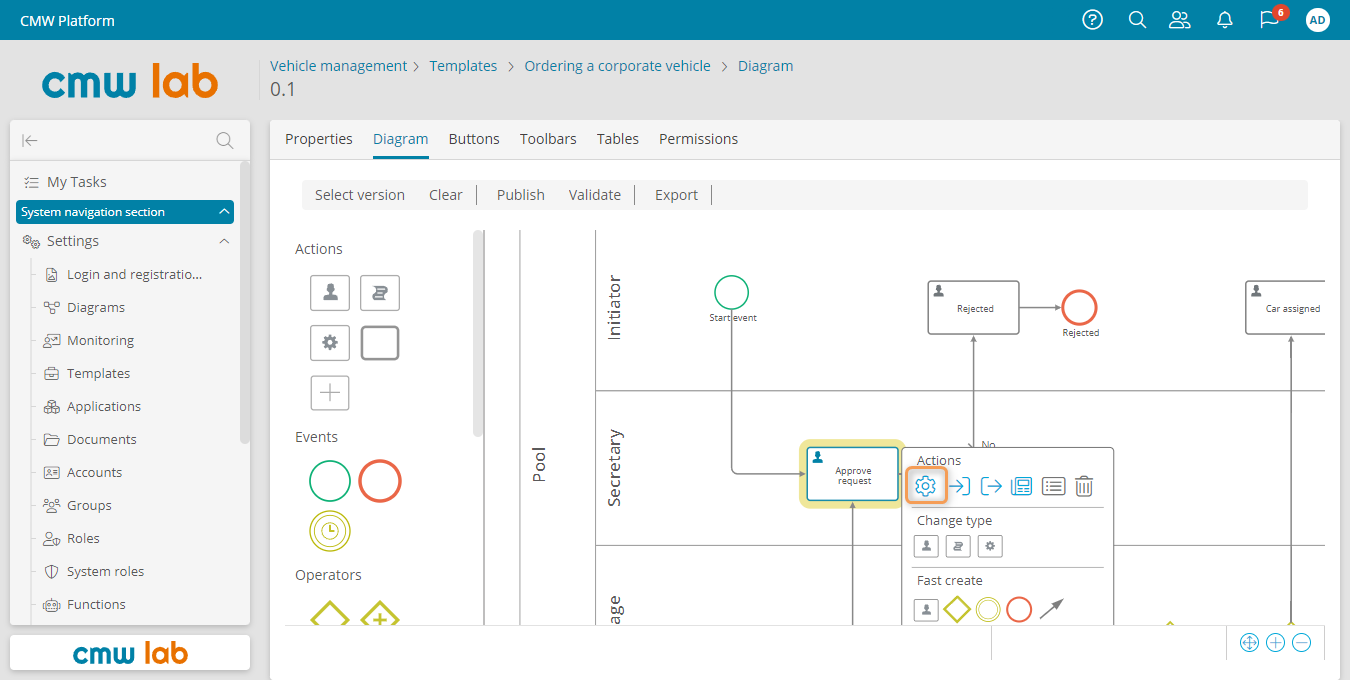
Navigating to the task's properties
2. On the Advanced tab, select an employee from the Performers dropdown.
3. Enter the task title — Ordering a corporate vehicle - Approve request.
4. Click Save.
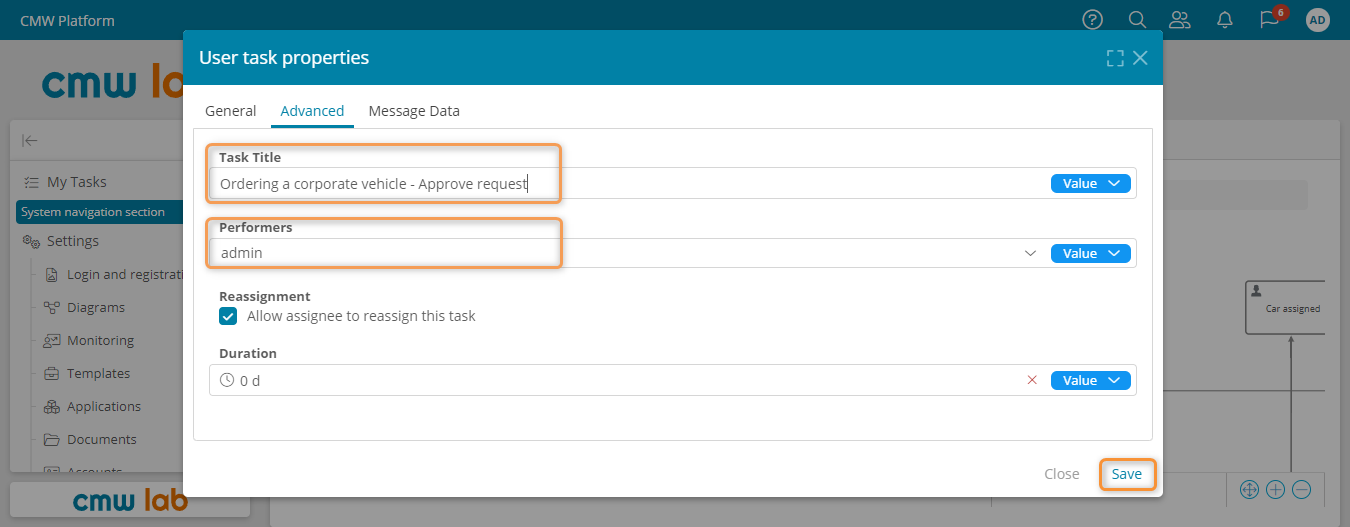
Configuring the Approve request task title and performer
5. Similarly, specify the performers and task titles for the tasks: Accept request and Complete the trip. At this point, you may use the same performer for all these tasks.
Rejected and Car Assigned Tasks
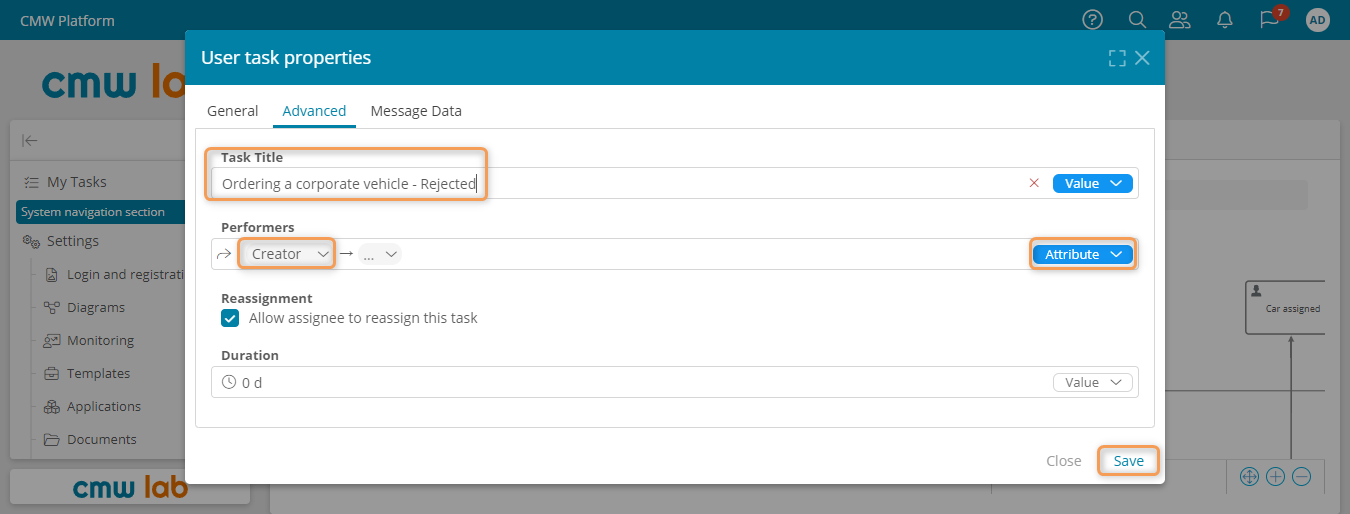
For the Rejected and Car assigned tasks, the performer should be the Initiator, the person who created the request. Let's calculate the Initiator.
1. Select the Rejected user task and click Properties in the element menu.
2. On the Advanced tab, select Attribute in the right dropdown of the Performers field.
3. In the Performers field, select the Creator attribute.
Creator System Attribute
The system attribute Creator points to the user who initiated the business process instance.
4. Enter the task title — Ordering a corporate vehicle - Rejected.
5. Click Save.
Configuring the Rejected task title and selecting the record creator as the task performer
6. Similarly to the above, set the Car assigned task title and performer.
Validate and Publish the Process Diagram
You have configured the business process template. To execute the process, you need to publish the process diagram. You should publish the business process diagram whenever you change it.
Before publishing, validate the diagram to make sure the expressions are correct and the diagram follows the BPMN notation.
1. Click Validate in the process diagram designer.
- If any errors are found, the elements with the errors are highlighted in red. Click the exclamation mark next to a highlighted element to see the error messages.
- If the diagram has no errors, the “OK” message appears, and you can publish the diagram.
2. Click Publish.
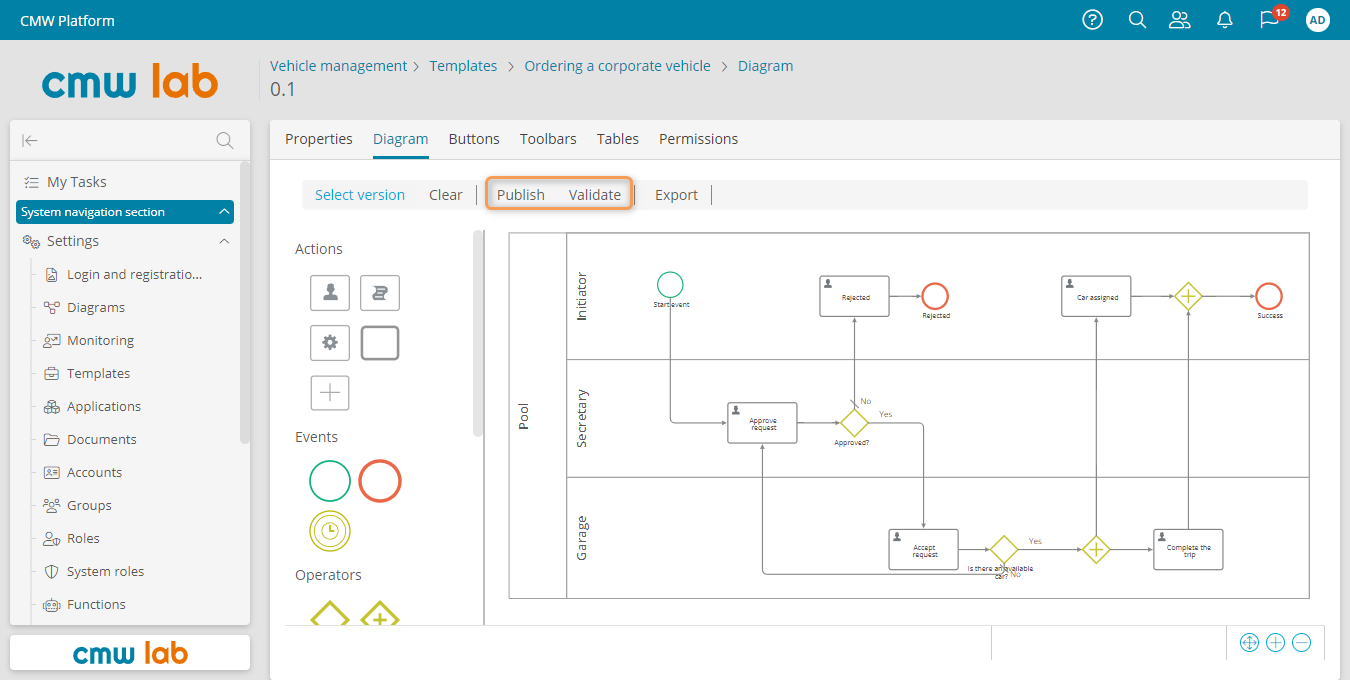
Validating and publishing the process diagram
Test the Business Process and My Tasks
You have configured and published the business process. Now, test it as an end-user.
1. Go to the Properties tab of the process template.
2. Click Navigate to instances.
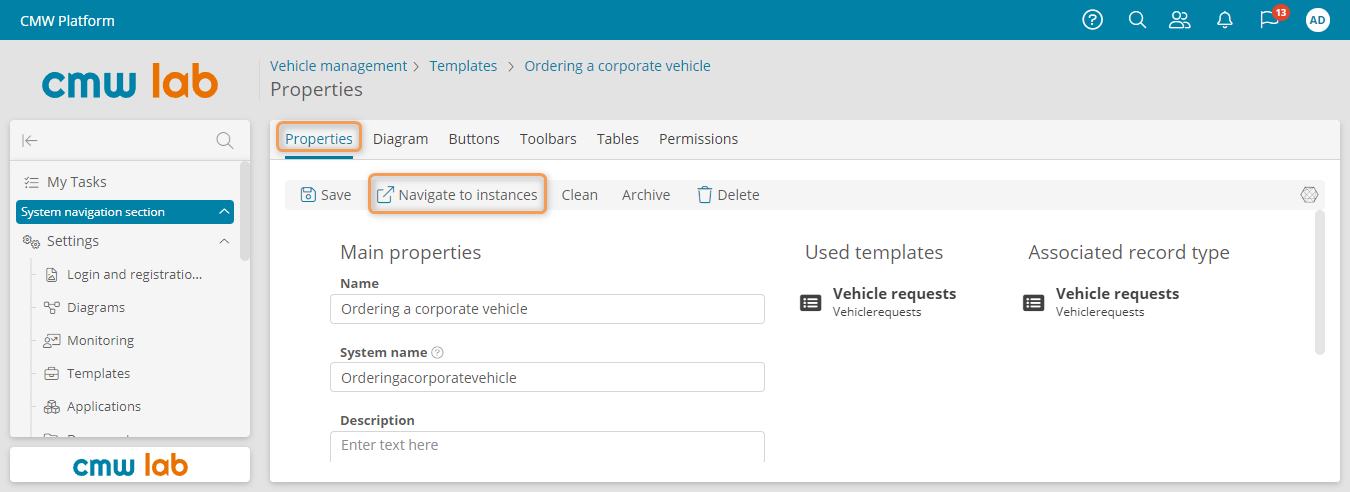
Navigating to the process instances
3. In the All records list, click Create. The configured start form should appear in the New record window.
4. Fill out the form and click Create.
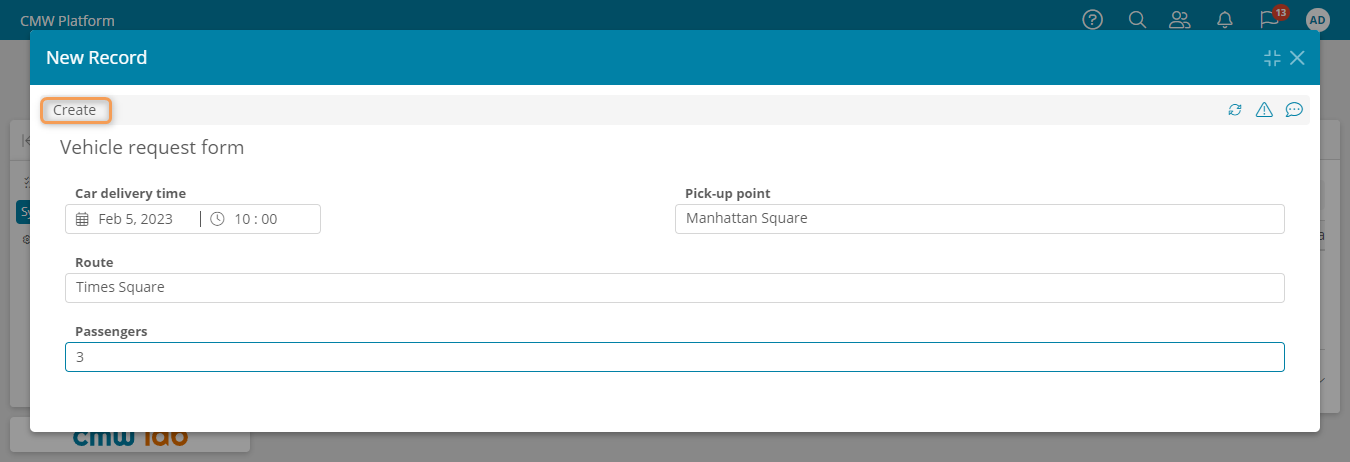
Creating a new vehicle request
5. A new business process instance appears in the list.
6. To perform the Approve request task (where the performer is the current user), go to My tasks page using the left navigation pane.
7. A list of active tasks assigned to you appears.
8. To open the task form, click the link with the task title.
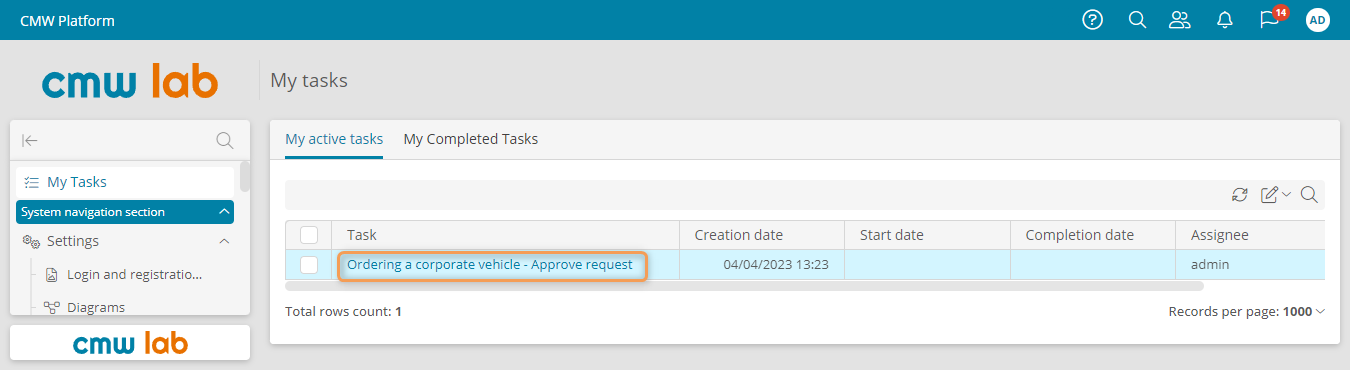
The active task list for the current user
9. In the vehicle request approval form that appears, check Approved and click Complete task.
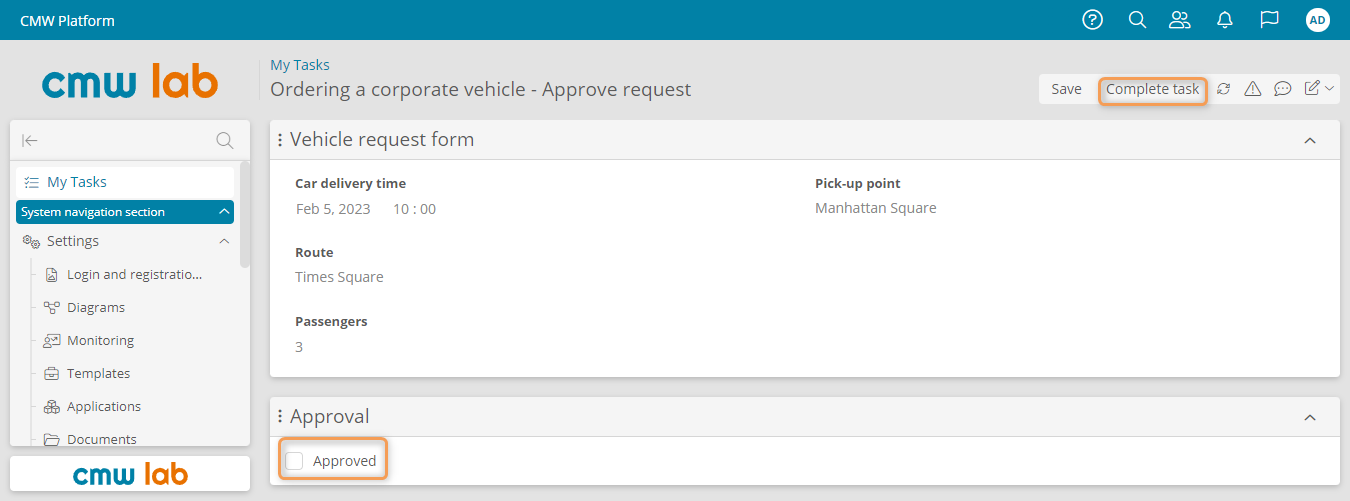
Approving the request and completing the task
10. Go to My tasks. You should see the Ordering a corporate vehicle - Accept request task in the list.
11. Set the Accepted field to No and click Complete task.
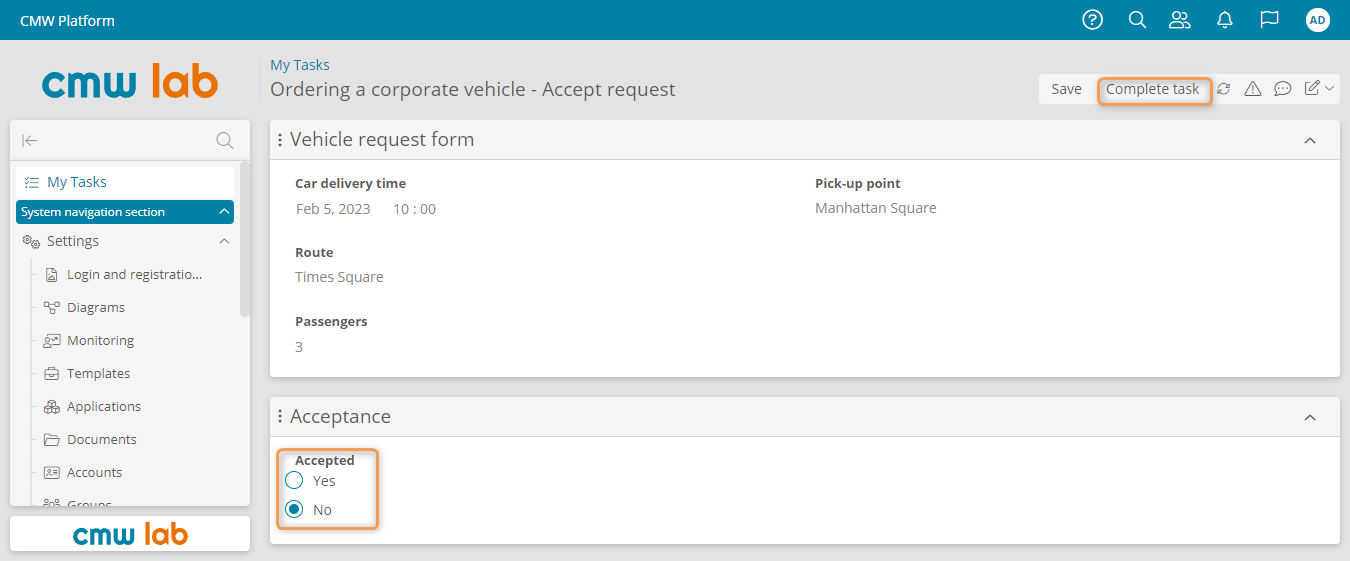
Rejecting the request and returning it to the Secretary
12. Return to My tasks. You should see the Ordering a corporate vehicle - Approve request in the list.
14. Open the task and uncheck the Approved box.
15. Click Complete task.
16. Go to My tasks. You should see the Ordering a corporate vehicle - Rejected task in the list. Open it, and click Complete task.
Results
Congrats! You have created your first business process, configured its task forms, and tested the process tasks initiation and execution.
Proceed to Lesson 4 — Monitoring and analytics to learn how to track the history of a running process and create dashboards with statistical charts for a certain period.