Lesson 8 — Accounts
Table of Contents
Introduction
In this lesson, you will learn how to design an organizational structure, create and manage user accounts: assign roles, issue and restrict access rights, assign task performers, and configure navigation sections. You will:
- Create roles and define their permissions for the templates used in the vehicle ordering process.
- Create account groups and link them to the roles.
- Assign the created roles as the task performers.
- Create several accounts and add them to the groups.
- Customize the navigation pane for each role.
Estimated time to complete: 15 min
Prerequisite: complete Lesson 3 — My First Business Process and Lesson 4 — Monitoring and analytics
Note: This lesson is for the CMW Platform version 4.2.571.0. In other versions, the page and menu appearance may differ from the screenshots.
Configure Roles
Business Requirement
We need the following user roles for our application:
- Initiator — an employee who submits a vehicle request. They need to create the requests and view the completed requests.
- Secretary — approves the vehicle request. They need access to editing and viewing requests.
- Garage manager — accepts a vehicle request and assigns a car. They need to edit the request and generate reports.
- Driver — performs the trip and records the costs. They need to enter the costs.
Account Roles
Roles define account permissions to access application resources: record templates, tables, buttons, forms, business process tasks, etc.
To configure a role, you need:
- Set the role permissions to access the application resources.
- Assign a role to accounts or account groups.
- Specify the navigation section to display for the users belonging to this role.
Create the Initiator Role
1. Select Applications in the navigation pane. Double-click the Vehicle management application to open its Administration page.
2. Go to the Roles.
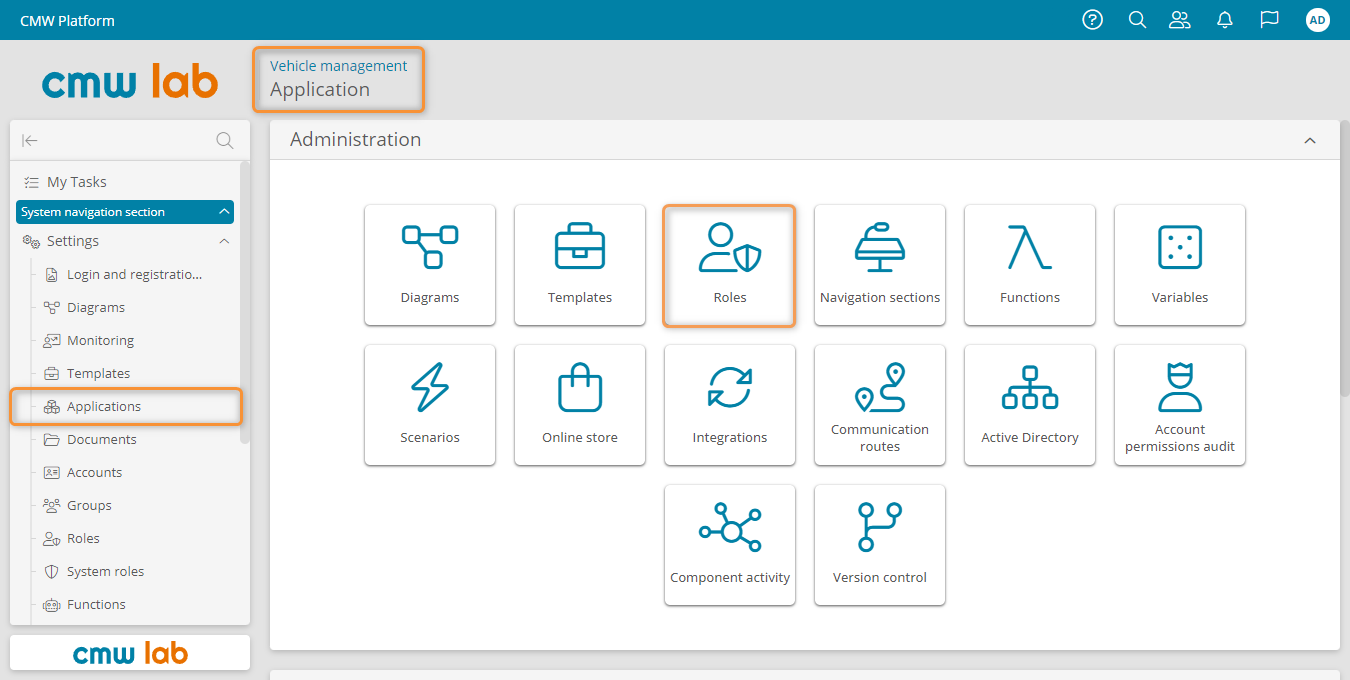
Navigating to the application Roles
3. Click Create. The Role properties page appears.
4. Specify the role name — Initiator.
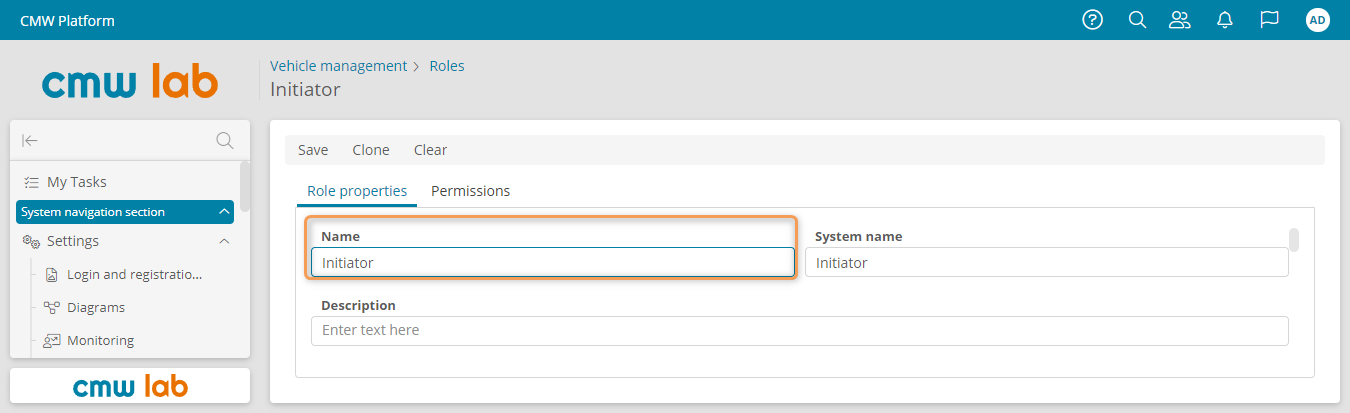
Creating the Initiator role
Business Requirement
The Initiator needs to create vehicle requests (i.e., initiate the vehicle booking process) and complete tasks. So, we will configure the permissions to access the process template and buttons.
5. Go to the Permissions tab.
6. Expand the Ordering a corporate vehicle process template in the resource pane on the left. Drag the Create, Save, and Complete task buttons to the resource permissions table.
7. Select the View checkbox for the Vehicle management application.
8. Select the Create and View checkboxes for the Ordering a corporate vehicle process template.
9. For the Create, Save, and Complete task buttons, select the Use buttons checkbox, as shown in the screenshot below.

Setting the process template access permissions for the Initiator role
Business Requirement
To select a vehicle type when submitting a request, the Initiator needs to view the vehicle type records.
10. Drag the Vehicle types record template to the resource permissions table and select the View checkbox.
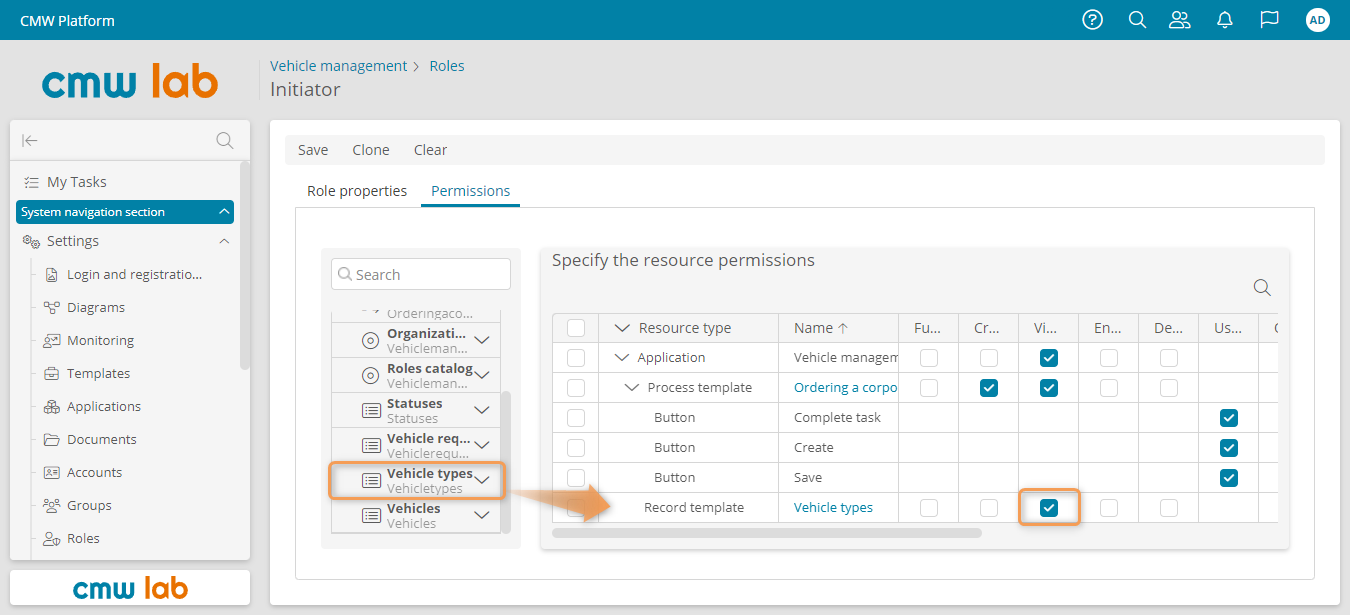
Setting the Initiator role access permissions to the reference data registry
Business Requirement
The Initiator needs to create vehicle requests and view the request list and request form.
11. Expand the Vehicle requests record template In the resource pane. Drag the All records table to the resource permissions table.
12. Drag the Vehicle requests - Main Form form to the resource permissions table.
13. Select the Create and View checkboxes for the Vehicle requests record template.
14. Select the View checkbox for the Vehicle requests - Main Form and All records table.
15. Click Save.
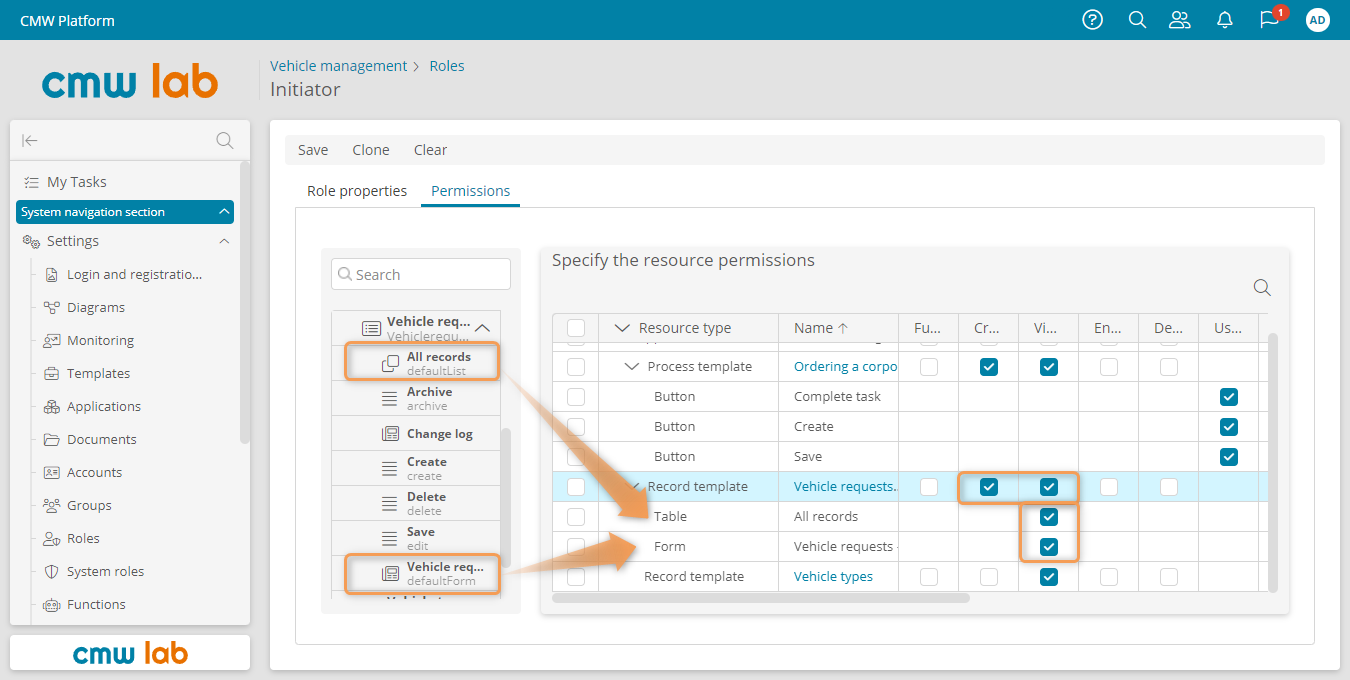
Setting the Initiator role access permissions to the transactional data registry
Create the Secretary Role
1. Create the Secretary role and go to its Permissions tab.
2. Drag the Ordering a corporate vehicle process template to the resource permissions table and select the View and Enter data checkboxes.
3. Expand the Ordering a corporate vehicle process template and drag the Create and Complete task buttons to the resource permissions table.
4. For these buttons, select the Use buttons checkbox.
5. Drag the Vehicle requests record template to the resource permissions table and set its permission to Full access.
6. Drag the Vehicle types and Statuses record templates to the resource permissions table and set their permission to View.
7. Click Save.
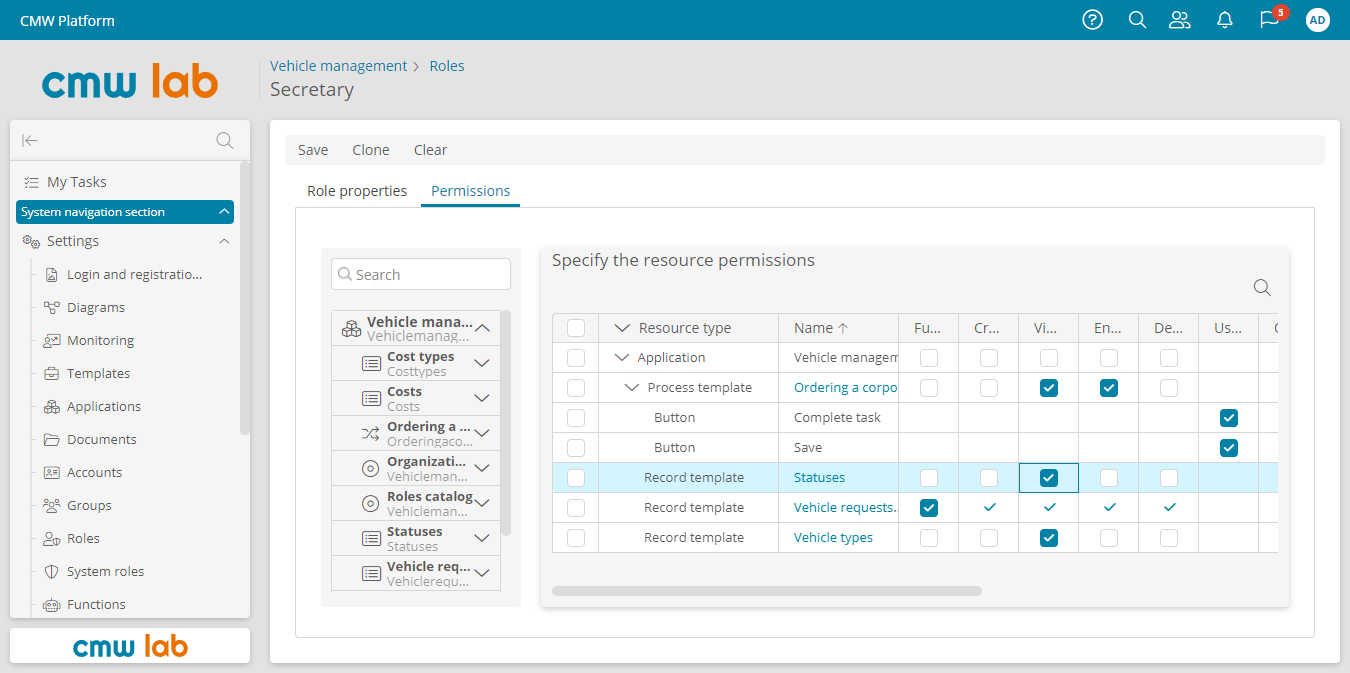
Setting the Secretary role permissions
Create the Garage Manager Role
1. Create the Garage manager role and go to its Permissions tab.
2. Drag the following templates to the resource permissions table: Ordering a corporate vehicle, Vehicle requests, Statuses, Vehicle types, Vehicles, Cost types, and Costs.
3. Set the Full access permission for these templates.
4. Click Save.
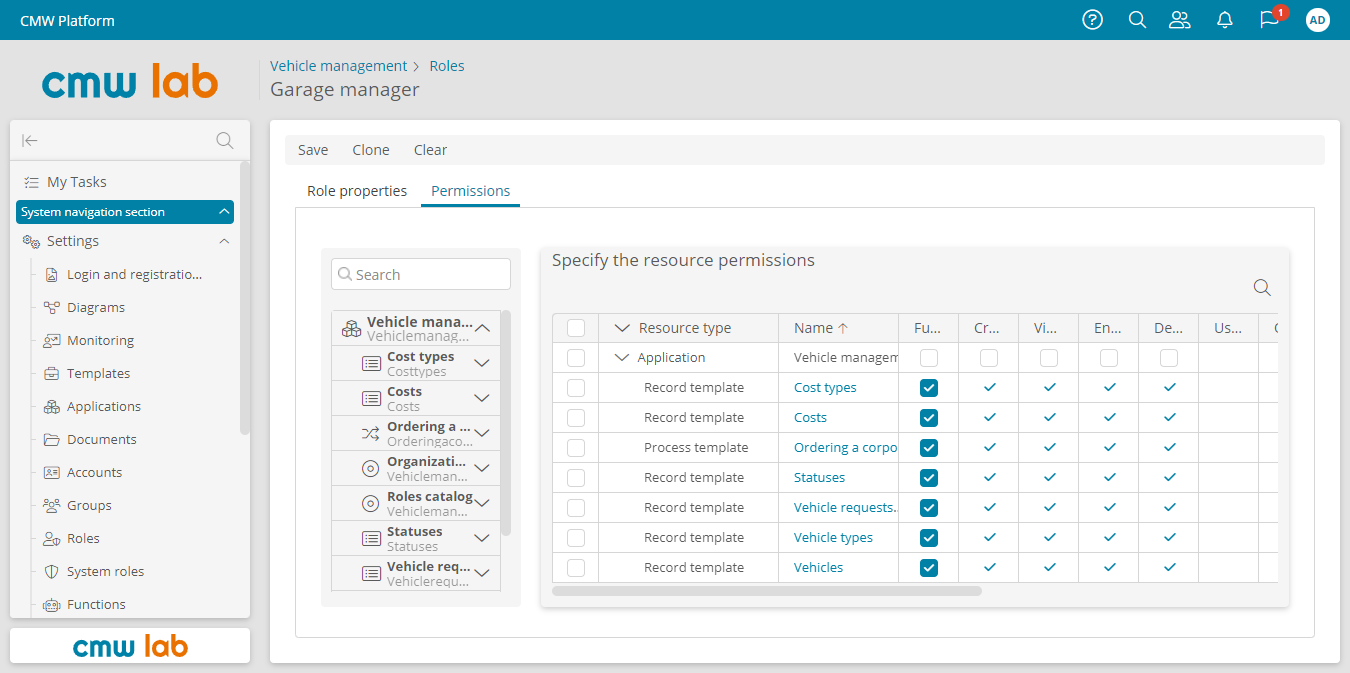
Setting the Garage manager role permissions
Create the Driver Role
1. Create the Driver role and go to its Permissions tab.
2. Drag the following templates to the resource permissions table: Statuses, Vehicle types, and Cost types.
3. Set the View permission for these templates.
4. Drag the Vehicles record template and set its permission to Create, View, and Enter data.
5. Drag the Vehicle requests record template to the resource permissions table and set its permissions to View and Enter data.
6. Expand the Ordering a corporate vehicle process template.
7. Drag the Save and Complete task buttons to the resource permissions table. Set the Use buttons for these buttons.
8. For the Ordering a corporate vehicle process template, set the View and Enter data permissions.
9. Drag the Costs record template to the resource permission table and set its permissions to Create, View, and Enter data.
10. Expand the Costs record template, drag the All records table from it to the resource permissions table, and set its permission to View.
11. From the Costs record template, drag the Create button to the permission table and set its permission to Use buttons.
12. Click Save.
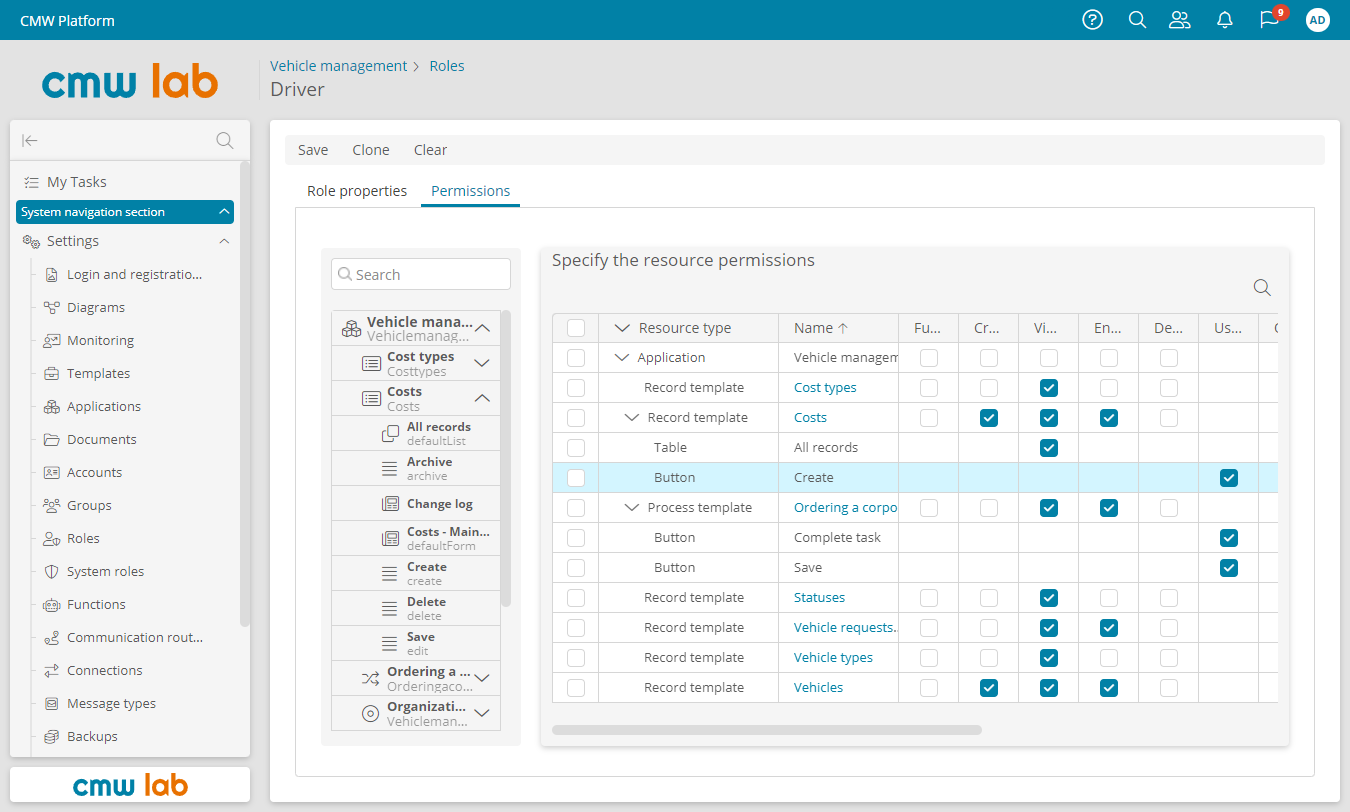
Setting the Driver role permissions
Configure Account Groups
We have created the Initiator, Secretary, Driver, and Garage manager roles and defined their permissions to access application resources.
Now, let's create account groups and assign roles to them.
1. Select Groups in the navigation pane to open the group list.
2. Click Create. Specify group name — Secretaries. Click Create to save the group.
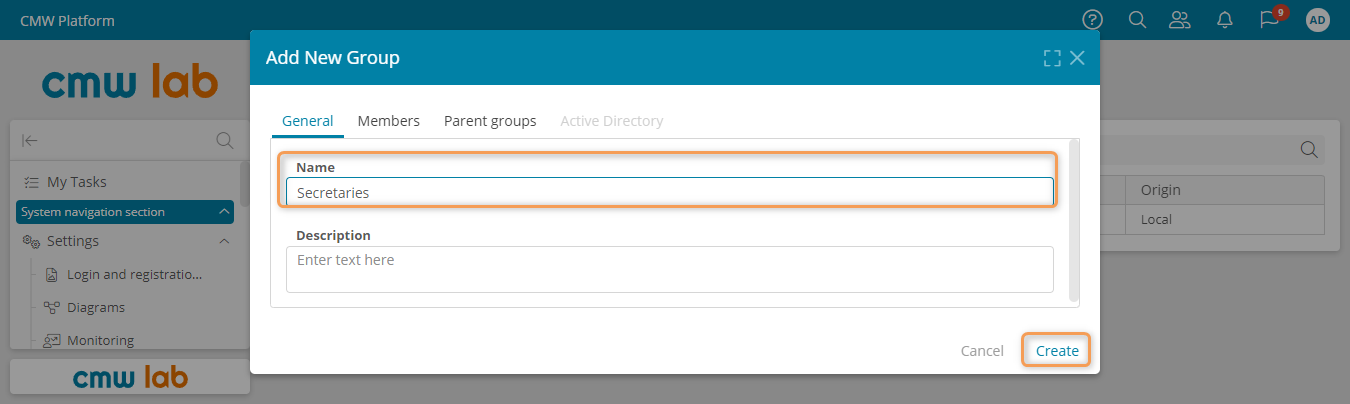
Creating a new account group
3. Similarly to the above, create the Garage managers and Drivers groups.
4. Create the Employees group and add all employees to it:
- Go to the Members tab.
- In the Select the accounts and subgroups pane, click the Garage managers, Drivers, and Secretaries groups to add them to the Employees group.
- Click Create to save the group.
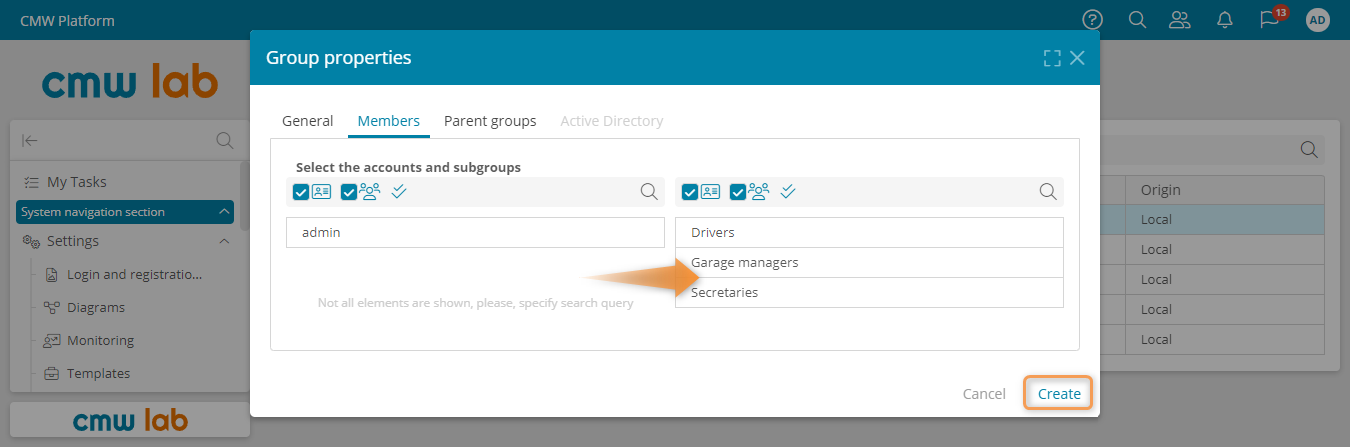
Adding members to the Employees group
5. The group list should contain Employees, Drivers, Garage managers, Secretaries, and Everyone groups.
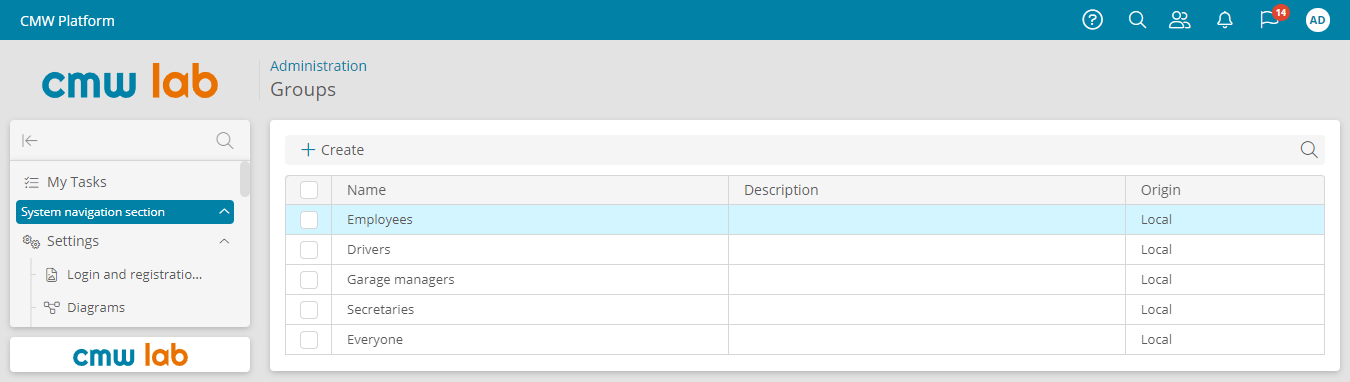
The list of all account groups
Assign Roles to Groups
Business Requirement
Any employee can initiate a vehicle request. So, we will assign the Initiator role to the Employees group.
We will assign the Secretary, Garage manager, and Driver roles to the Secretaries, Garage managers, and Drivers groups, respectively.
1. In the navigation pane, select Roles.
2. Open the Initiator role by double-clicking it in the role list.
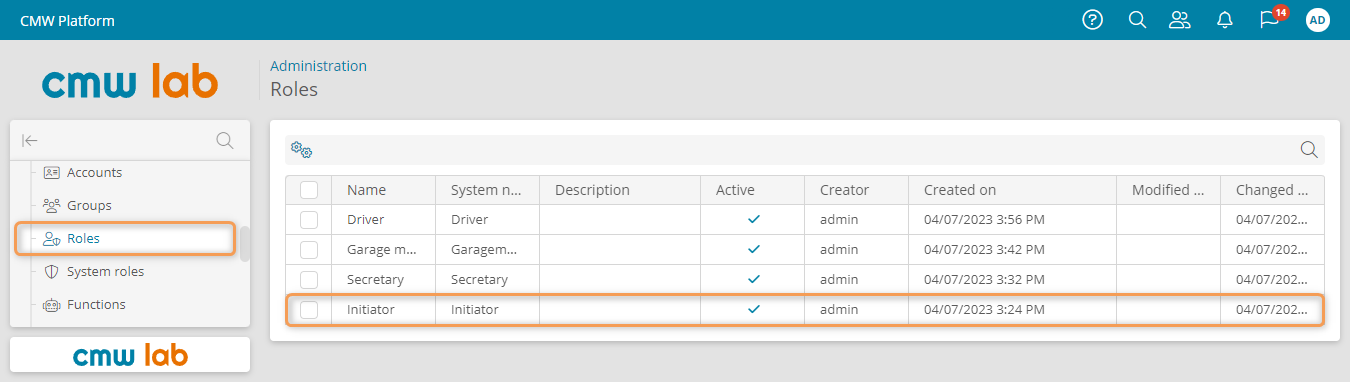
Navigating to the Initiator role from the role list
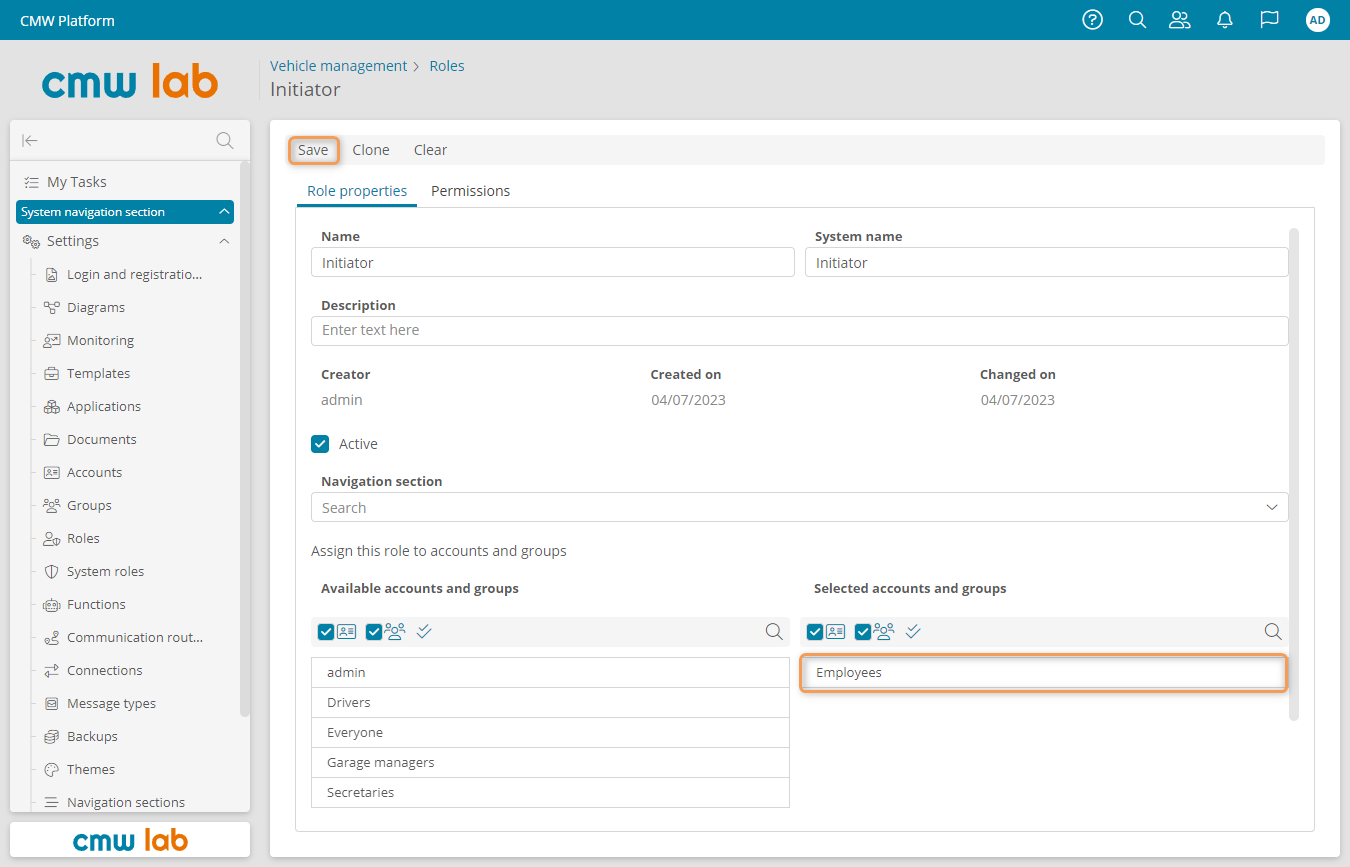
3. Go to the Role properties tab.
4. In the Assign this role to accounts and groups list, click the Employees group to move it to the Selected accounts and groups list.
5. Click Save.
Assigning the Initiator role to the Employees account group
6. Similarly to the above, configure the remaining roles:
- Add the Secretaries group to the Secretary role.
- Add the Garage managers group to the Garage manager role.
- Add the Drivers group to the Driver role.
Assign Task Performers
We have created roles, specified account groups, and their access rights.
Business Requirement
Up to this point, all user tasks were assigned to the current user.
Now, we will assign the Secretary, Garage manager, and Driver roles as performers for the respective user tasks.
As before, the Rejected and Car assigned tasks will be assigned automatically to the vehicle request creator.
1. Select Applications in the navigation pane. Navigate to the Vehicle management application.
2. Open Templates and go to the Ordering a corporate vehicle process template.
3. Go to the Diagram tab and click Edit.
4. Select the Approve request user task and click Properties in the element menu.
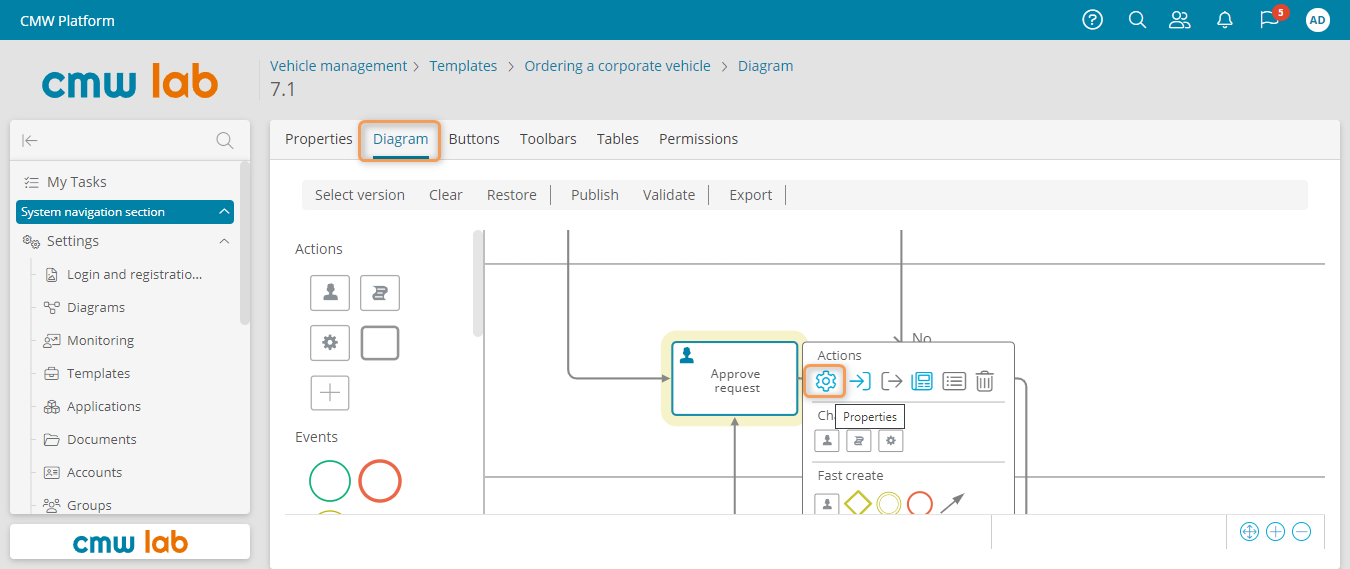
Navigating to the user task properties from the process diagram
5. Go to the Advanced tab.
6. In the Performers field, uncheck your account and check Secretary.
7. Click Save.
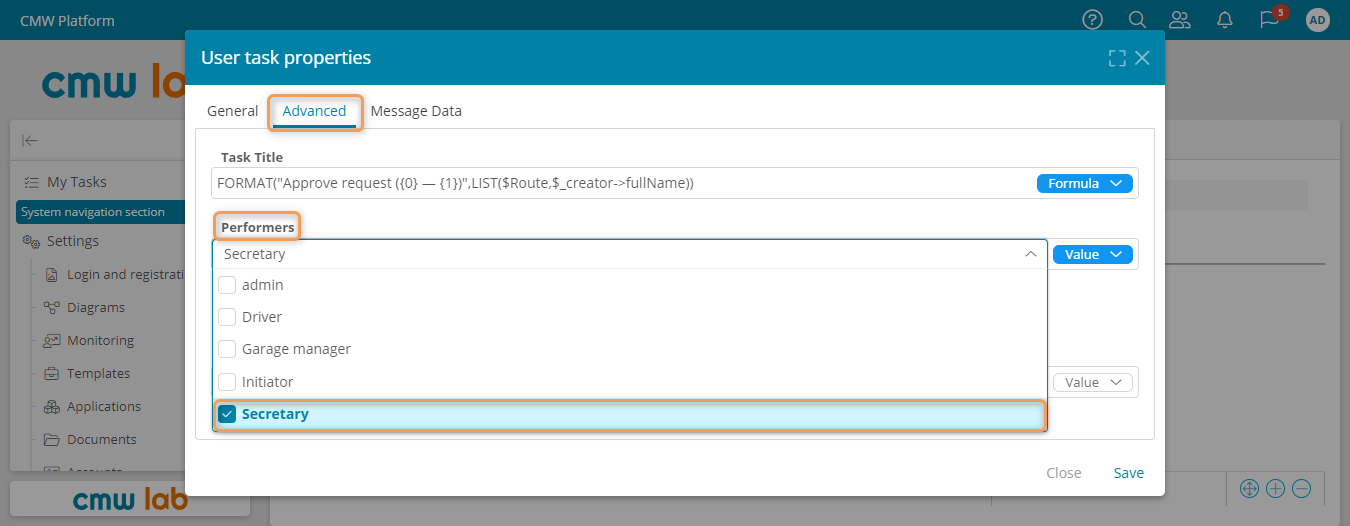
Changing the task performer
8. For the Accept request user task, specify the Garage manager role as the performer.
9. For the Complete the trip user task, specify the Driver role as the performer.
10. Publish the business process diagram.
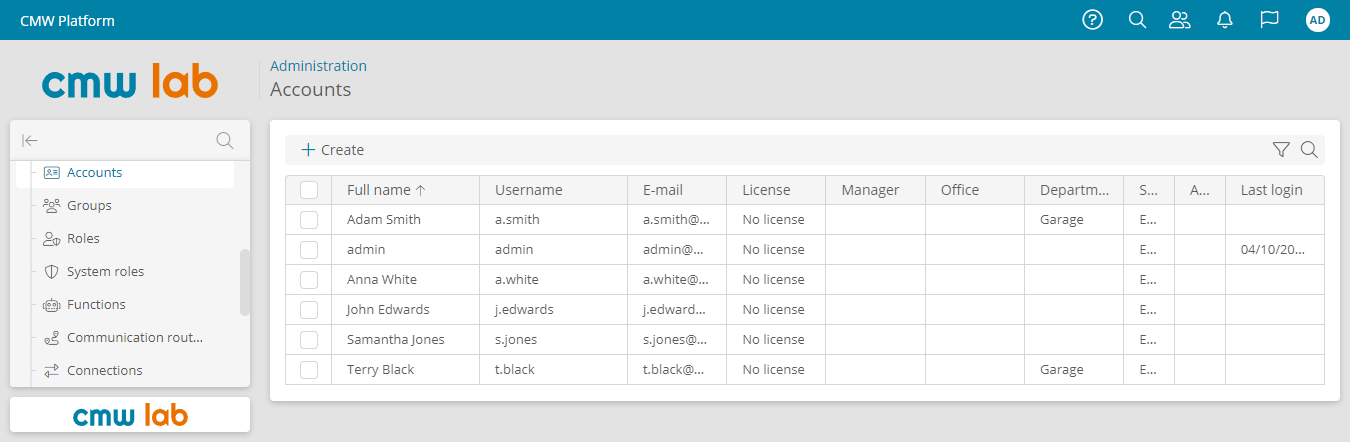
Create Accounts
Let's create the Secretary, Garage manager, and Driver accounts.
1. In the navigation pane, go to Accounts.
2. Click Create.
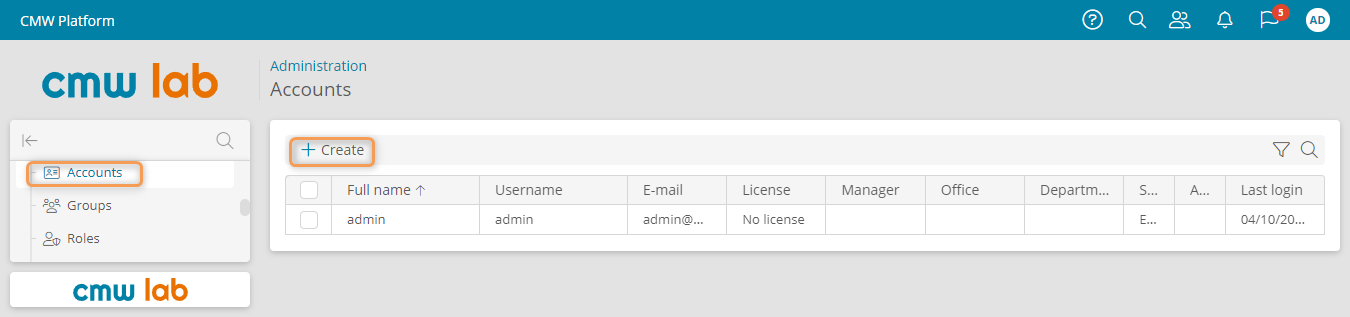
Creating a new account
3. Select the English language.
4. Enter the user's full name and e-mail.
5. Enter the username to log in to the account.
6. Enter and confirm the password.
7. Enter the job title — Garage manager and department — Garage.
8. Click Create to save the account.
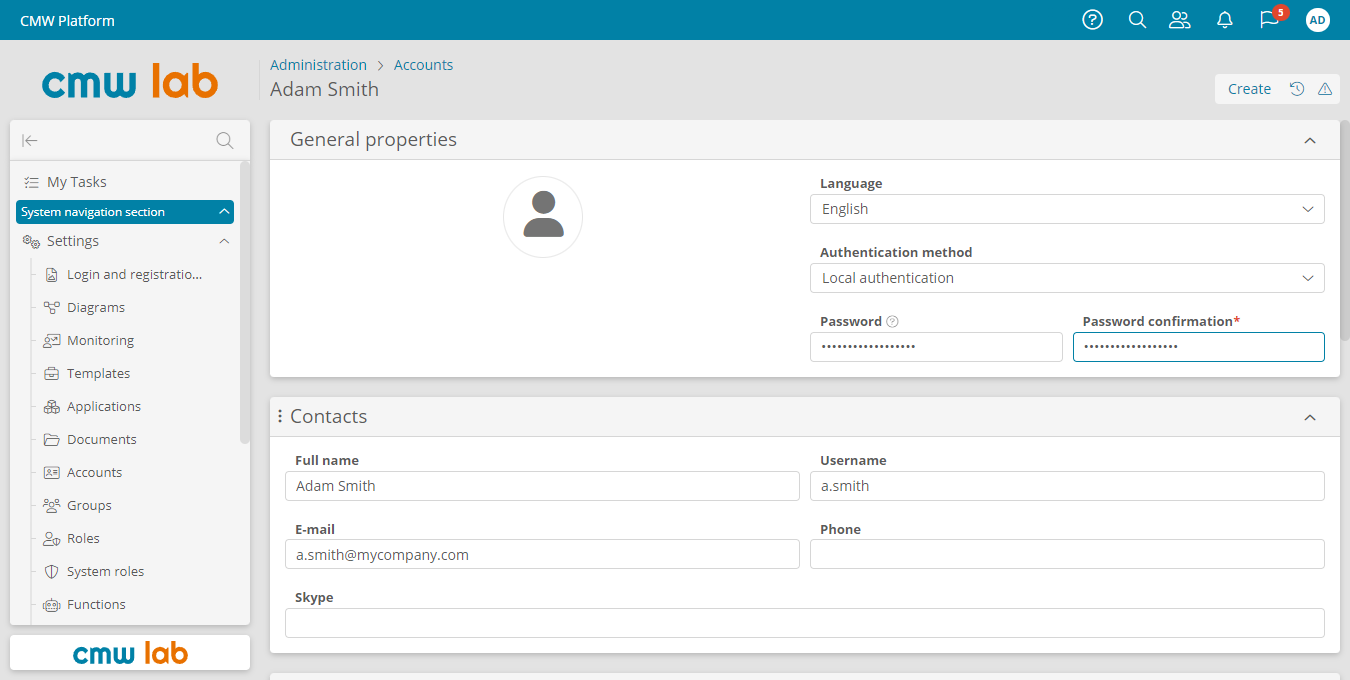
Configuring an account
9. Similarly to the above, create a driver account (job title — Driver, the department — Garage).
10. Create two Secretary accounts and one Initiator account.
Accounts for the vehicle booking process
Add Accounts to Groups
Let's add the accounts to groups according to their job function.
1. In the navigation pane, go to Groups.
2. Double-click the Drivers group and go to the Members tab.
3. Add the Driver's account to this group.
4. Click Save.
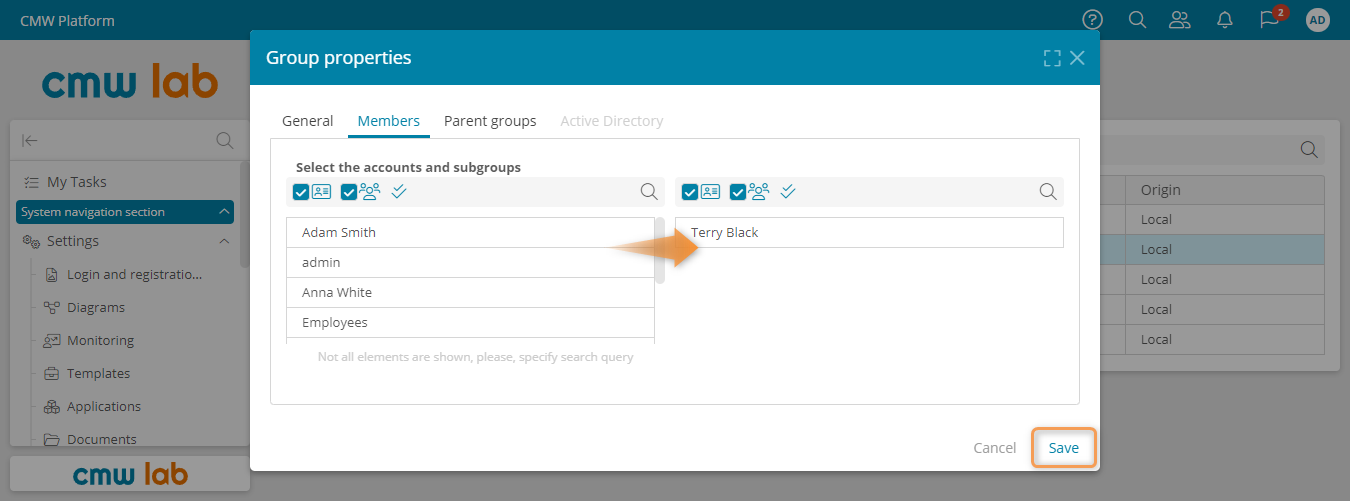
Editing the group members
5. Similarly to the above, add the Garage manager account to the Garage managers group
6. Add the Secretary accounts to the Secretaries group.
7. To the Employees group, add an account that should be able to create vehicle requests.
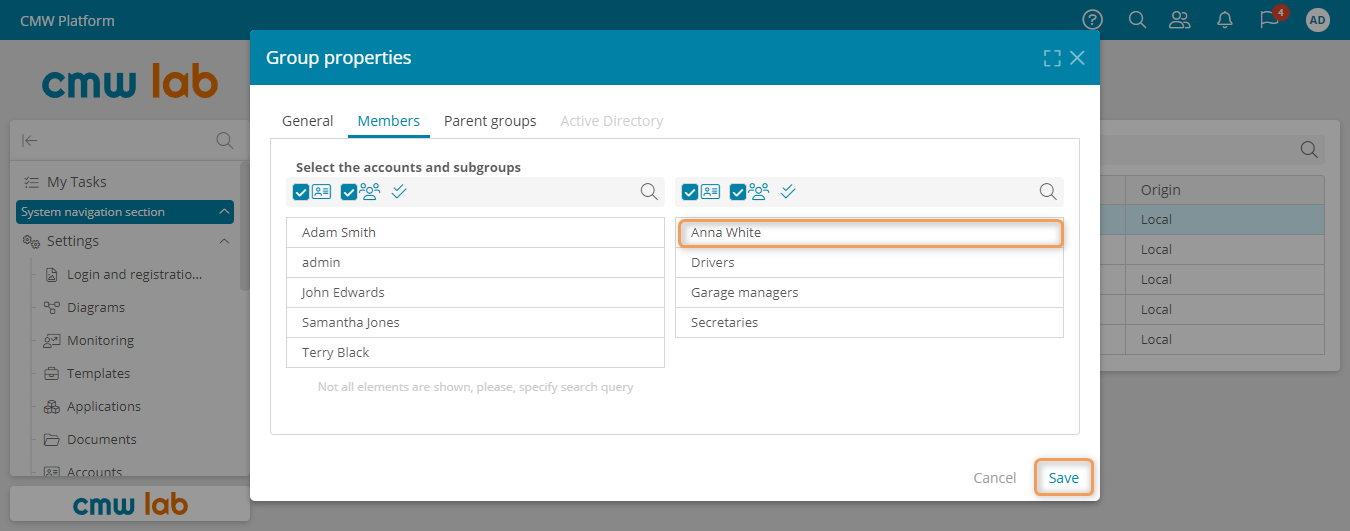
Adding a user account to the Employees group
Configure Navigation Sections
Navigation sections appear in the navigation pane and provide a convenient way to navigate within the CMW Platform.
Up to this point, we have been using the system navigation section. Now, we will configure a navigation section for each role.
Create the Initiator Navigation Section
Let's configure a navigation section for the Initiator role. They need to create vehicle requests and view their tasks.
1. Select Applications from the navigation pane.
2. Double-click the Vehicle management application to open its Administration page.
3. Go to the Navigation sections.
4. Click Create. The navigation section designer appears.
5. In the Navigation section properties, set the navigation section display name — Initiator. Ensure that the Vehicle management application is selected.
6. Assing the navigation section to the Initator role:
- Click the 0 roles label in the Navigation section properties panel.
- In the Roles window, add the Initiator role to the right list by double-clicking it in the left list.
- Click Apply.
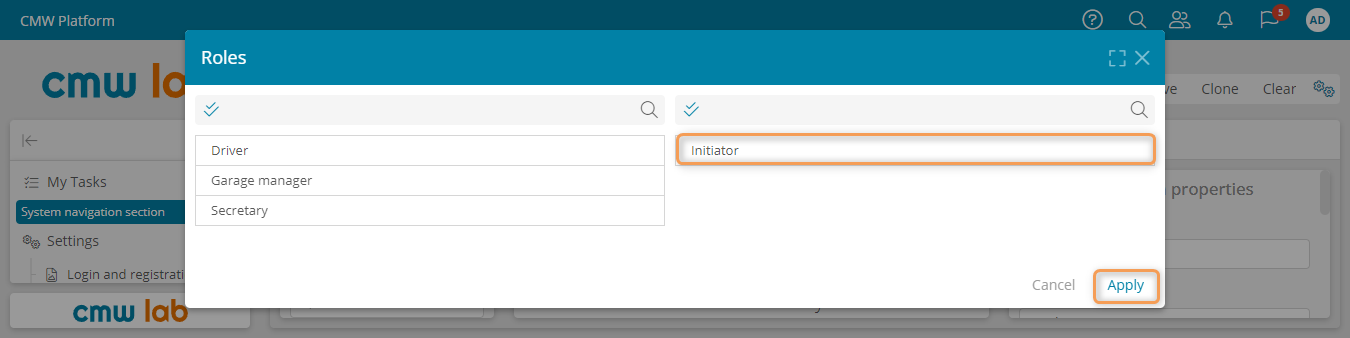
Selecting a role for the navigation section
8. Drag the My tasks item from the resource pane to the navigation section layout.
9. Expand Process templates > Ordering a corporate vehicle > Buttons in the resource pane and drag the Create button to the navigation section layout.
10. Click Save.
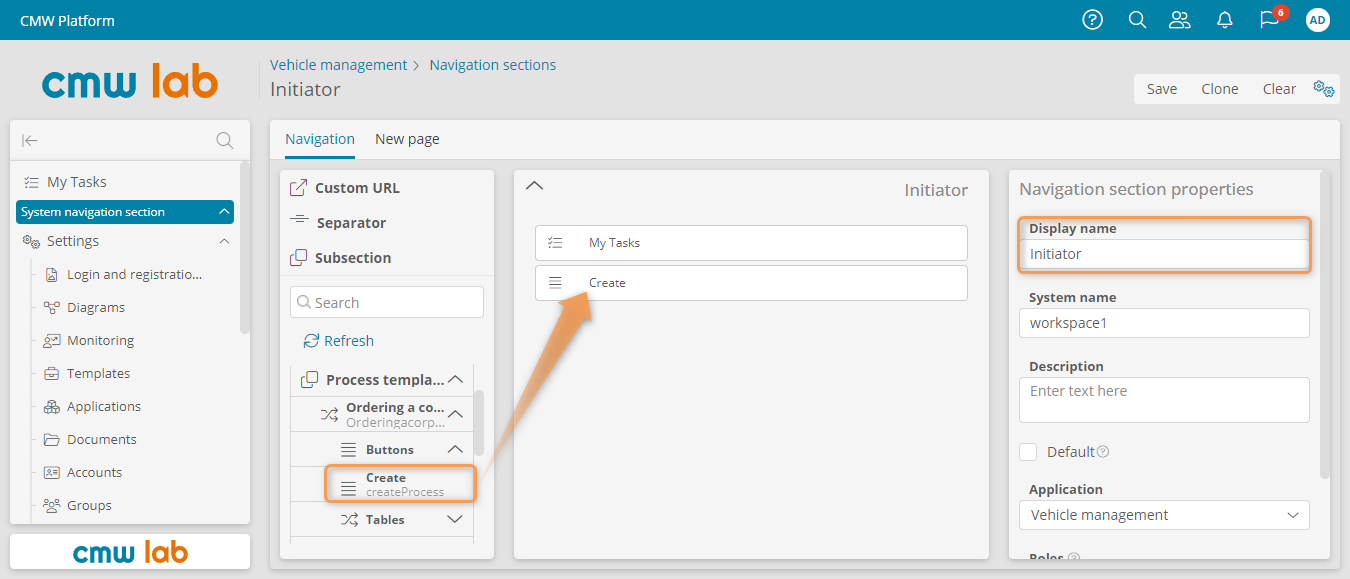
Configuring the Initiator navigation section
Create the Secretary Navigation Section
Let's create a navigation section for the Secretary role. They need to view all vehicle requests and their tasks.
1. Create a new navigation section using the navigation section list of the Vehicle management application.
2. Rename the navigation section to Secretary.
3. Assign the navigation section to the Secretary role.
4. Drag the My tasks item to the navigation section layout.
5. Expand Record templates > Vehicle requests > Tables in the resource pane and drag the All records table to the navigation section layout.
6. Select the All records item and rename it to Vehicle requests.
7. Click Save.
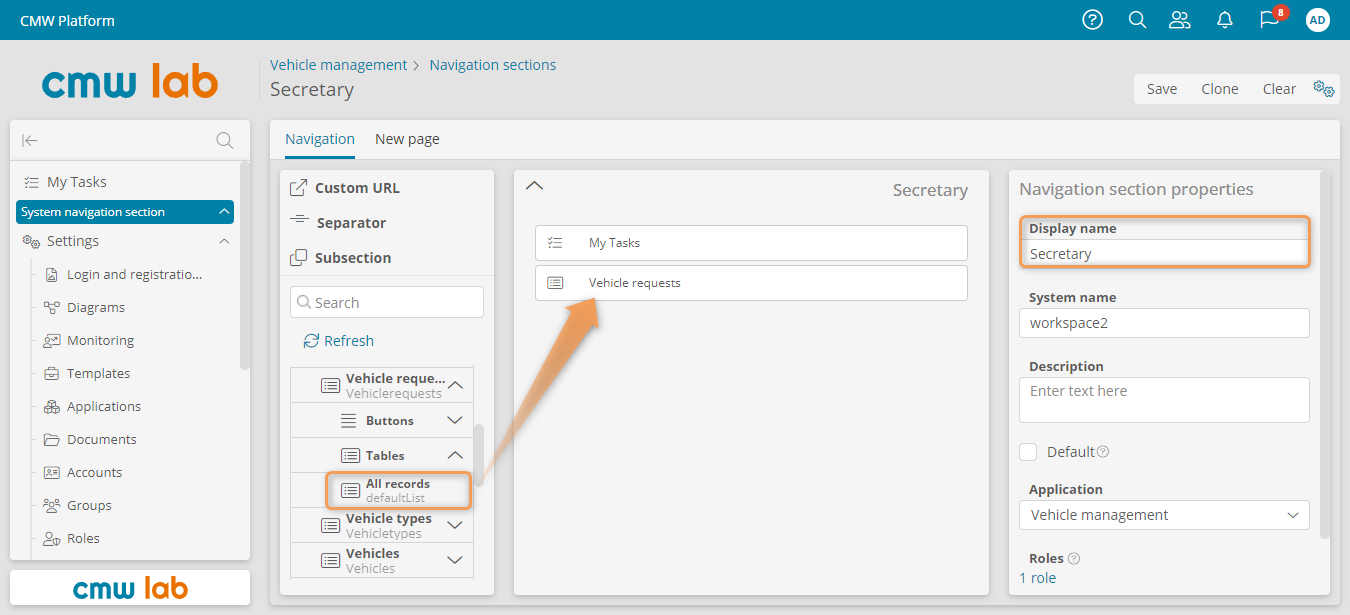
Configuring the Secretary navigation section
Create the Garage Employee Navigation Section
Let's configure a navigation section for garage employees — garage managers and drivers. They need to process vehicle requests and view costs and monthly request summary.
1. Open the Summary navigation section you created in Lesson 4 — Monitoring and analytics. It is available in the Vehicle management application navigation section list.
2. Rename the navigation section to Garage employee.
3. Assign two roles to this navigation section: Garage manager and Driver.
4. Drag the My tasks item to the navigation section layout.
5. Expand Record templates > Vehicle requests > Tables in the resource pane and drag All records table to the navigation section layout.
6. Rename the All records navigation item to Vehicle requests.
7. Expand Record templates > Costs > Tables and drag All records table to the navigation section layout.
8. Rename the All records navigation item to Costs.
10. Click Save.
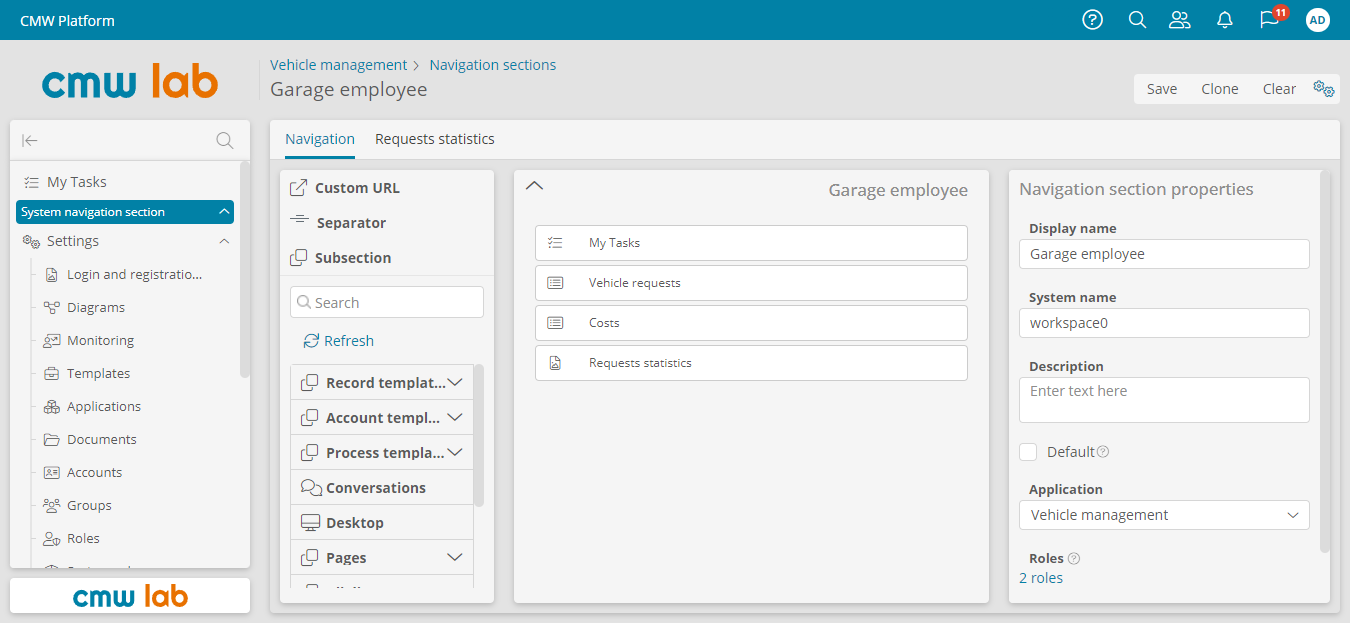
Configuring the Garage employee navigation section
Test the Roles and Task Performer Assignment
Note
To test the configured roles and task performer assignment, you will log in to the accounts with different roles (Initiator, Secretary, Garage manager, and Driver) several times.
You can view the account usernames on the Administration — Accounts page.
For your convenience, log in to each account using incognito mode and a new window in a different browser.
1. Sign in to the Initiator account.
2. Click Create in the navigation pane and fill in the start form fields to create a vehicle request and start the business process.
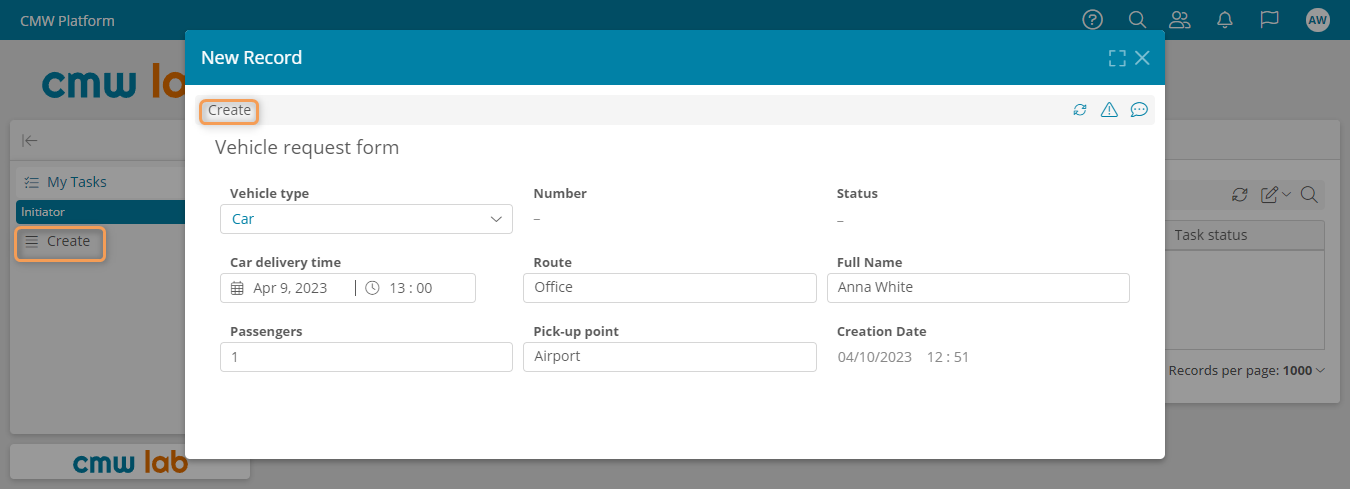
Creating a vehicle request under the Initiator account
3. Log out. To do this, click the user icon in the upper right corner of the page and click Log out.
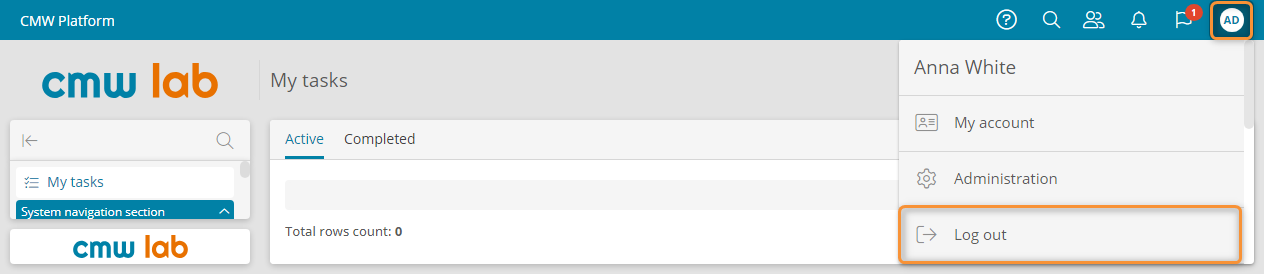
Logging out
4. Log in to one of your Secretary accounts.
5. Go to My tasks using the left navigation pane.
6. Open the Approve request task by double-clicking its name.
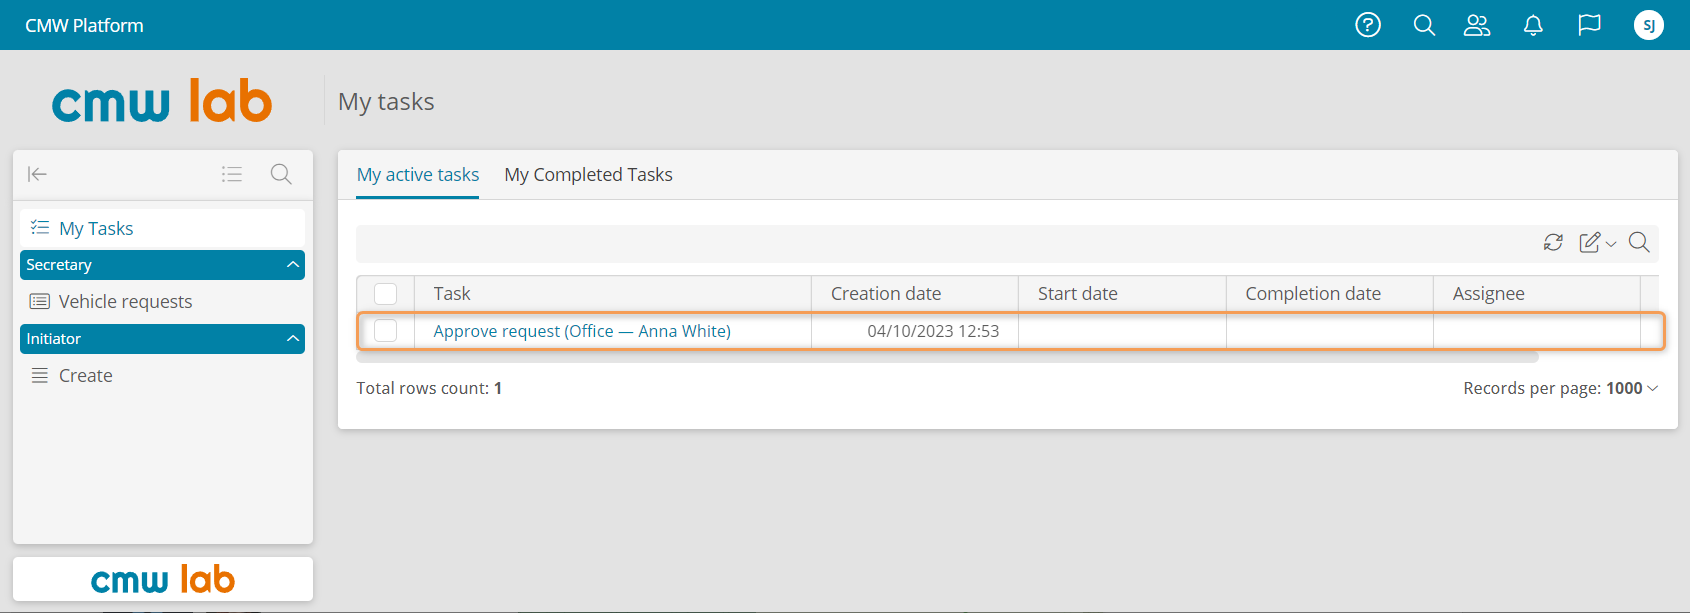
Viewing My tasks as the Secretary
7. Select the Approved checkbox and complete the task.
8. Log out.
9. Sign in to your Garage manager's account.
10. Go to My tasks and open the Accept request task.
11. Select a vehicle, select the Accepted checkbox, and complete the task.
12. Log out.
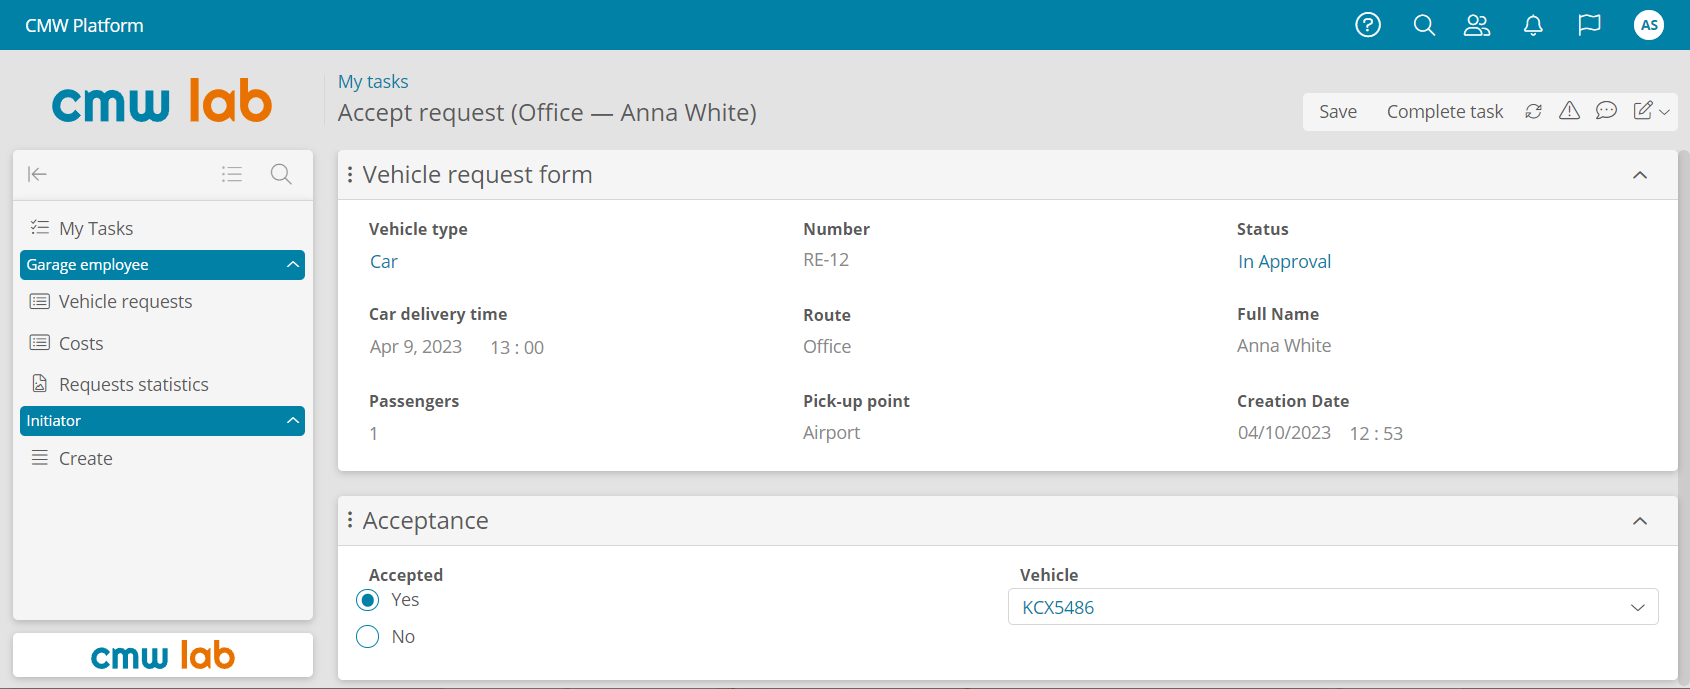
Completing a task as the Garage manager
13. Log in to the Driver’s account.
14. Open the Complete the trip task and fill in the cost data.
15. Complete the task.
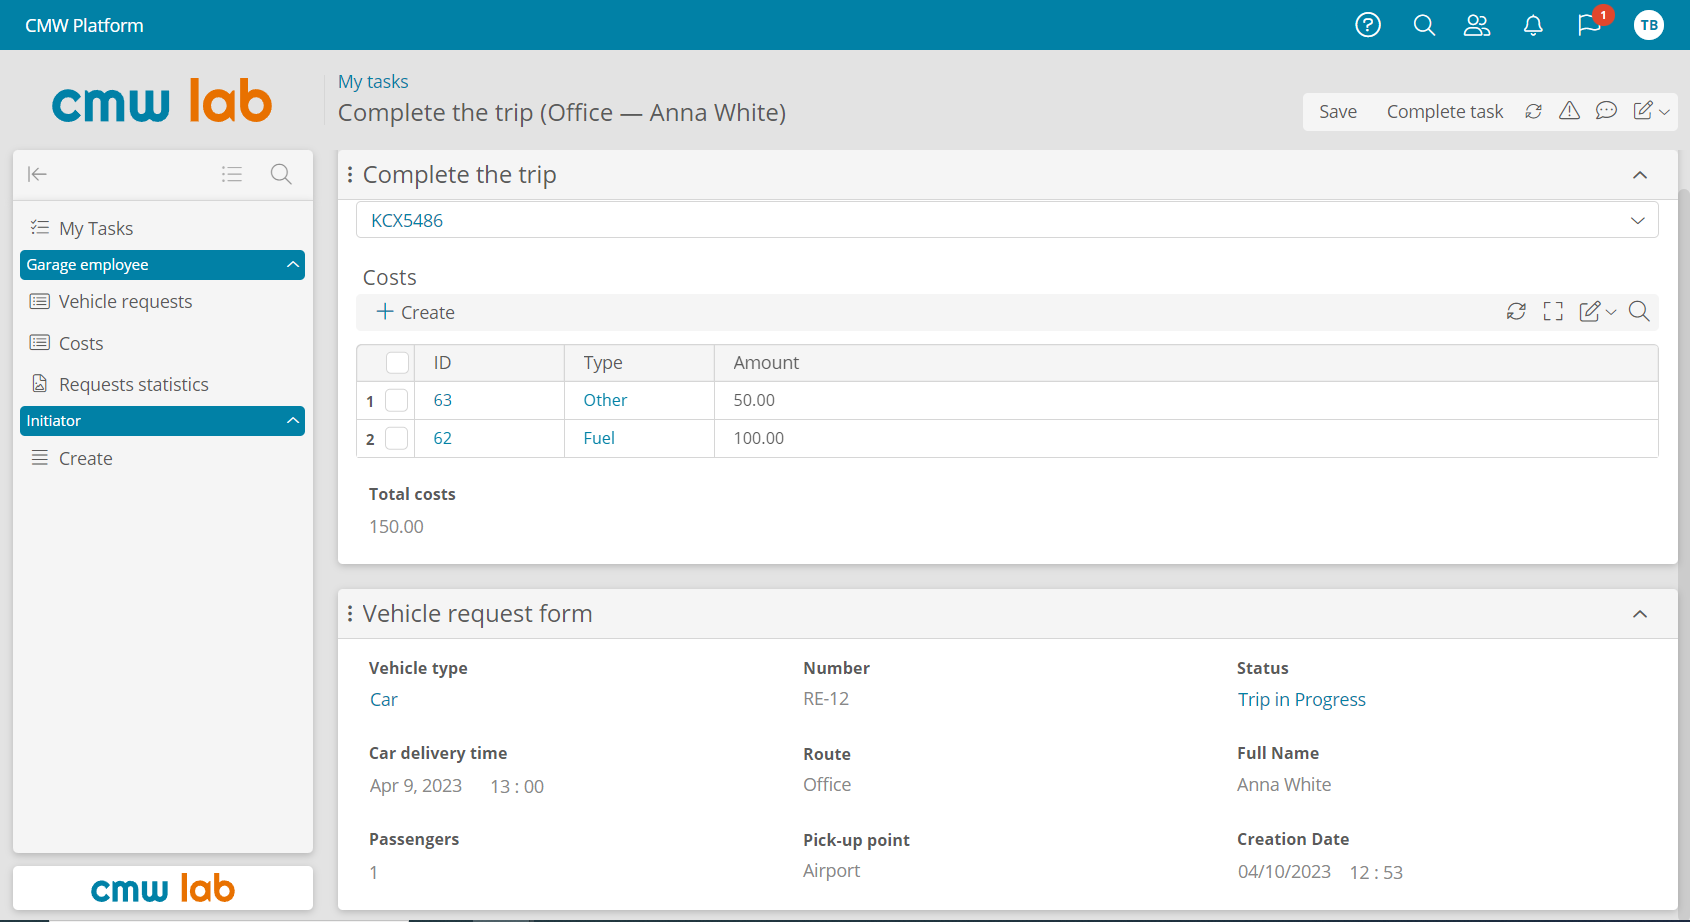
Completing a task as the Driver
16. Log in to the Initiator’s account and complete the Car assigned task.
Results
Congrats! You learned how to configure roles and define access rights, configure accounts and groups, and configure navigation sections. You have improved the vehicle booking process: now, different users perform their tasks according to their roles and access only the pages intended for them.
Proceed to Lesson 9 — Document Generation to learn how to generate documents using the CMW Platform.