Form Designer
Table of Contents
Opening the Form Designer
Use the form designer to configure the form layout, properties, and elements.
- Open the template form list.
- Double-click a form row.
- The form designer will be displayed.
- Configure the form.
Form Designer
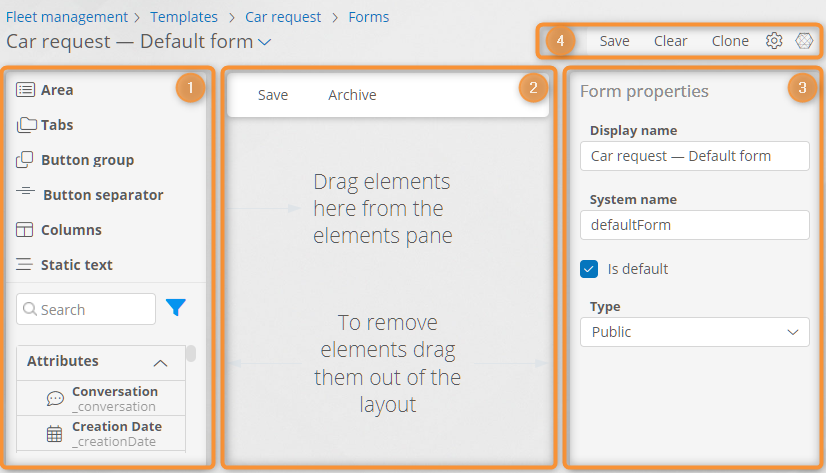
Form Designer Elements
- Element panel — a palette of elements to drag onto the form: attributes and visual elements. See Element Panel Operations. Use this panel to:
- Drag and drop elements on the form layout.
- Search for elements.
- Filter element list by element type.
- Create and edit attributes, buttons, and forms.
- Form layout sets the form's visual appearance.
- Properties panel — view and configure the properties of the selected element.
- Buttons:
- Save — save the form.
- Clear — remove all elements from the form layout.
- Clone — create a form duplicate.
- Configure template — go to the template Properties page.
- Relations — view a list of application objects that use the form.
Form Properties
- Display name — the form name that will be displayed in its header when viewing template records.
- System name — a unique form name, for use scripts, expressions, and scenarios.
- Is default — check this box to display this form by default when viewing template records.
- Type:
- Public — select this type for the form to be viewed using the form selection dropdown next to the form title.
- Internal — select this type for the form to be displayed only if it is embedded in another form or is set as a record form (eg. for process start, record creation, dialogues).
Form Elements
You can place the following elements on the form.
- Region — contains all other form elements. You can drag other elements only onto the area. The form must have at least one region. There can be several areas on a form.
- Tabs — arrange form elements on several tabs.
- Columns — arrange elements in several columns.
- Static text — arbitrary text with HTML formatting.
- Attribute field — when you drag an attribute to the form layout, a field associated with the attribute is created. Field properties correspond to the associated attribute type.
- Embedded form — you can drag another form onto the form layout to embed it into the current form.
- Button area — provided for each form and each area. Buttons can be placed only in the button areas.
- Button group — combines buttons into a dropdown.
- Button Separator — visually separates buttons within button areas.
Configuring the Form
- Drag the required elements from the elements panel to the form layout.
- To set the form properties, click an empty layout area and configure the properties using the properties panel.
- To set the properties of a form element, select it in the layout and configure the properties in the properties panel.
- Click Save.
Editing the Form Rules
- Click the selector button next to the form title in the designer.
- Select Form Rules from the dropdown.
- The rule builder for the form is displayed.
- Edit the form rules.
- Click Save.
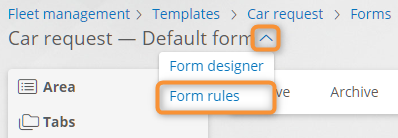
Jump menu to form rules designer
Element Panel Operations
Creating an Attribute
- In the element panel:
- Hover over the Attributes heading to create an attribute in the current template, or…
- Hover over the template name in the element list to create an attribute in the corresponding template.
- Click the Add Attribute button that appears.
- The attribute creation window will be displayed.
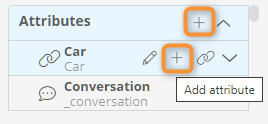
Creating an attribute using the form designer
Editing an Attribute, Button, or Form
- Hover the mouse pointer over an attribute, button, or form name in the elements panel.
- Click Edit Attribute, Edit Button, or Edit Form button that appears.
- The attribute properties window, the button designer, or the form designer will be displayed.

Editing a form using the form designer
Creating a Button
- In the element pane, hover over the Buttons heading.
- Click the Add button button that appears.
- The button creation page will be displayed.
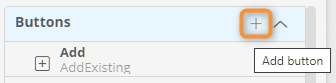
Creating a button in the form designer
Cloning a Form
- Click Clone.
- In the form cloning window, enter the form name and system name.
- Click Save.
- The new form will be opened in the form designer.
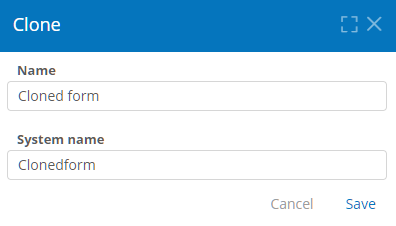
Form cloning
Related Articles
Viewing the Template Form List
Creating a Form