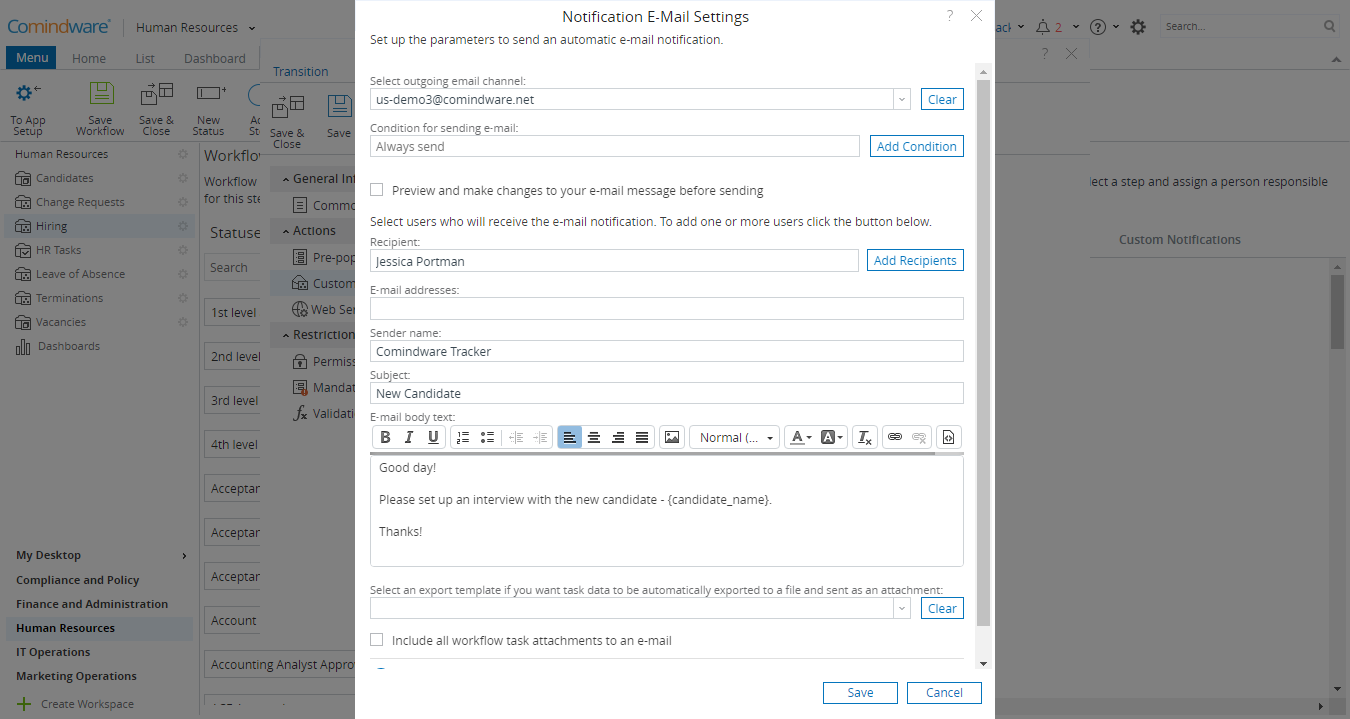
Custom Notifications
You can set up custom e-mail notifications that the system will generate and send automatically when the workflow moves through a certain transition. You can set up multiple e-mail notifications for any transition. When an automatic e-mail is sent, this is logged in the task history.
To set up custom e-mail notifications:
1. Click the «Add Notification» button. A dialog window will open.
2. Fill in the following fields:
- Select outgoing email channel — select from the list of the available channels;
- Condition for sending e-mail — by default, the notification you set up will always be sent when the workflow goes through the transition. However, if you want to send this notification only under a specific condition, you can set up a condition using the Comindware expression language. To do that, click the «Add Condition» button. See also: What is Comindware Expression Language;
- Preview and make changes to your e-mail message before sending — if you want to be able to preview and edit the e-mail before it is sent, select this check box. When the e-mail is generated, you will be able to change the recipients and message text, as well as add or remove an attachment;
- Recipient — select the person who will receive this notification. To add multiple recipients, click «Add Recipients»;
- E-mail addresses — you can also fill this field with some static e-mails instead of Recipient;
- Sender name — enter the name that will appear in the «From» field of this e-mail;
- Subject —enter the name that will appear in the «Subject» field of this e-mail;
- E-mail body text — type the message that you want to appear on the notification e-mail;
If necessary, you can add information from a specific field in the application to the Subject and E-mail body text fields in the custom e-mail. To do that, enter the field ID in braces anywhere in the text. For example, enter «Bug {bug_number} has been fixed» to insert bug numbers into bug fix notifications. If you would like to insert links to these bugs, that can be done using the following pattern: {#bug_number}.
- Select an export template if you want task data to be automatically exported to a file and sent as an attachment — you can export task data into a Word/Excel file and send it as an attachment to the notification e-mail. To do that, select a Word/Excel template from the drop-down list. This template will be used to export data;
- Include all workflow task attachments to an email — if you want all task attachments to be included in the notification email, select this check box;
- Add Attachment — if necessary, add an attachment.
3. When done, click «Save».
Setting up a custom e-mail during a transition