Configuring Application Security Settings
After the application is created, you need to add users who will work with it. Within the application, a user must be added to one of the default or custom roles, each of which implies a particular set of permissions.
Users can be added individually or in bulk by groups.
Default security roles
CMW Tracker provides 4 default security roles, each of which implies a particular set of permissions.
- Owners:
- Can add and remove users or user groups to/from the application
- Full control over the application's items, including deleting and editing them
- Can create and edit lists and dashboards that belong to the application
- Member:
- Can create and manage the application's items but cannot delete them (including self-created items)
- Can add the application's lists and dashboards to Favorites
- Can create and edit personal lists and dashboards in My Desktop
- Viewer:
- Can view all the application's items (read-only)
- Can add the application's lists and dashboards to Favorites
- Can create and edit personal lists and dashboards in My Desktop
- Basic user:
- Can create items in the application
- Can view and modify only self-created items
- Can add the application's lists and dashboards to Favorites (the CMW Tracker Full license has to be assigned)
- Can create and edit personal lists and dashboards in My Desktop (the CMW Tracker Full license has to be assigned)
Requestor permissions can be assigned to users with the CMW Tracker Full license and CMW Tracker Requestor license.
The following table represents the default roles. Besides the permissions provided for by your role, you may view and modify all tasks assigned to you.
| Actions | Default Roles | |||
|---|---|---|---|---|
| Owners | Members | Viewers | Basic user | |
| Modifying an app settings | Yes | |||
| Creating and modifying any lists | Yes | |||
| Creating new items | Yes | Yes | Yes | |
| Modifying any items | Yes | Yes | ||
| Modifying self-created items | Yes | Yes | Yes | |
| Deleting items | Yes | |||
| Deleting self-created items | Yes | |||
| Viewing all items | Yes | Yes | Yes | |
| Viewing self-created items | Yes | Yes | Yes | Yes |
The set of permissions in a default role cannot be changed. In order to create a custom set of permissions, add a custom role.
Adding a custom role
When configuring an application security settings, a need in a new set of permissions may arise. To create it, you have to add a custom role to the application (as the default role permissions are unalterable).
To add a custom role:
1. Go to the application's settings > «Security».
2. Click «Add a New Role» (under the Roles list).

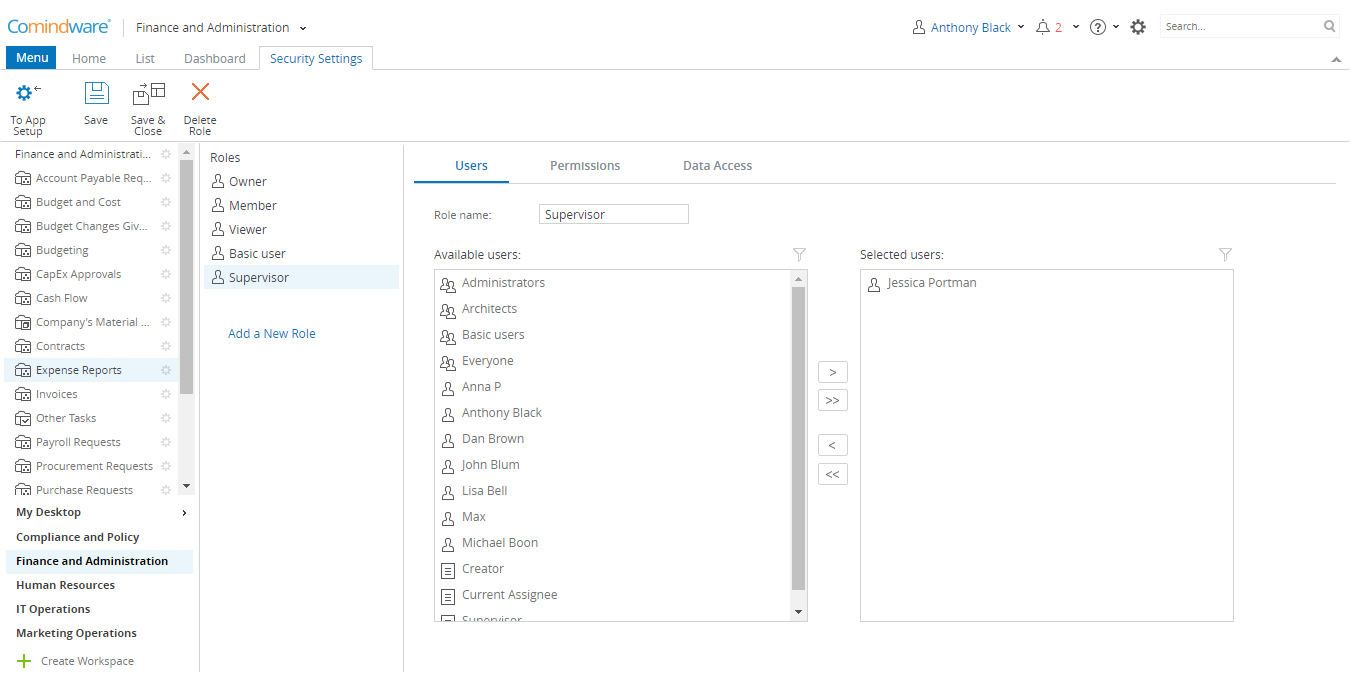
Adding a custom role
3. On the «Users» tab, enter the role name and add individual users or user groups to the role.
4. On the «Permissions» tab, assign permissions to the role.
5. On the «Data Access» tab, define which application fields are to be accessible for the role holders.
6. When done, click «Save & Close».
Adding users to a role
In order to work with an application, a user must be added to one of the application default or custom roles. You can add users individually or in bulk by groups.
Users are to be allocated to their roles by the application Owners. By default, the first application Owner is its creator.
To add users to a role:
1. On the «Users» tab, add/remove individual users or user groups by using the «Add» («>»), «Add All» («>>»), «Remove» («<»), «Remove All» («<<») buttons.
2. When done, click «Save».
Assigning permissions to a role
Each default role has a predetermined set of permissions that you cannot change. You may assign permissions only to a custom role.
Besides the permissions provided for by your role, you may view and modify all tasks assigned to you.
To assign permissions to a custom role:
1. On the «Permissions» tab, check the relevant permissions.
2. When done, click «Save».
Data access for a role
It often happens that certain users are not supposed to see or modify particular data pieces. For example, budgets must be open only for accountants; it's but a product manager who can change the target release, etc.
In CMW Tracker you can handle such situations by defining which application fields for which roles are to be accessible.
The settings can be done for both custom and default roles. For each role, fields are assigned one of the following statuses: Hidden, Read-only and Editable.
Note :
- Field read/write permissions are also applied concerning a particular step — in the step properties.
- Should permissions in «Step properties» and in Application Security overlap, a prohibitive rule is always predominant. For example, if you make a field read-only on some step, it's impossible to change the field on this step, even having the relevant permissions in the Application Security. And so forth.
- The «Hidden» status affects operation of the whole system: Users won't be able to see hidden data in Forms, Lists, Dashboards, History, Notifications, Mobile apps, Share Point, Outlook, Search results etc.
To set data access for a role:
1. On the «Data Access» tab, make fields editable, read-only or hidden by clicking on the relevant options. Be aware of the following rules imposed:
- System fields are not available for hiding.
- You can make some system fields editable (such as Title, Description and Due Date) but most of them can be solely read-only.
- All custom fields can be in any status: Editable, Read only or Hidden.
3. When finished, click «Save».
